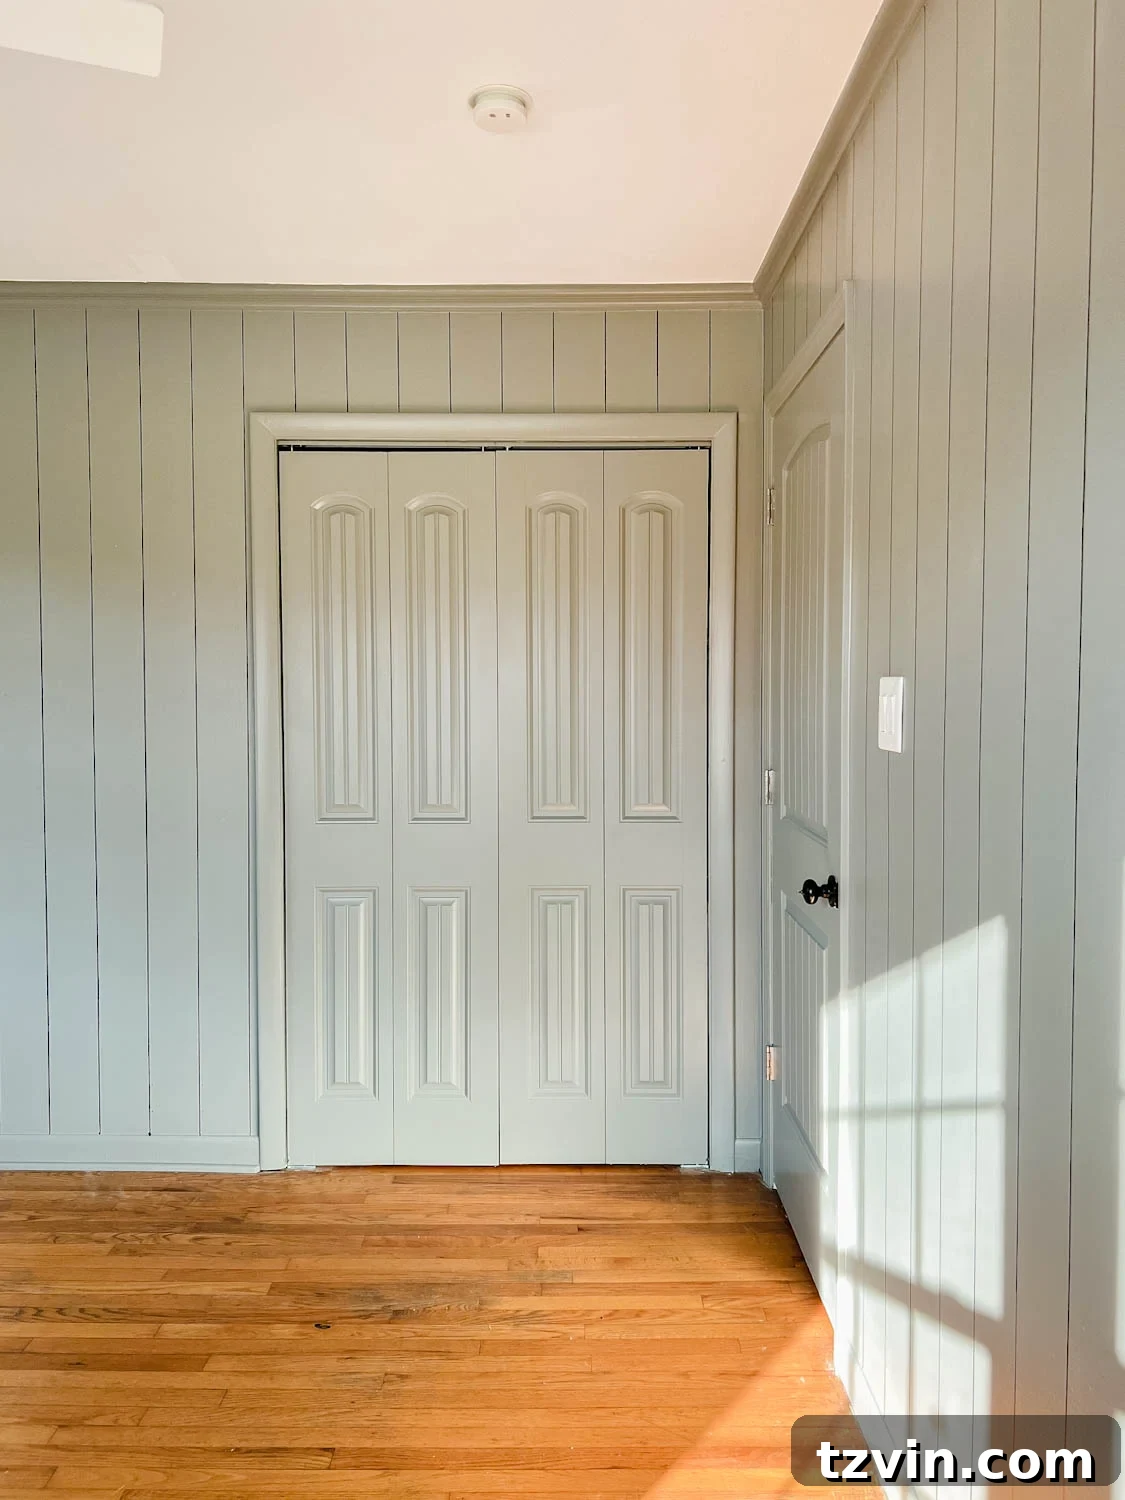
Transform your living space with a stunning DIY faux wall planking treatment that’s incredibly easy, budget-friendly, and completely temporary. All it takes is a simple board and an oil-based permanent marker to achieve the coveted planked wall look for a fraction of the cost and effort.
Imagine giving an entire room a fresh, sophisticated planked wall aesthetic for less than $20. Sounds too good to be true, right? Well, prepare to be amazed. While these aren’t traditional dimensional planks, the visual impact is remarkably convincing.
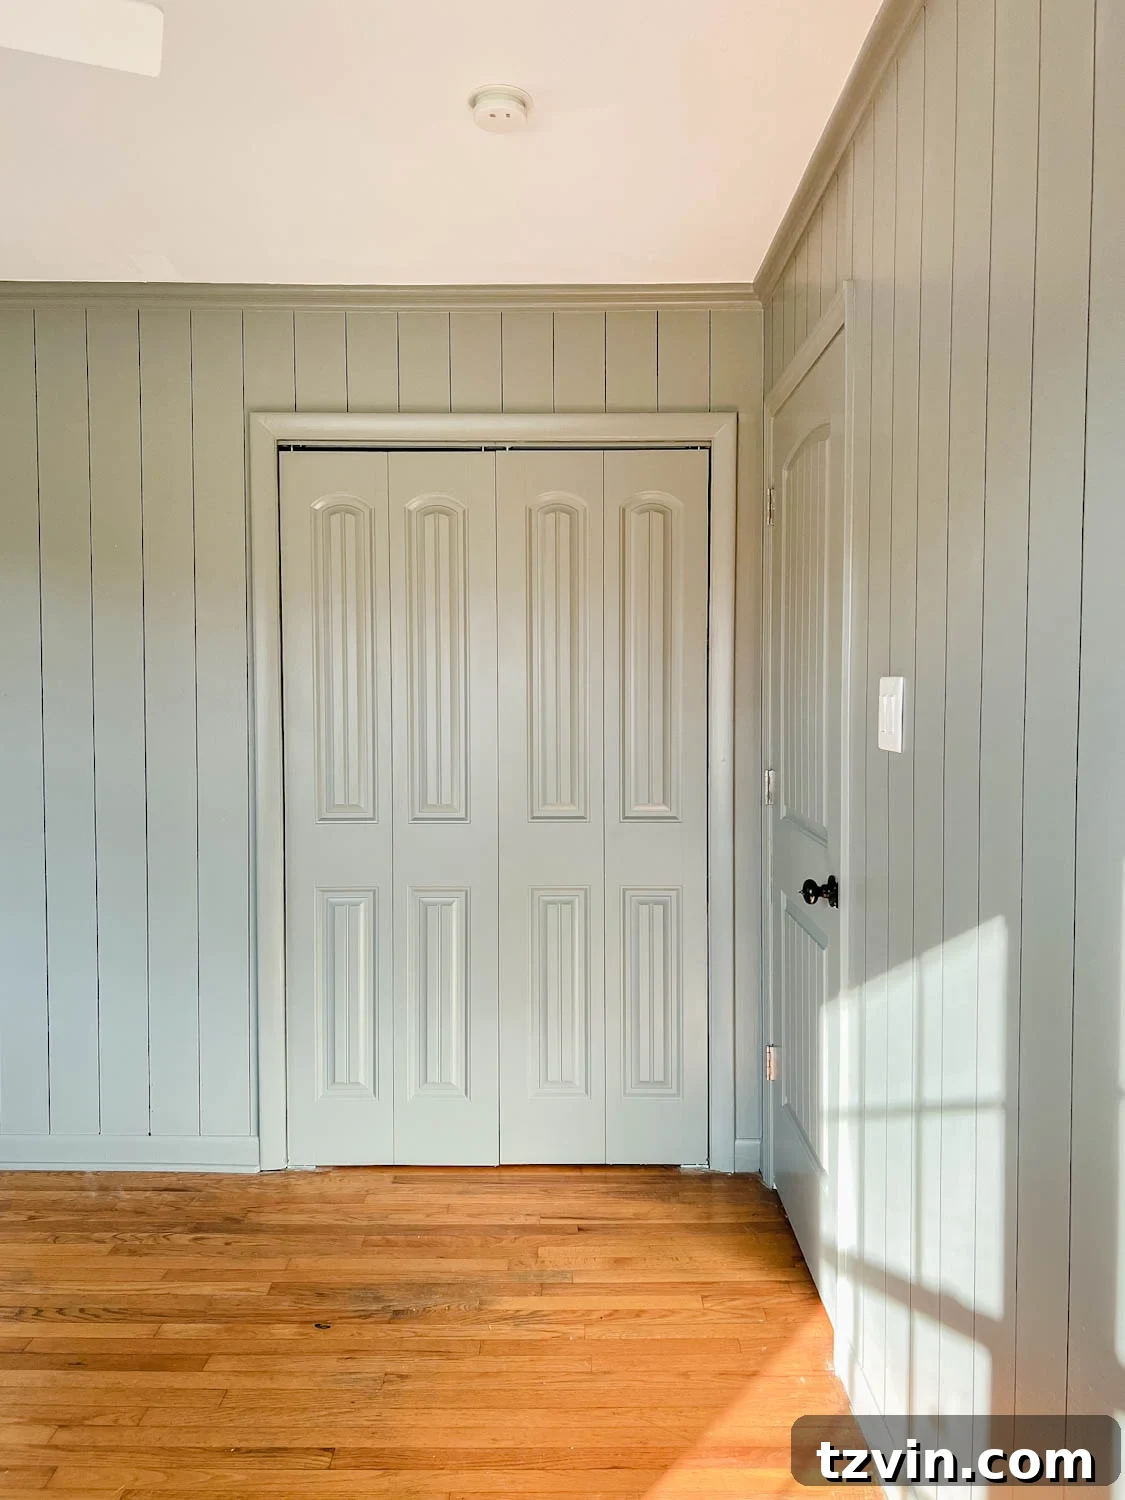
But don’t just take our word for it… take a look for yourself. Do these walls truly capture the charm and character of authentic planking?
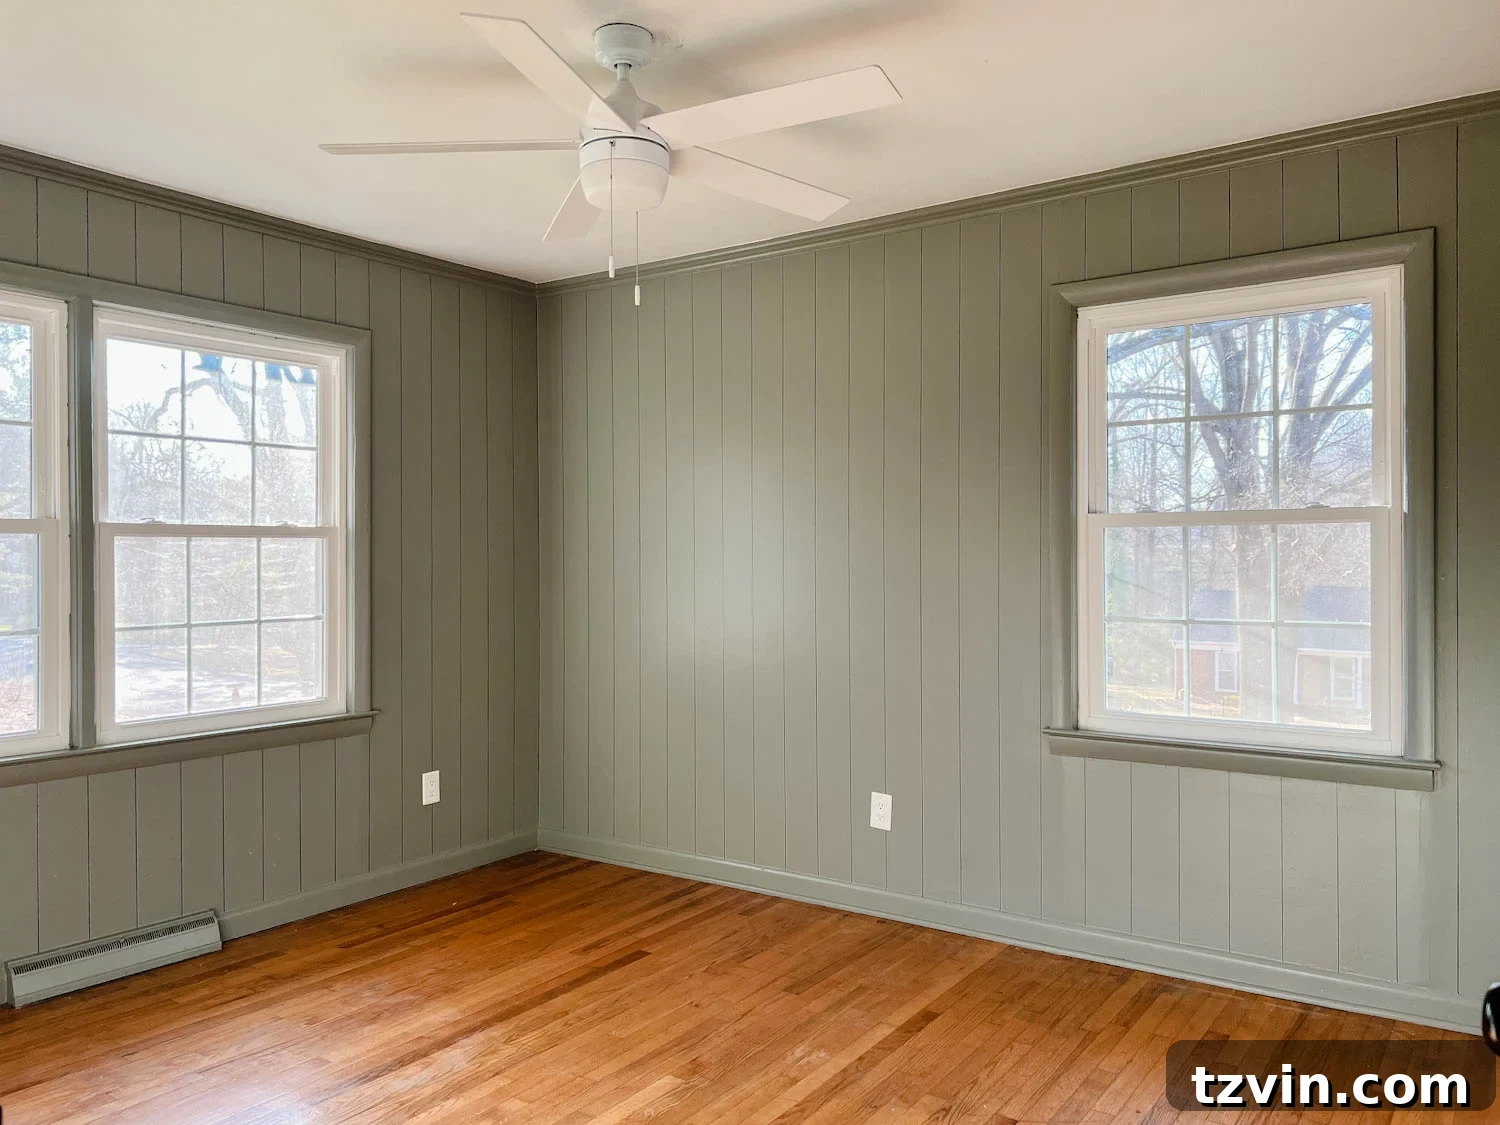
The True Cost and Commitment of Traditional Wall Planking
While the allure of genuine shiplap or planked walls is undeniable, the reality often comes with significant drawbacks that can deter even the most enthusiastic DIYer. Understanding these challenges can help you appreciate why a faux alternative is such a game-changer.
- Exorbitant Expense: The most significant hurdle for many homeowners is the cost. With fluctuating lumber prices, purchasing enough wood planks for even a single accent wall can quickly add up. Factor in additional materials like nails, wood filler, caulk, primer, and paint, and the budget can easily spiral into hundreds, if not thousands, of dollars. This initial outlay often makes the dream of planked walls seem unattainable for those on a tight decorating budget.
- Time-Consuming Installation: Real wall planking is a labor-intensive project. From meticulous measuring and precise cutting of each board to nailing them securely, filling nail holes, sanding smooth, and finally priming and painting, the process can easily consume several days of dedicated work. It requires patience, precision, and often specialized tools, making it a demanding undertaking for the average homeowner.
- Long-Term Permanence and Potential Damage: Perhaps the most overlooked issue with traditional planking is its permanence. Once installed, these wooden panels become an integral part of your wall. Should your style evolve, or if you decide to remove them in the future, you’re likely facing extensive drywall repair or even complete replacement. The nails used can cause significant damage, leaving you with a much larger and more costly renovation project than simply repainting.
These considerations were particularly relevant when we embarked on transforming a shared teen girls’ bedroom. Teenagers’ tastes are notoriously fickle, evolving almost as quickly as they grow up (and trust me, the thought of them growing up and moving out is enough to make anyone emotional!). We needed a solution that offered stunning aesthetics without the commitment and permanence of real wood. A temporary and easily reversible option was paramount.
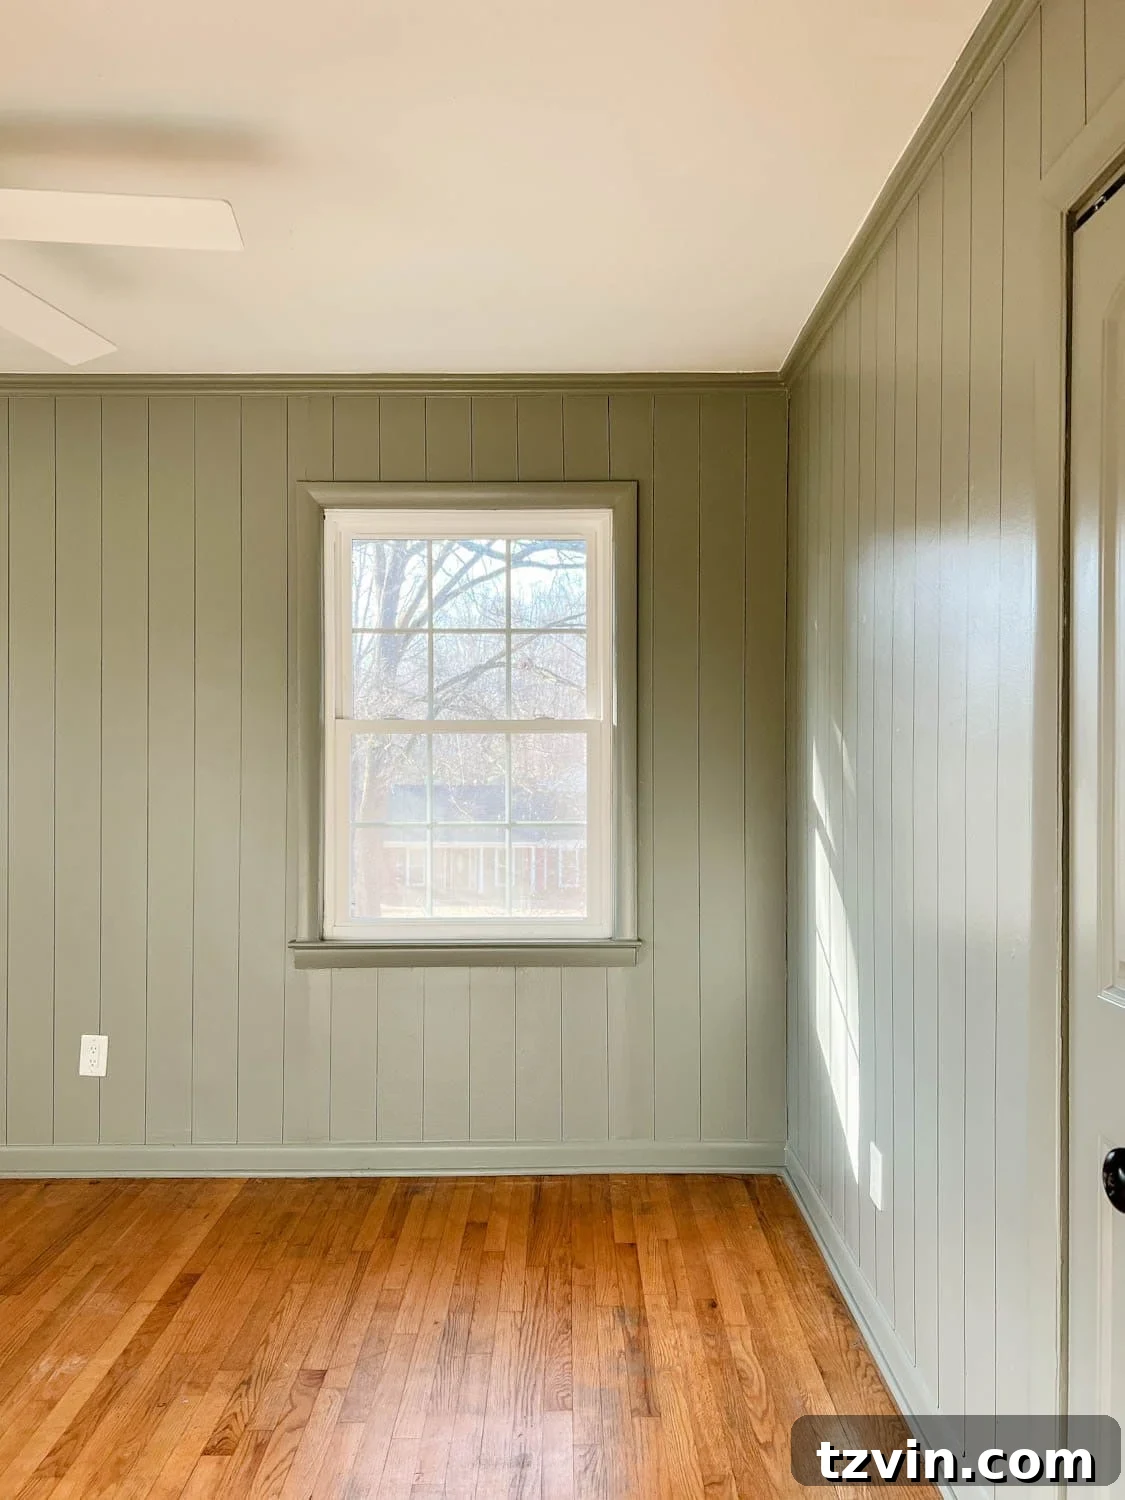
As a quick decorating tip: the walls in these photos were painted with Sherwin Williams Evergreen Fog, which proved to be an absolutely perfect backdrop for this faux planking project. It’s a beautifully calming shade that enhances the overall aesthetic. If you’re looking for similar hues, explore our guide to designer-recommended sage green paint colors for a relaxing room.
When Faux Wall Planking is the Perfect Solution for Your Home
This ingenious DIY faux wall planking technique emerged as the ideal remedy for all the aforementioned challenges. Its versatility makes it an outstanding choice for a multitude of scenarios where traditional planking falls short.
- Kids’ and Teenagers’ Rooms: As mentioned, children’s and teenagers’ preferences can change on a whim. This method allows you to embrace trendy styles, like the ever-popular boho vibe or a cozy cottage aesthetic, without worrying about a costly overhaul a few years down the line. It’s a fantastic way to create a personalized space that can easily adapt as they grow.
- Budget-Conscious Decorators: For anyone looking to achieve a high-end look without breaking the bank, faux planking is a dream come true. The minimal material cost makes it accessible to almost any budget, proving that stunning home decor doesn’t have to be expensive.
- Rental Properties: Living in a rental often means strict rules against permanent alterations. If your landlord permits painting, this faux planking method is a brilliant way to add character and visual interest to your walls without causing any damage that would impact your security deposit. It’s a stylish workaround for customizing your space.
- “Trying Before Buying” the Look: Perhaps you’re intrigued by the planked wall trend but unsure if it’s right for your home in the long term. This DIY approach allows you to “try on” the look without commitment. If you discover it’s not quite what you envisioned, simply paint right over the lines, and your wall is back to its original state, problem solved. It’s the ultimate low-risk design experiment.
- DIY Beginners: For those new to home improvement projects, this technique offers a rewarding entry point. It’s forgiving, doesn’t require complex carpentry skills, and yields impressive results, boosting confidence for future DIY endeavors.
- Seasonal or Thematic Decor: If you enjoy changing your home’s aesthetic with the seasons or for special occasions, this temporary wall treatment allows for creative flexibility. Easily update a room for a holiday or a fresh seasonal feel without major renovations.
By opting for faux planking, you’re choosing flexibility, affordability, and ease of application, making a sophisticated design statement accessible to everyone.
Unveiling the Secret: The Magic of Faux Planked Walls with Paint Pens
The deceptively simple secret to achieving these stunning faux planked walls lies in just two words: paint pens. We understand that this revelation might initially cause a moment of skepticism, perhaps even a “screeching halt” in your mental design process. But we urge you to hear us out, as this method is far more effective and visually striking than you might imagine.
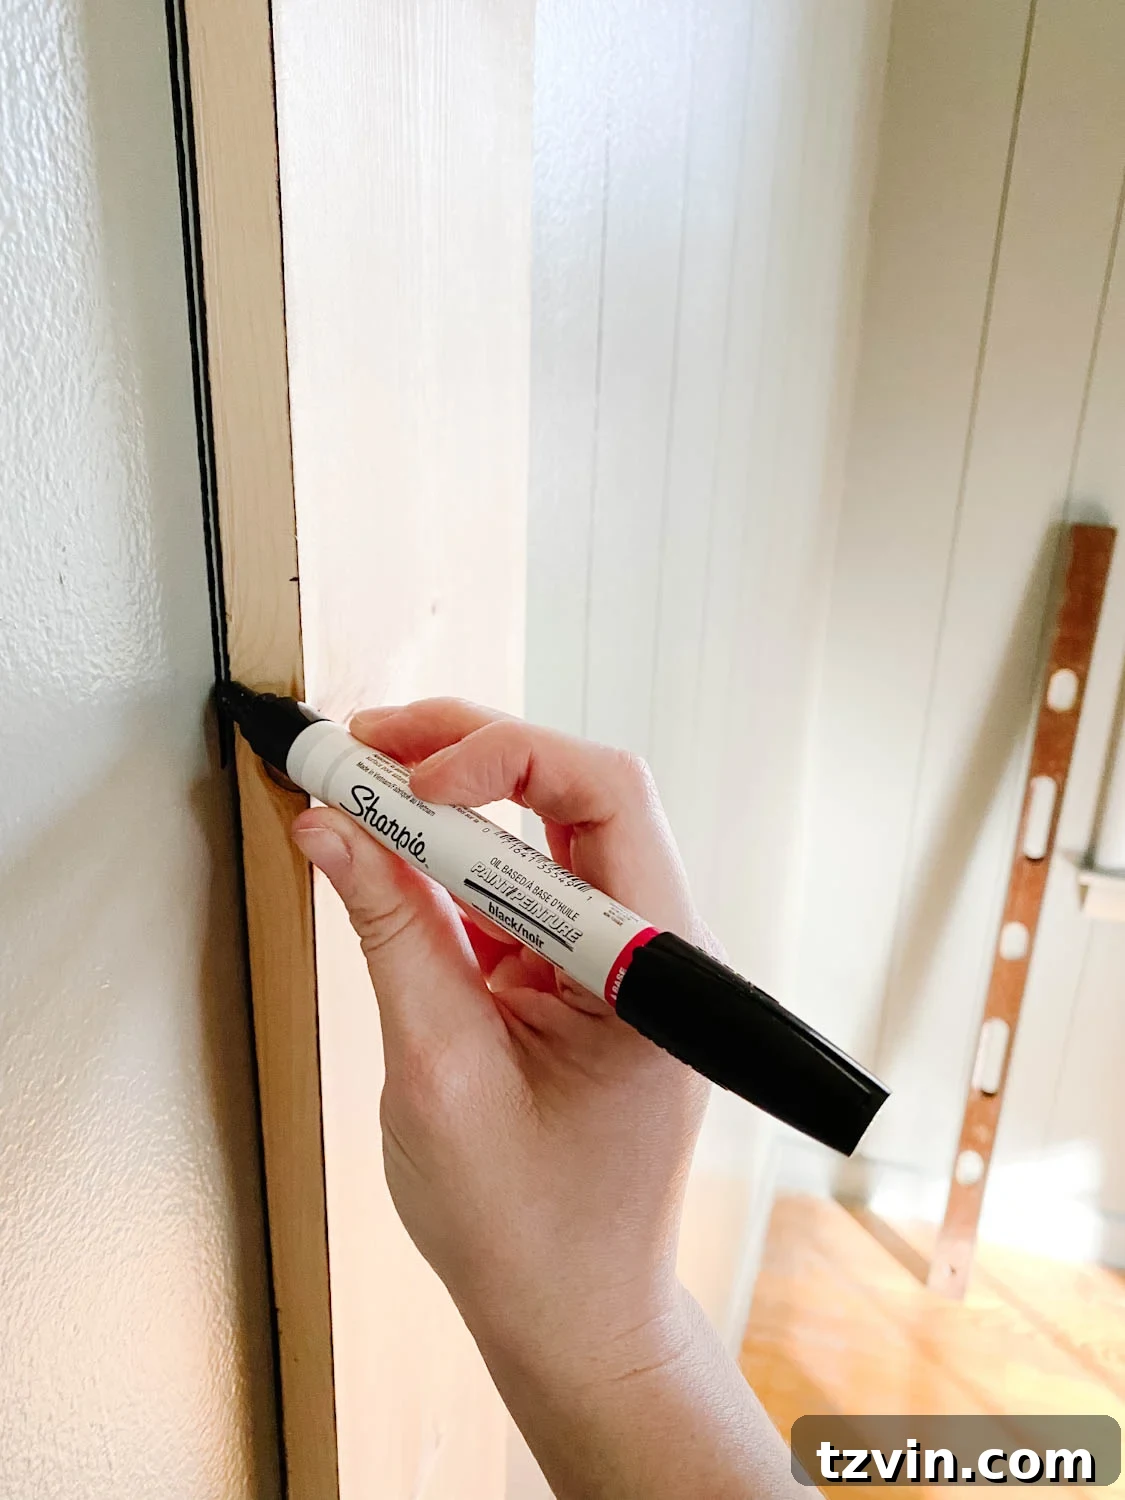
This faux wall paneling technique is every bit as effective as the more commonly known peel-and-stick shiplap wallpapers you might find at major retailers like Target or Wayfair. The underlying concept is similar: both aim to create the illusion of individual planks. However, the paint pen method offers distinct advantages that make it superior in many ways.
- Visual Deception: The human eye is incredibly adept at picking up on visual cues. By drawing precise, evenly spaced lines on a wall, you trick the brain into perceiving depth and separation, mimicking the natural shadows and gaps between actual wood planks. The result is a surprisingly authentic 2D representation of 3D paneling. There are no actual raised planks, but the visual effect is undeniably there.
- Unbeatable Affordability: Compared to peel-and-stick wallpaper, which can still be quite costly for an entire room, paint pens are significantly cheaper. A few pens are all you need, drastically reducing your material expenses.
- Effortless Installation: If you’ve ever struggled with aligning and smoothing large sheets of peel-and-stick wallpaper, you’ll appreciate the ease of the paint pen method. There are no bubbles, no awkward cuts around outlets, and no sticky adhesive to contend with. It’s a straightforward process that minimizes frustration and maximizes efficiency.
- Seamless Finish: Unlike wallpaper, where seams can sometimes be visible, the paint pen lines are flawlessly integrated into your existing wall, creating a seamless and custom-painted appearance that truly elevates the room.
Having experimented with several faux shiplap and paneling methods in our previous home, we can confidently say that this paint pen technique is one of our all-time favorite tricks. Its simplicity, cost-effectiveness, and stunning results make it a standout choice for anyone seeking a dramatic yet accessible wall transformation.
Your Step-by-Step Guide to DIY Faux Wall Planking
Ready to embark on this incredibly rewarding DIY project? Here’s everything you need to know, from gathering your supplies to drawing your final lines. This process is designed to be straightforward, even for beginner DIYers, and the results are truly transformative.
Essential Supplies for Your Faux Planking Project
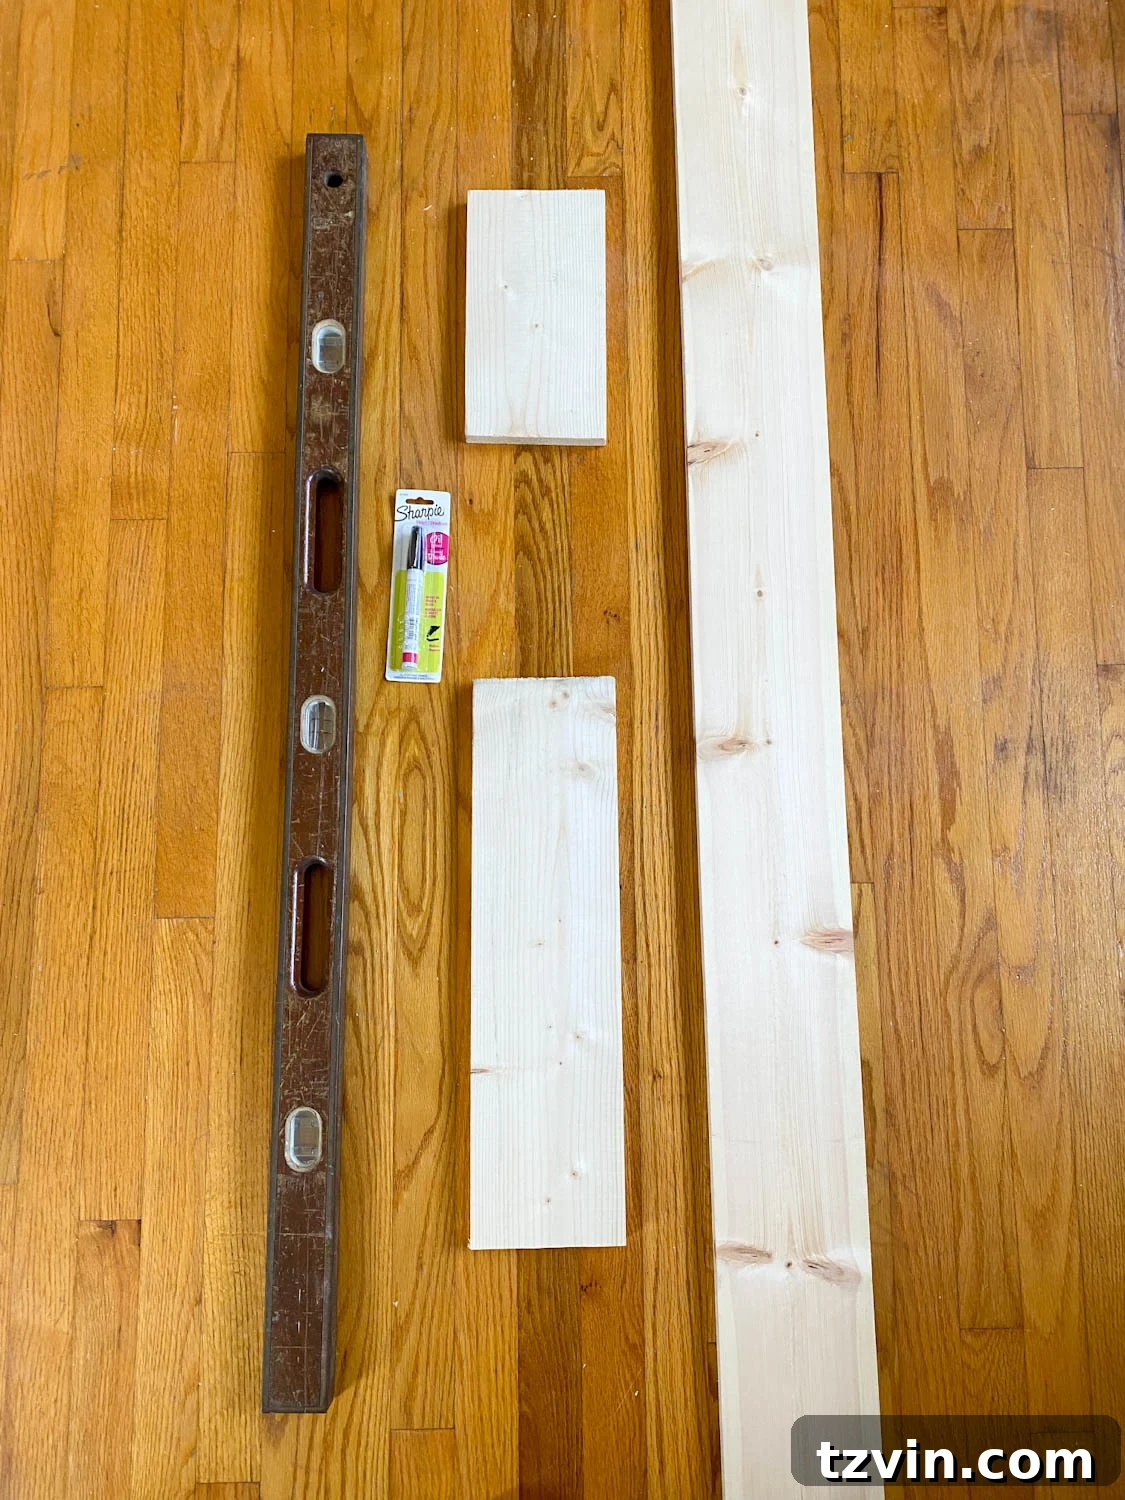
Gathering the right tools and materials is the first crucial step. Don’t skimp on these, especially the type of paint pen, as it makes all the difference in the final look and durability.
- Black Sharpie Oil-Based Medium Point Paint Pen: This is the most critical item. Regular Sharpies or water-based markers will not provide the opacity, permanence, or smooth application needed for this project. The oil-based formula ensures rich, consistent lines that won’t bleed and will hold up over time. You’ll likely need 2-3 pens for an average-sized room, so it’s wise to have extras on hand.
- 1x6x8 Board: This standard lumber board will serve as your primary vertical spacer. Its consistent width (approximately 5.5 inches) will dictate the width of your faux planks, giving a uniform and professional look. Choose a straight board for best results.
- 1x6x4 Board: A shorter section of the same 1×6 lumber, easily found in the pre-cut sections of hardware stores like Home Depot or Lowe’s. This will be used for smaller, trickier sections of your wall, such as above and below windows.
- Level: A good quality level is indispensable. It ensures that your first line is perfectly plumb (vertically straight), which is critical for the entire project to look professional and not skew across the wall.
- Square: Useful for checking corners and making precise marks, though less critical than the level for vertical lines.
- Tape Measure: For accurate measurements of your wall sections and for cutting your spacer boards.
- Circular Saw or Hand Saw: A circular saw makes quick, clean cuts for your spacer boards. If you don’t own one, a basic hand saw will also work, though it may require a bit more effort. Ensure you have a stable surface for cutting.
- Step Ladder: Essential for reaching the top sections of your walls comfortably and safely, ensuring consistent lines from floor to ceiling.
- An Extra Pair of Helping Hands (Optional but Highly Recommended): While not strictly mandatory, having another person to hold the spacer board steady while you trace will significantly speed up the process and improve accuracy, especially for the longer vertical lines.
Detailed Steps to Create Your Faux Planked Walls
Follow these steps carefully to achieve beautiful, straight, and convincing faux planks.
Step 1: Precise Measurement for Spacers
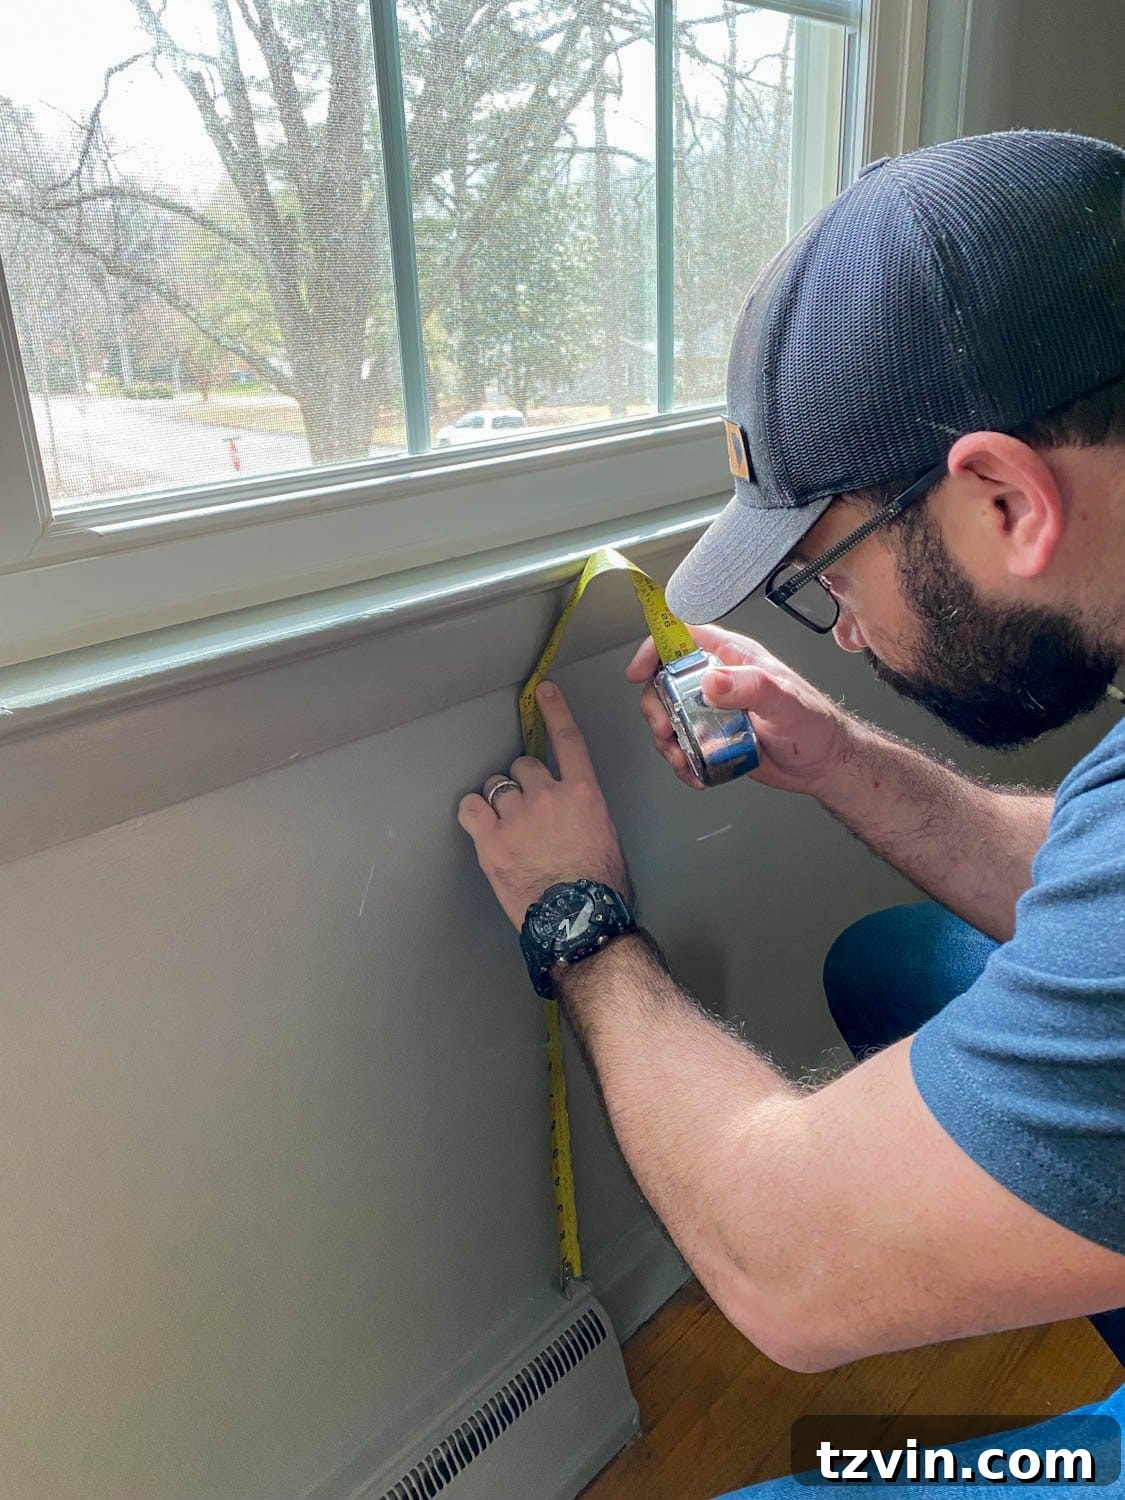
- Before cutting any wood, accurately measure the vertical distances on your walls. You’ll need three main measurements to create your spacer boards efficiently:
- The space between your baseboards and the bottom of your window apron (if applicable).
- The space between the top of your window head casing and your crown molding (or ceiling if no molding).
- The full wall space between your baseboards and crown molding (or ceiling), for sections without windows.
Write down these three measurements clearly. This preparation ensures that your spacer boards perfectly fit each section, guaranteeing uniform plank lengths and a professional finish.
Step 2: Cutting Your Spacer Boards
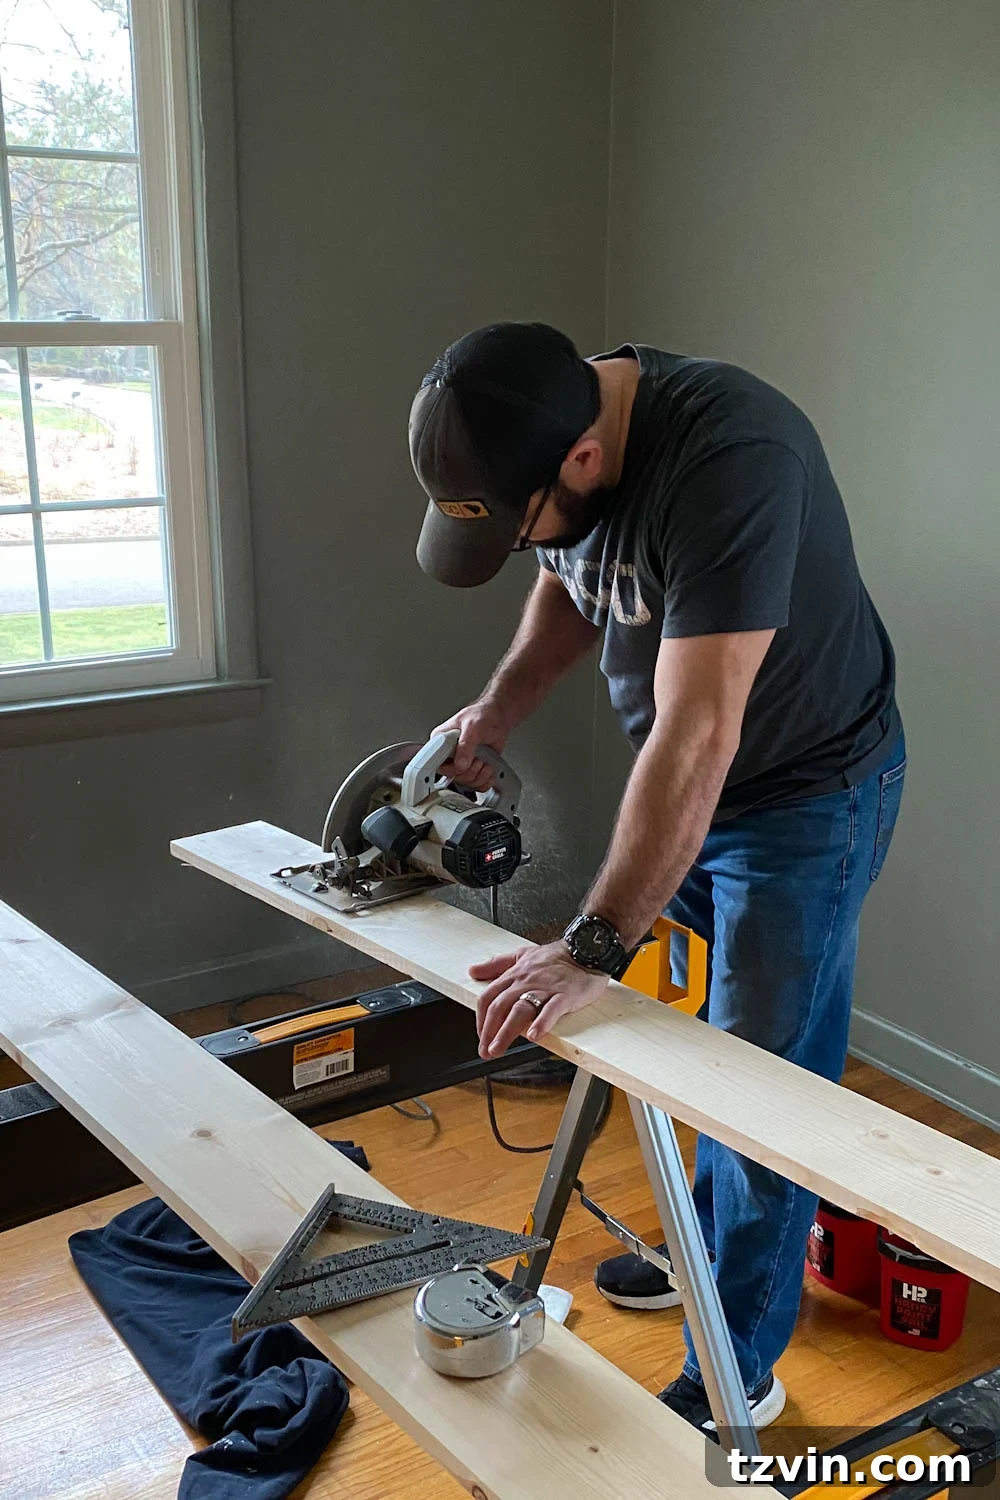
2. Using your recorded measurements and a saw, cut your lumber. The 1x6x8 board should be cut to match your longest measurement (for the full wall sections between baseboards and ceiling/crown molding). The 1x6x4 board can then be cut into two pieces, matching your shorter measurements for the areas above and below your windows. These precisely cut boards will act as your guides, ensuring every drawn plank is perfectly straight and evenly spaced across your wall.
Step 3: Establishing Your First Plumb Line
3. Select an unobstructed corner of your room to begin. Place your longest 1×6 spacer board firmly against the corner. Now, using your level, meticulously ensure that the board is perfectly plumb (vertically straight). This initial line is paramount; if it’s even slightly off, subsequent lines will compound the error, resulting in crooked planks across your entire wall. Don’t be afraid to adjust the board until your level confirms it’s perfectly straight. Remember, it’s always better for your first line to be plumb than to try and perfectly align it with a potentially “wonky” corner, as this establishes the integrity of all your following lines.
Step 4: Tracing with the Paint Pen to Mimic Planking
4. This is where the magic happens. With one person (or yourself, with care) holding the 1×6 spacer board firmly in place against the wall, use your oil-based paint pen to trace a consistent line along the entire side of the board. Take your time, applying steady pressure to ensure an even flow of paint and a crisp line. A tip for new paint pens: it might take a little while to get the paint flowing smoothly. You’ll likely need to frequently blot, shake, and compress the tip of the pen on a scrap piece of paper to maintain a consistent paint supply. Consistent flow is key to preventing patchy or faded lines. Work your way down the wall, or have your helper move the board for you if you’re working with a partner.
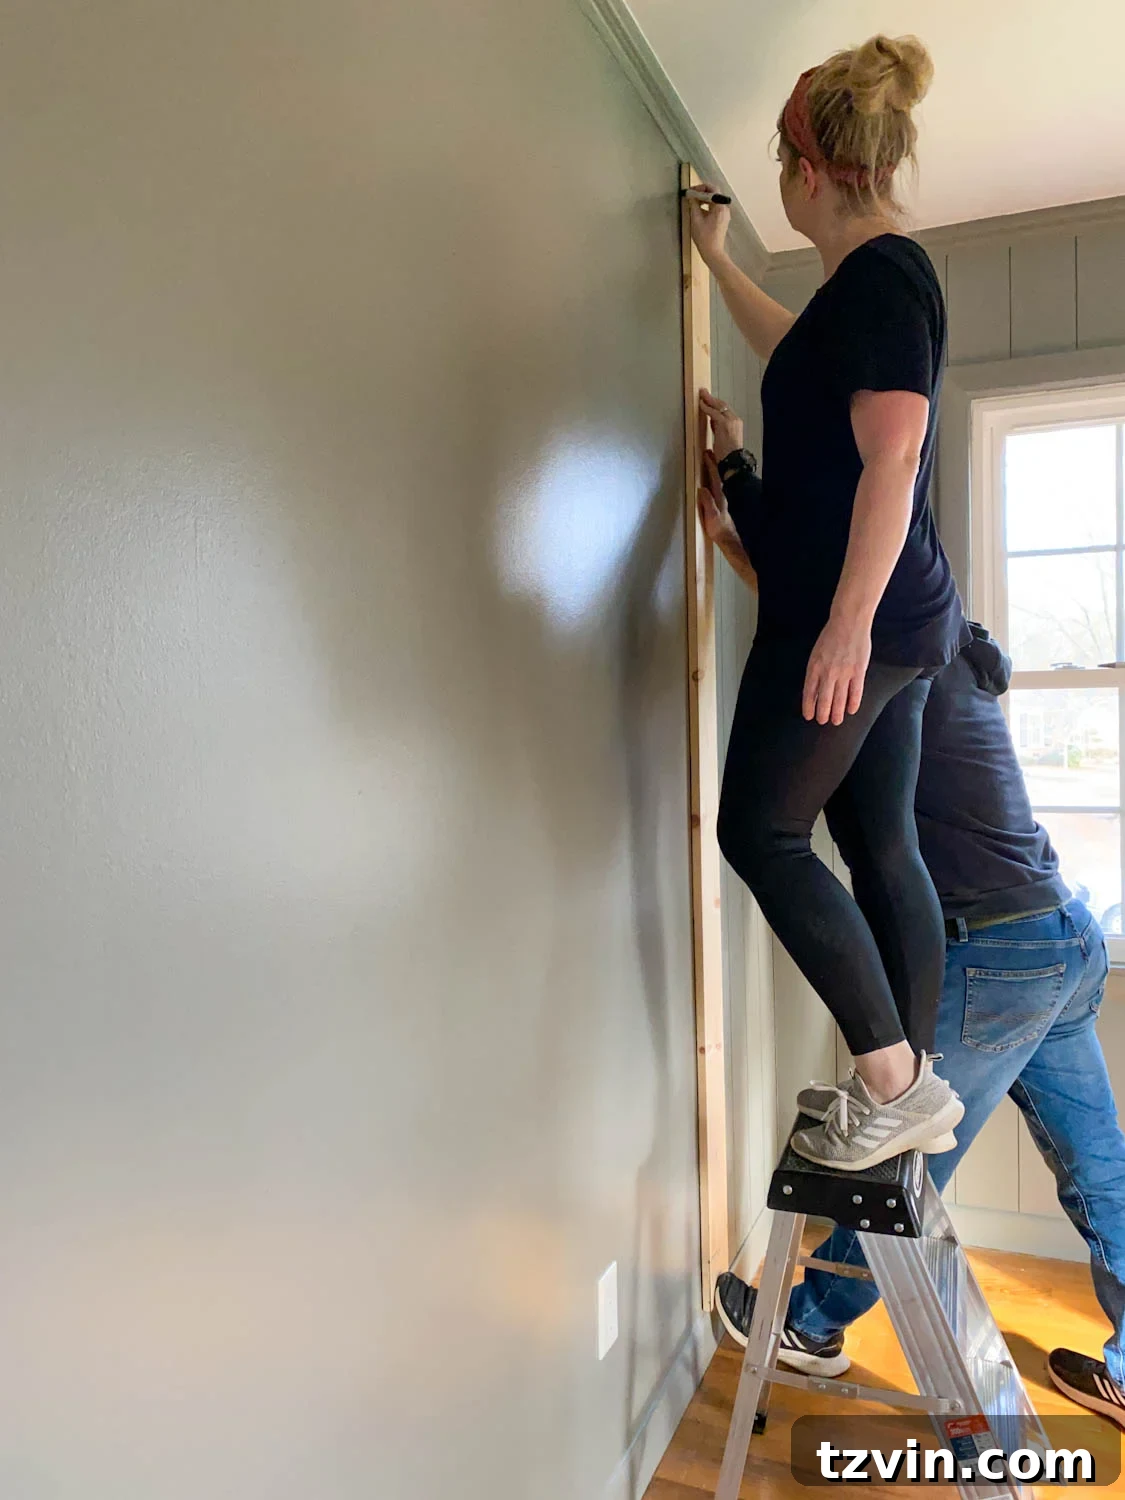
4. (Continued) When you encounter architectural features like windows, switch to your shorter, pre-cut spacer boards. Use the appropriate short spacer for the sections above and below the window, meticulously aligning it with the last full-length line you drew and continuing the tracing process. This ensures a seamless transition and continuous planking illusion around all obstacles.
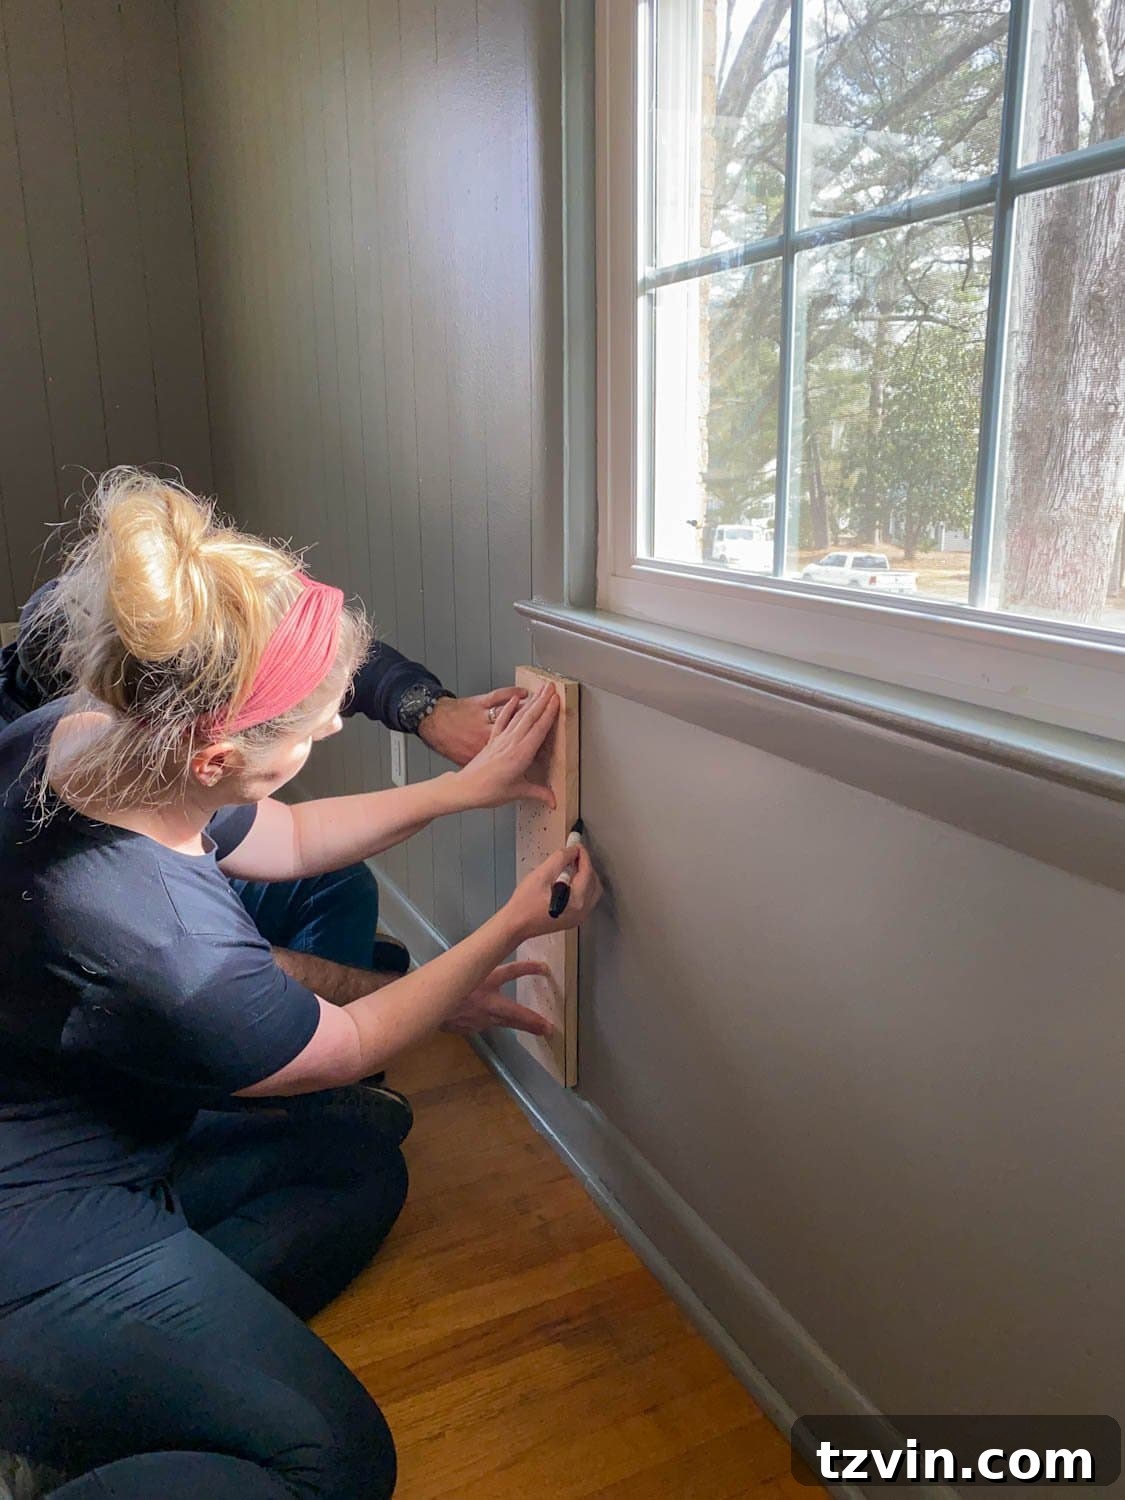
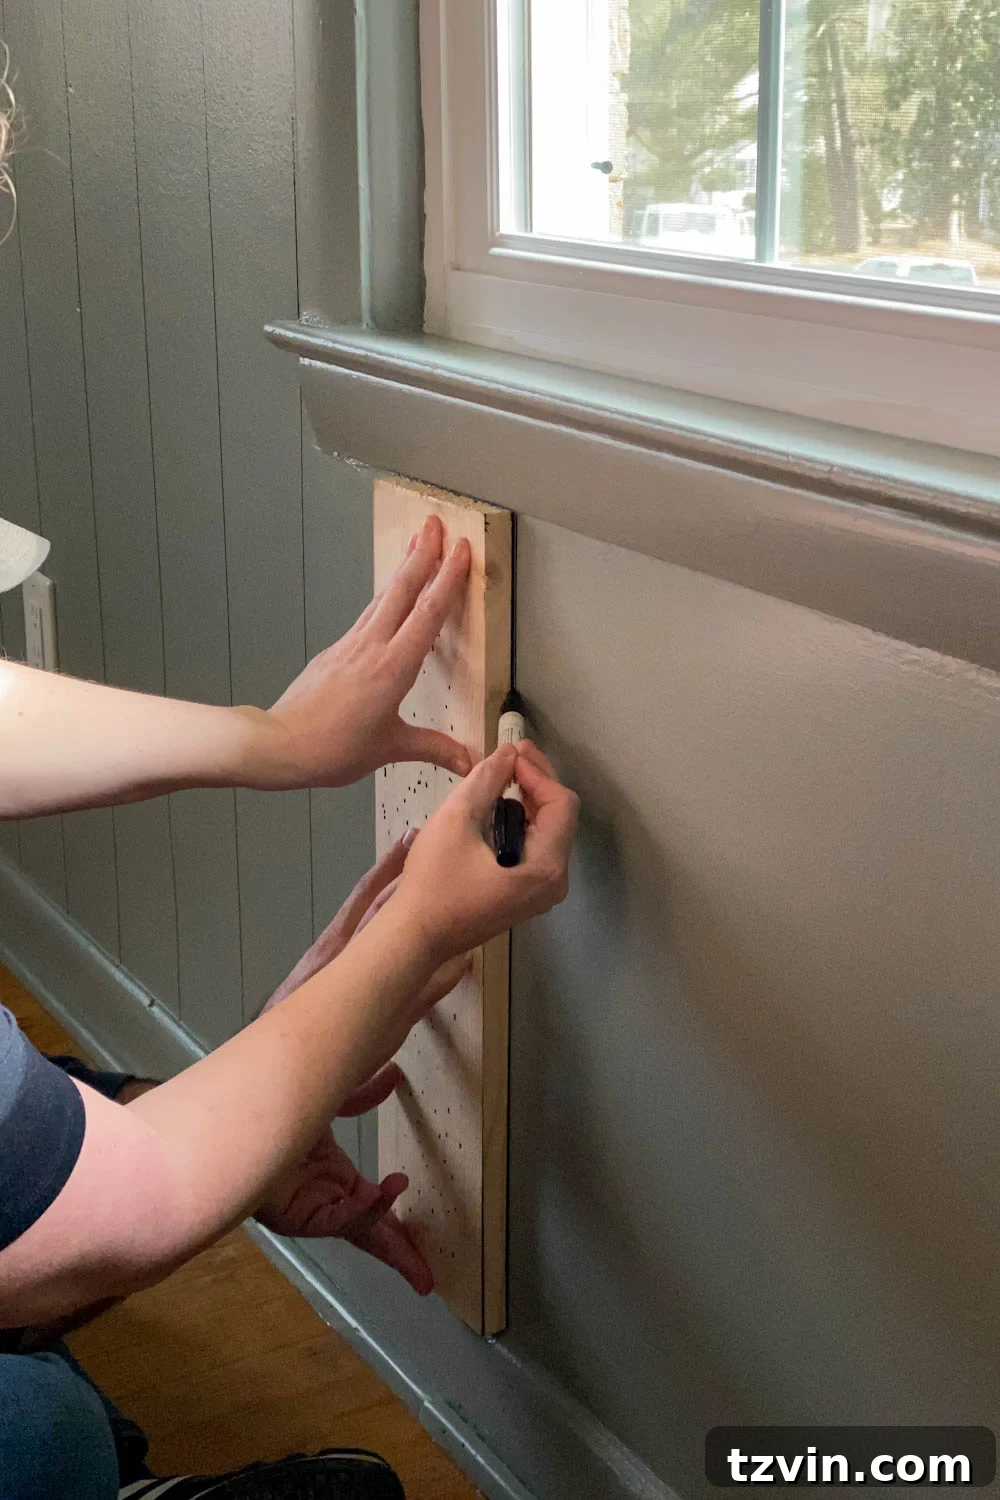
5. To maintain accuracy throughout the room, periodically check your progress. Every 3-4 lines, re-position your level against your newly drawn line to ensure it remains perfectly plumb. This quick check helps catch any slight deviations early, preventing cumulative errors that could ruin the illusion of straight planking.
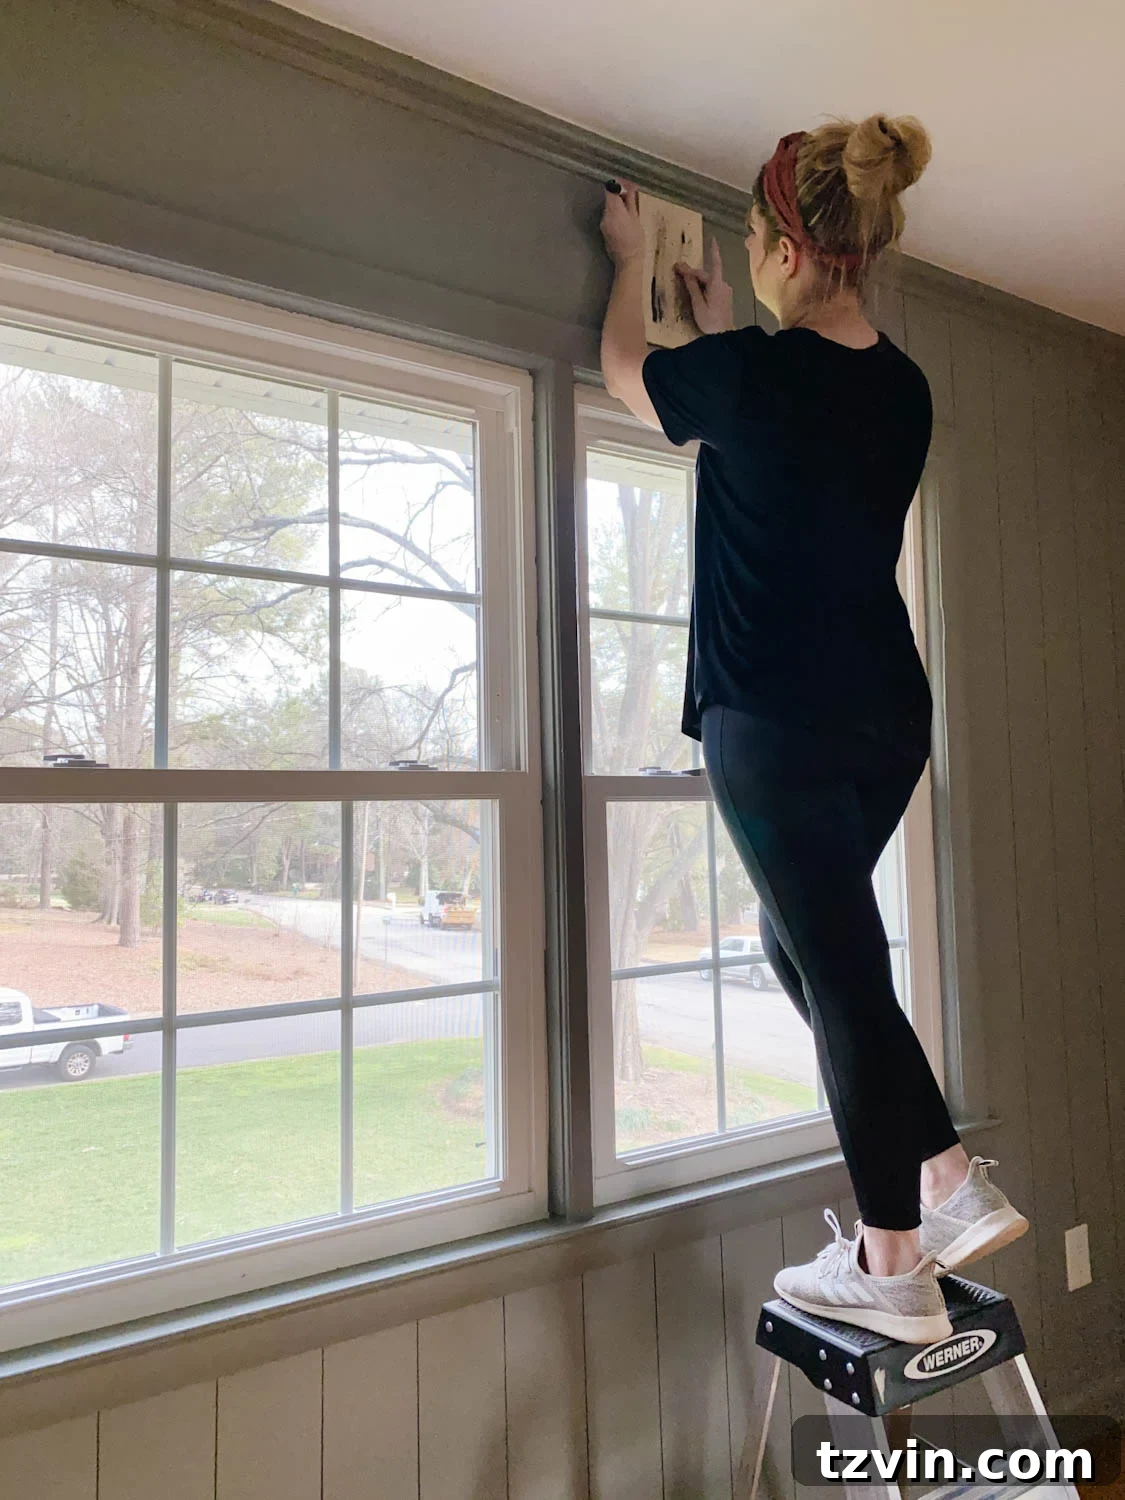
6. Continue this process around the entire room, taking breaks as needed. You’ll be astonished by how quickly your walls transform. For an entire room, we completed this project using just two paint pens and in approximately two hours – a truly remarkable feat compared to the days required for traditional planking!
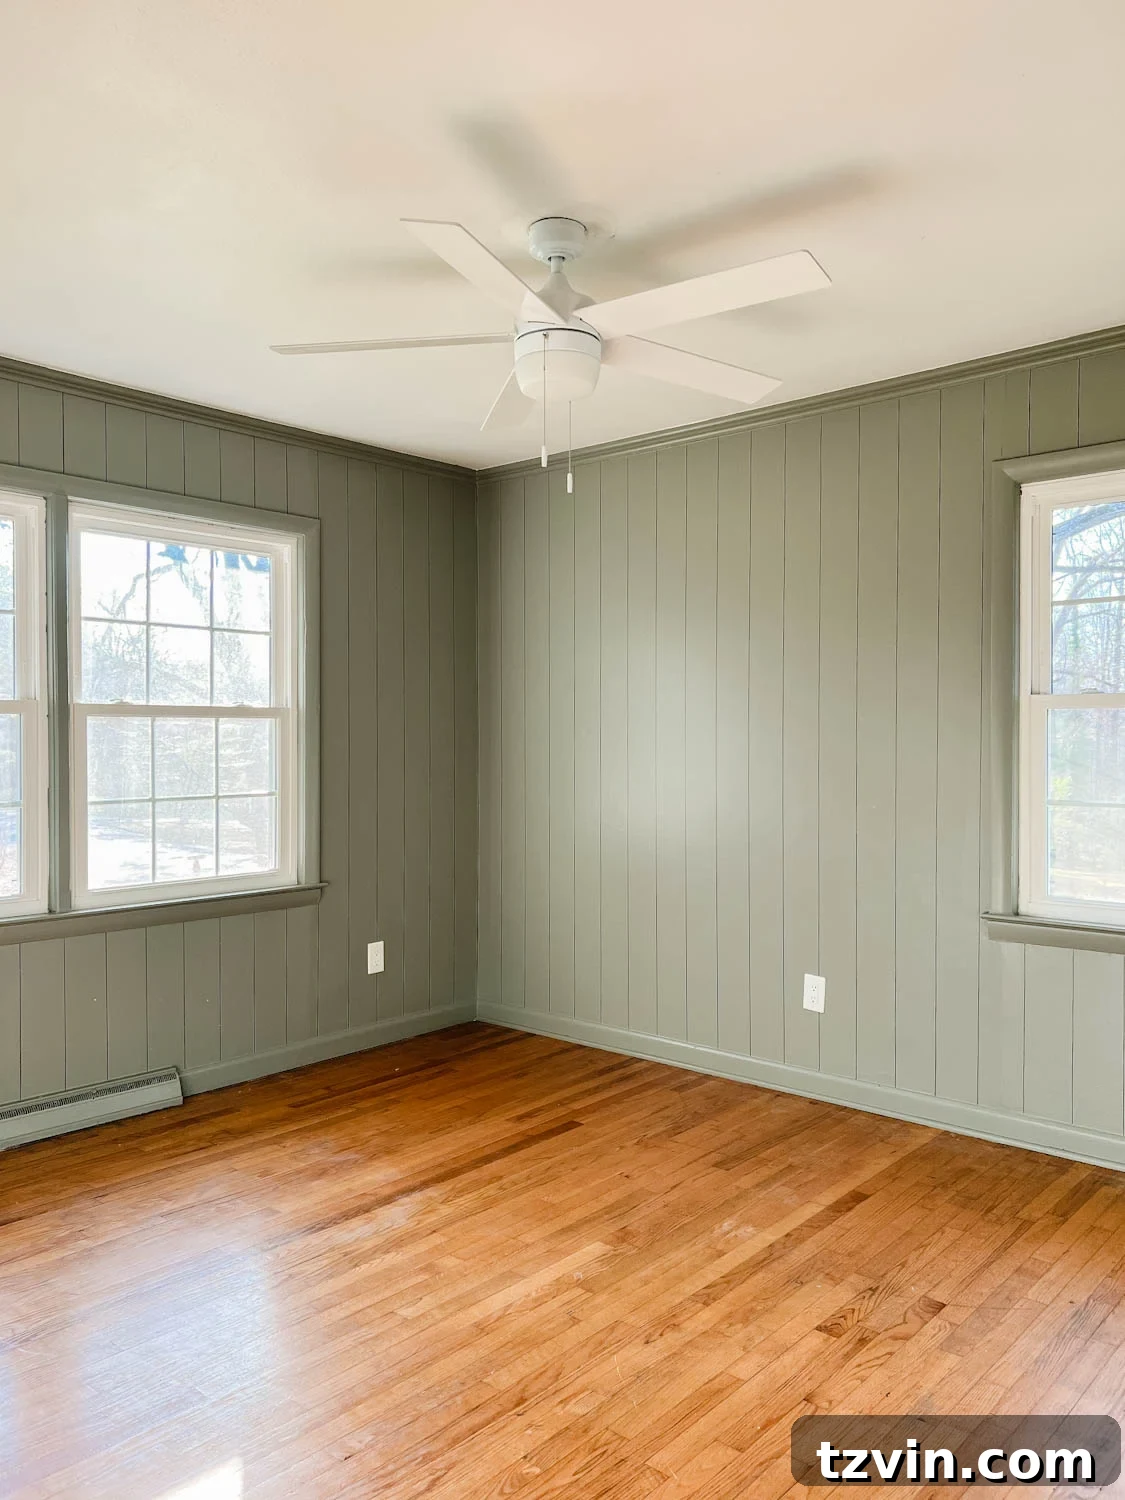
With your faux planked walls complete, the exciting part begins: decorating! You’ll find these charming new walls provide the perfect backdrop for a myriad of styles, from modern farmhouse to bohemian chic. The visual impact of these faux planked walls is genuinely amazing. Even standing in the room and admiring them in person, it’s almost hard to believe they aren’t real, dimensional wood planks.
Have you ever experimented with a wall treatment using a Sharpie paint pen before? Or perhaps you’re a purist who prefers the authentic feel of real wall planking? For those interested in traditional methods, you can find our detailed guide on the easy DIY vertical shiplap wainscoting method here. And if you’re hungry for more creative wall ideas, we’ve compiled 8 more DIY-able wall molding ideas to add character to your home.
Stay tuned, because the next time you see this beautifully transformed room, it will be filled with all the charming and stylish decor elements that truly bring the space to life!
Absolutely! Oil-based paint pens create a durable finish, but they can certainly be painted over if you decide to change your wall color or remove the faux planking effect. For best results, first apply a coat of high-quality bonding primer (either oil or water-based will work). Allow the primer to dry completely according to the manufacturer’s instructions, and then you can paint over it with any interior paint color you desire. This process ensures excellent adhesion and a smooth, even finish.
Up close, the faux planking simply appears as very crisp, dark lines drawn on your wall. While you can discern that there isn’t actual dimensional wood, the illusion of depth is remarkably strong. From a typical viewing distance of a foot or two away, the effect is incredibly convincing, mimicking the shadows and gaps found in real shiplap. It’s a testament to how effectively simple lines can trick the eye into perceiving texture and dimension.
When created with oil-based paint pens, this faux planking is surprisingly durable. The lines are permanent and will last as long as your wall paint does, showing no signs of fading or smudging under normal circumstances. It’s a long-lasting aesthetic solution that doesn’t require touch-ups unless the wall itself gets damaged or repainted.
Certainly! While black provides the most classic and striking shiplap effect, you can absolutely experiment with other colors. A dark gray could offer a softer, more subtle shadow line, while a lighter brown might mimic natural wood tones. Just ensure it’s an oil-based paint pen for the best opacity and permanence. Test your chosen color on an inconspicuous area first to ensure it creates the desired illusion against your wall paint.
Don’t panic! Minor mistakes are often easy to correct. For small smudges or wobbly lines, you can try gently wiping them away immediately with a cotton swab dipped in a tiny amount of mineral spirits (use sparingly and test on an inconspicuous area first). For more significant errors, the easiest solution is to simply touch up the affected area with your wall paint. Once the paint is dry, you can re-trace the line. The temporary nature of this DIY means mistakes are not permanent disasters!
Related Posts for More DIY Inspiration
- Easy DIY Vertical Shiplap Wainscoting: If you’re ready to tackle real wood paneling or prefer a wainscoting style, this guide provides a straightforward method for vertical shiplap.
- 8 DIY-able Wall Molding Ideas to Add Character to Your Home: Discover a variety of creative and achievable wall molding projects that can dramatically enhance the architectural character of any room.
- 15 Ways to Transform Your Entire House with Just Paint: Unlock the incredible power of paint with these inspiring ideas that demonstrate how a fresh coat can revolutionize your home’s aesthetic.
- DIY Painted Wall Paneling: Explore another fantastic method for adding painted wall paneling, offering a different style and approach to achieving a custom look.