
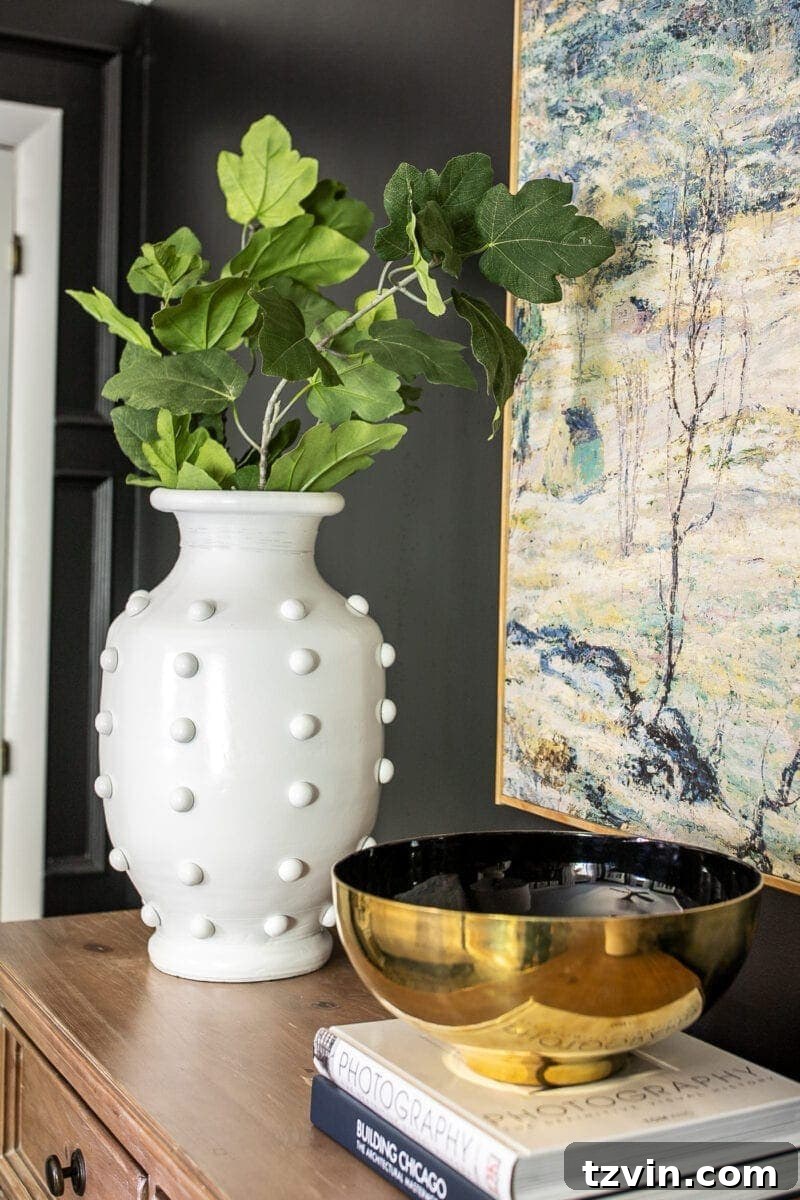
Transform a Plain Vase into a Chic Hobnail Masterpiece: An Easy DIY Guide
Are you yearning to rediscover the thrill of finding hidden gems in thrift stores, much like I am? There’s a unique joy in sifting through forgotten treasures, imagining their potential. As I delve deeper into my pile of pre-loved items awaiting a creative touch, I find myself longing for those leisurely strolls down thrift store aisles. It’s a sentiment many of us share, isn’t it?
If only I had known my last thrifting adventure would be put on hold for months, I would have lingered a little longer, savoring every moment. Nevertheless, the memory of discovering this $7 vase back in early March remains a cherished one. It truly was one of my most exciting finds in recent memory.

However, that original shade of pea green wasn’t quite aligning with my home decor vision. My mind kept returning to the elegant, textured hobnail look that has been gracing the shelves of many high-end decor boutiques, inspiring a desire to recreate that sophisticated aesthetic on a budget.
If you have a simple vase, an unassuming planter, or even a basic canister that could use a touch of personality and style, then you’ve stumbled upon the perfect DIY project. This tutorial will guide you through creating a stunning, trendy hobnail vase that looks far more expensive than it truly is.
DIY Hobnail Vase: An Anthropologie-Inspired Makeover
(Some affiliate links are provided below for your convenience, allowing you to easily find the materials mentioned. Full disclosure here.)
Why Choose a DIY Hobnail Vase?
The hobnail style, characterized by its raised, dot-like texture, adds a touch of vintage charm and sophisticated elegance to any piece. High-end retailers often feature these beautiful, textured vases at premium prices. By choosing to DIY, you not only save a significant amount of money but also gain the satisfaction of transforming an ordinary item into a personalized decor statement.
This project is perfect for upcycling those forgotten pieces or giving new life to thrift store finds. It’s an accessible craft for beginners and experienced DIYers alike, requiring minimal supplies and even less time to achieve a striking result. Embrace the creative freedom to customize the color and finish, making it truly unique to your taste and home aesthetic.
Essential Supplies for Your Hobnail Vase Project:
Gathering your materials is the first exciting step in any creative endeavor. For this project, you’ll find that the necessary items are readily available, often at very affordable prices, making this an incredibly budget-friendly way to achieve high-end style.
- The Vase (Your Blank Canvas): The star of the show! You can use almost any kind of vase – glass, ceramic, terracotta, or even metal. Look for interesting shapes or sizes at thrift stores, garage sales, or even in your own cabinets. A smooth surface is ideal for bead application, but slight textures can also work. Remember, the original color doesn’t matter, as it will be covered with paint. Don’t limit yourself to vases; this technique works beautifully on planters, canisters, or even decorative bottles.
- Half Beads (The “Hobnails”): These are the key to achieving the distinctive hobnail texture.
- Acrylic half beads are lightweight and come in various sizes and colors. Opt for a size that complements the scale of your vase – typically 6mm to 12mm works well for most standard vases.
- Alternatively, small glass gems or flat-backed marbles from a dollar store or craft supply store can create a similar, perhaps slightly more irregular, texture. Get creative with what you can find!
- Super Glue (The Bond): A strong, fast-drying super glue is crucial for securely attaching the beads. Gel super glue varieties often provide a bit more control and prevent excessive dripping, which can be helpful. Ensure it dries clear to avoid any visible residue. Always work in a well-ventilated area and follow the manufacturer’s safety instructions.
- Spray Paint (The Finishing Touch): This is where your vase truly transforms.
- I personally used Rustoleum Universal gloss finish in white, which provides a durable, professional-looking coat and a subtle shine.
- Color & Finish Choices: Consider white for a classic, minimalist, or farmhouse aesthetic. Matte black offers a dramatic, modern look. Soft pastels can add a touch of whimsy, while metallics like gold or copper can elevate the piece to pure glam. Choose a finish – gloss, satin, or matte – based on your desired final look.
- Primer (Optional but Recommended): If your vase is particularly slick (like highly glazed ceramic or glass) or has a dark, vibrant color that you want to completely mask, a spray primer formulated for multiple surfaces can provide better adhesion for your chosen color and prevent it from scratching off easily.
Step-by-Step Guide to Crafting Your Hobnail Vase:
This project is surprisingly straightforward, proving that stunning home decor doesn’t require complex techniques or extensive crafting experience. Let’s get started!
- Preparation is Key: Clean Your Canvas
Before you begin, ensure your vase is impeccably clean and dry. Any dust, grime, or oily residue can prevent the beads and paint from adhering properly. Wash it with soap and water, rinse thoroughly, and let it air dry completely. For a truly pristine surface, you can wipe it down with rubbing alcohol, especially if it’s glass. Set up your workspace in a well-ventilated area, preferably outdoors or in a garage, protecting surfaces with newspaper or a drop cloth. - Attaching the Half Beads: Creating the Signature Texture
This step is where the magic happens, giving your vase its distinctive hobnail appearance. Begin by applying a small dot of super glue to the flat back of each half bead. Precision is helpful, but don’t overthink it; a small amount of glue is sufficient.Carefully press each bead onto the vase surface. The goal is to create a consistent, linear pattern, spacing the beads evenly around the vase. Many find it easiest to work in horizontal rows, starting from the top or bottom and working their way around. You can use a ruler or even a piece of painter’s tape as a temporary guide to ensure your rows are straight and the spacing between beads is uniform. For a more organic, random hobnail effect, you can simply space them as you go without strict adherence to lines.
Work in small sections to prevent the glue from drying before you can place the beads. If you accidentally get glue on your fingers, use an acetone-based nail polish remover or a specialized super glue remover to clean it off carefully. Allow the glue to dry completely according to the manufacturer’s instructions, typically for at least a few hours or overnight, to ensure all beads are securely attached before moving to the next step. This patience will prevent beads from falling off during painting.

- Painting: Unifying Your Creation
Once all the beads are firmly in place and the glue is fully cured, it’s time to paint! Place your vase on a protected surface in your well-ventilated area. Hold the spray paint can about 8-12 inches away from the vase and apply light, even coats. It’s better to apply several thin coats than one thick coat, which can lead to drips and an uneven finish. Ensure you spray from all angles, rotating the vase to cover all surfaces, including between and around the beads.Allow each coat to dry to the touch (usually 15-30 minutes, check your paint can’s instructions) before applying the next. This layered approach ensures excellent coverage and a smooth, professional-looking finish. Continue until you achieve your desired opacity and the vase’s original color is completely hidden. The beads will now blend seamlessly into the vase, creating that coveted textured look.
Let the vase dry and cure completely. Curing time can vary from 24 hours to a few days, depending on the paint type and humidity. Refer to your spray paint can for precise drying and curing recommendations. This final waiting period is essential for a durable finish that will stand the test of time.


And just like that, you’re done! Seriously, it’s a two-step process, and even explaining it in detail almost feels like overkill because of how intuitive it is. Haha!

Beyond the simple steps, this project offered a delightful excuse to step outside, enjoy some fresh air, and infuse a bit of happiness into our home. My newly transformed hobnail vase now perfectly complements our DIY large-scale art, adding a charming accent to the serene atmosphere of our master bedroom.
Styling Your New Hobnail Vase
Once your DIY hobnail vase is complete and fully cured, the fun continues with styling it in your home. Its textured design makes it a versatile piece that can enhance various decor styles. Place it as a standalone sculptural element on a mantelpiece, bookshelf, or side table. Fill it with a vibrant bouquet of fresh flowers for a pop of color, or opt for delicate dried botanicals or eucalyptus branches for a more understated, natural look. It also shines with faux greenery, providing maintenance-free beauty. Consider grouping it with other vases or decorative objects of varying heights and textures to create a captivating vignette. Whether gracing an entryway console, a bedroom nightstand, or a living room coffee table, your handcrafted hobnail vase is sure to be a conversation starter and a testament to your creativity.


Unleash Your Inner Decorator!
With only a few things left in my current thrift project pile, the rest of the decor around our house better prepare itself! Because if we continue to spend more time at home, nothing will be safe from my creative paint brush or trusty spray can. This project is a fantastic reminder that a little ingenuity and a few simple materials can completely transform your living space without breaking the bank.
Hang in there, friends! Embrace these opportunities for creativity and find joy in making your home a reflection of your unique style.
If you’re eager for more brilliant ideas on how to transform common thrift store finds into stylish home decor, you can explore a wealth of inspiration here. Happy crafting!
