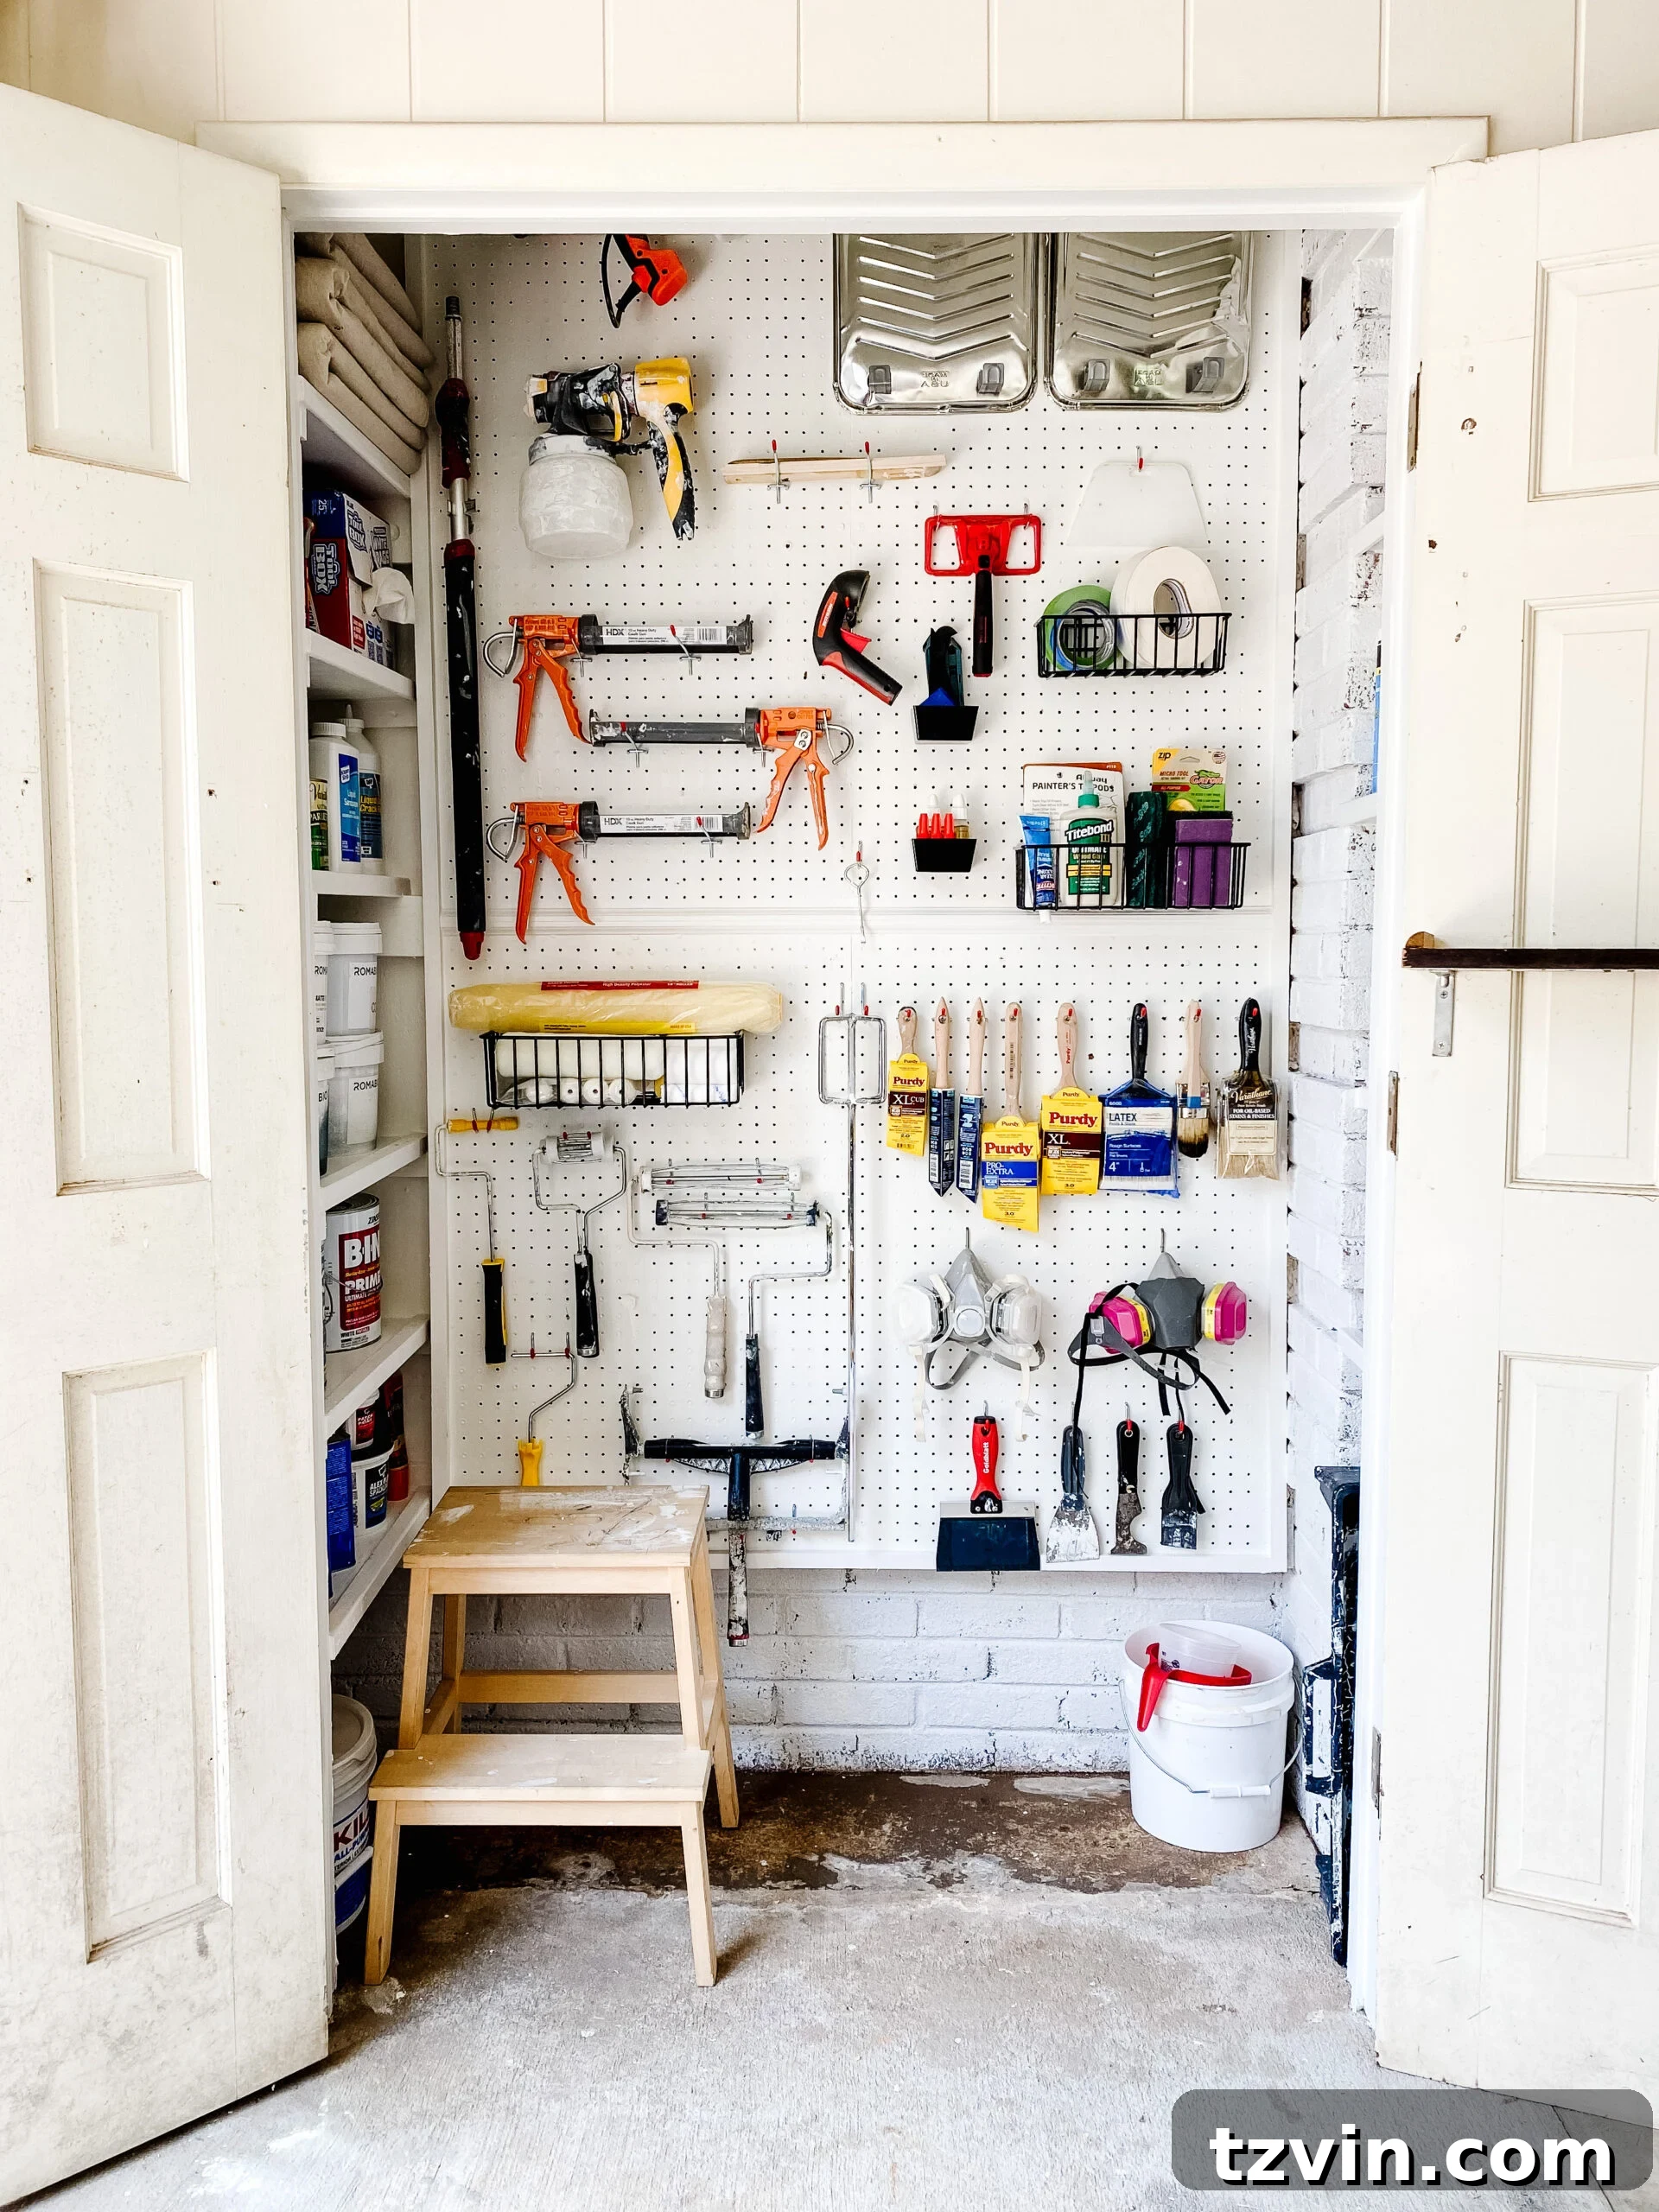
Transform Your Utility Closet: The Ultimate DIY Paint Storage System
Achieving an impeccably organized space can feel like a monumental task, especially when it comes to the often-neglected corners of our homes like utility closets or garages. However, the satisfaction and efficiency gained from a well-structured system are immeasurable. Today, we’re diving into a complete overhaul of a chaotic paint storage area, transforming it into a functional and easily accessible “Paint Central” using clever DIY solutions, practical pegboard installations, and essential organizing kits. If you’re tired of rummaging through dozens of half-empty paint cans and misplaced brushes, this guide will walk you through creating a streamlined system that will save you time, reduce stress, and keep your creative projects flowing seamlessly.
This remarkable transformation began out of necessity. Following unexpected water damage that triggered a significant renovation, our garage was plunged into utter disarray. Among the many casualties of this chaos, our paint storage was by far the biggest culprit. What was once a haphazard collection of cans and tools had devolved into a truly unmanageable mess – in essence, there was no system whatsoever. Every painting project became a scavenger hunt, wasting precious time and testing our patience.
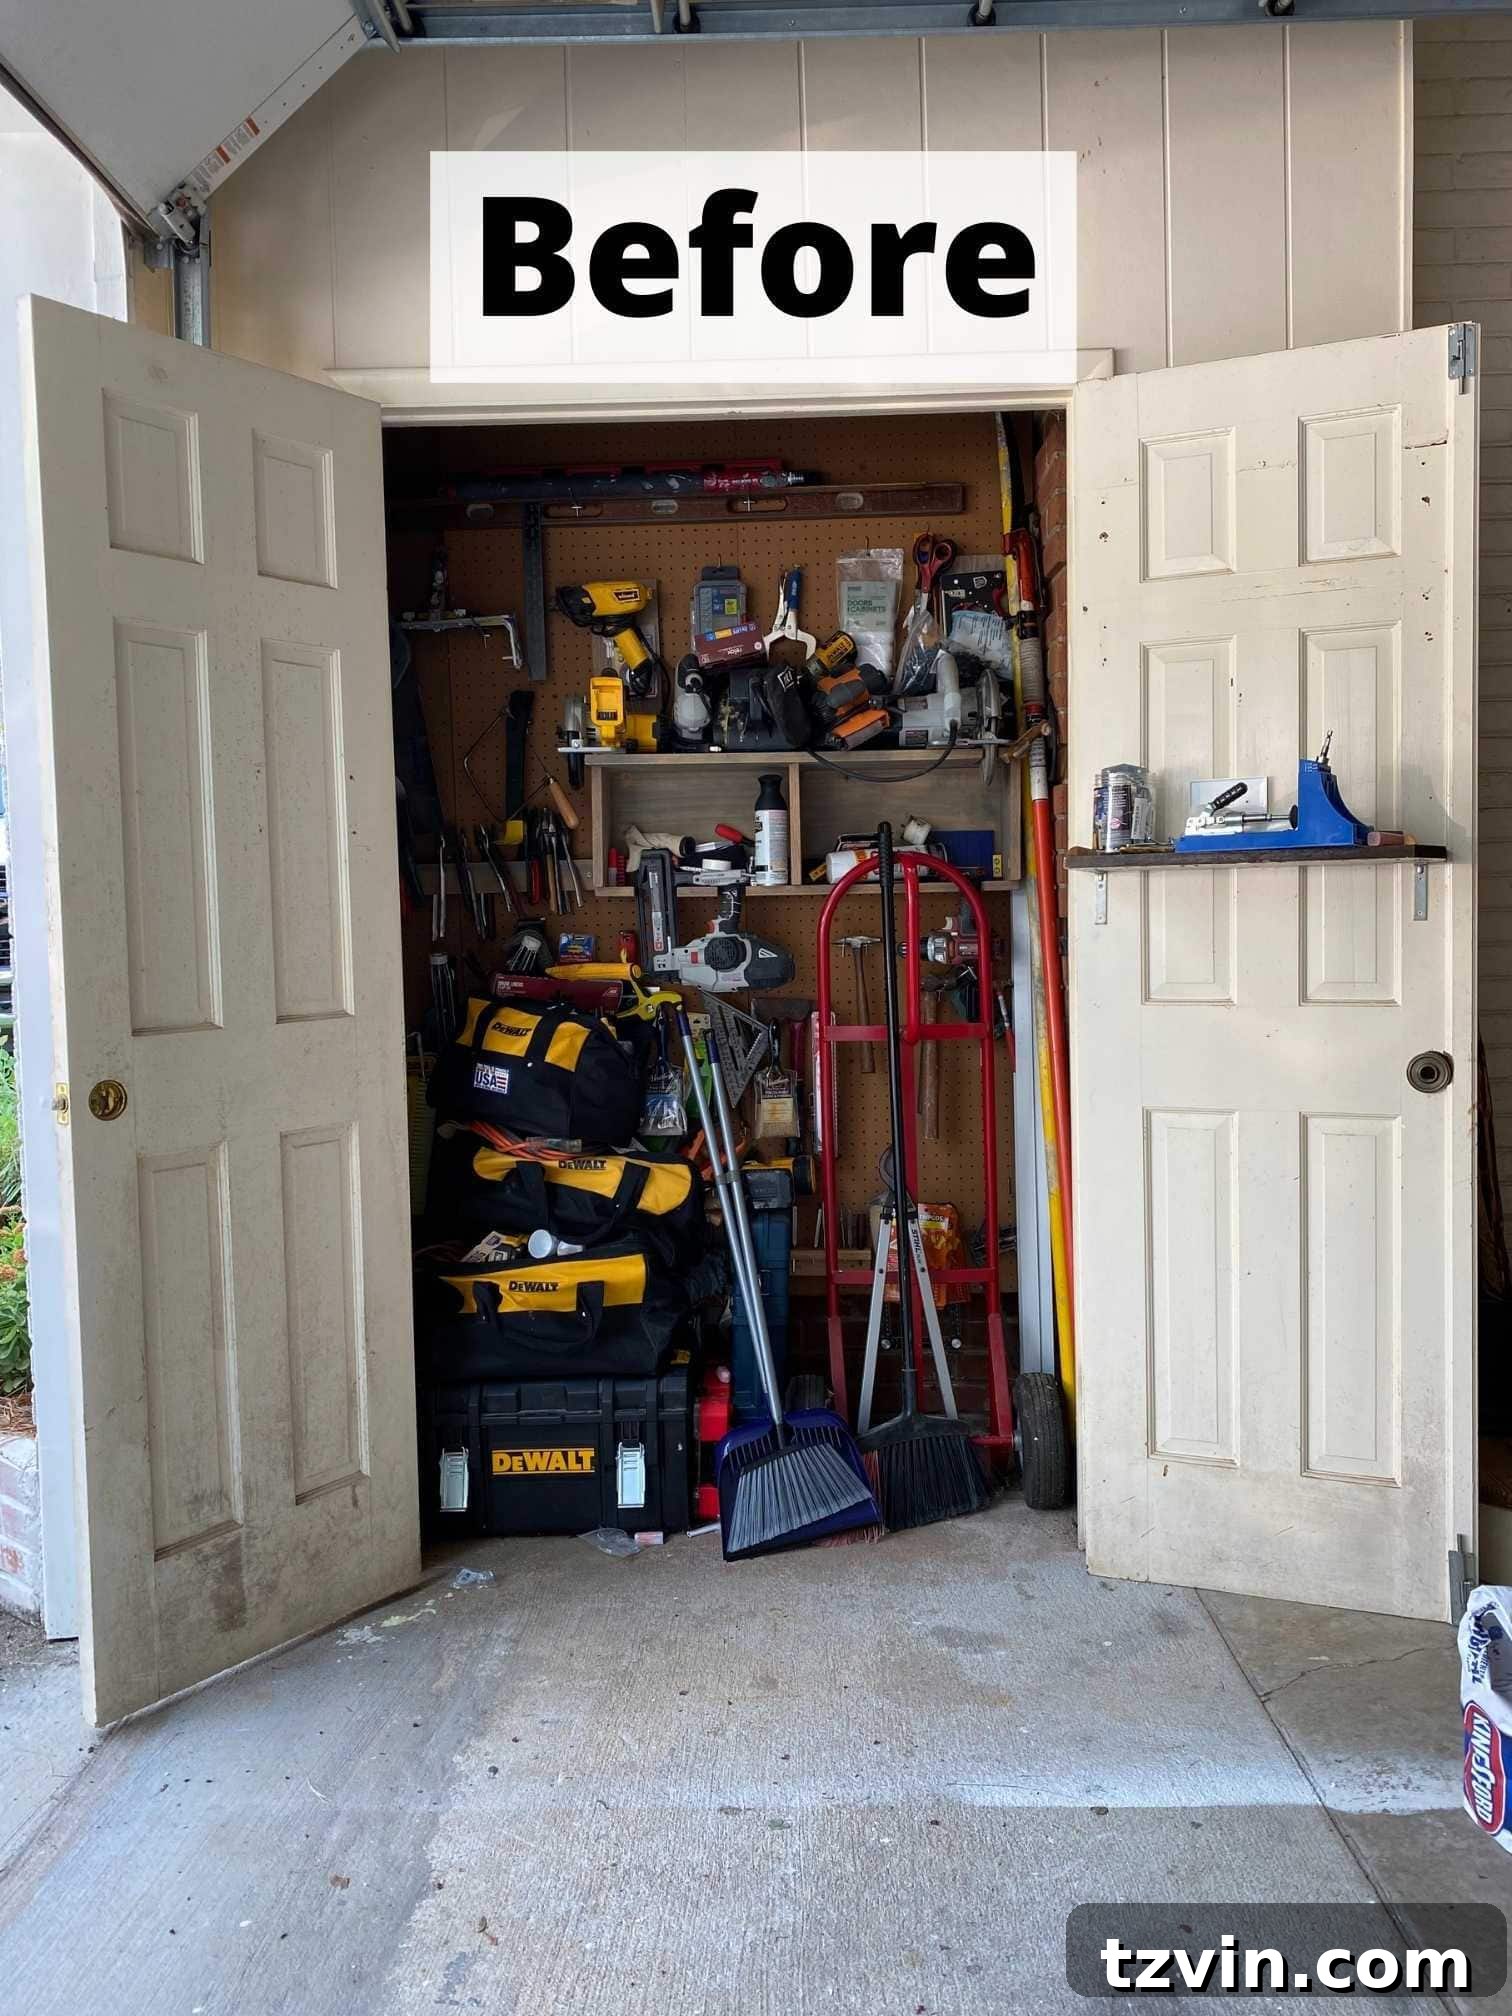
The situation was ripe for change. We had an existing storage closet in our garage, and the idea sparked to dedicate it entirely to our painting needs. Given that we are perpetually undertaking painting projects and constantly accumulating supplies, establishing a designated “Paint Central” was not just a luxury, but a genuine necessity. This dedicated space promised to bring order to the chaos and make future projects far more enjoyable and efficient.
If you’re ready to tackle your own paint storage challenges, you’re in the right place. We’re about to share practical and budget-friendly paint storage ideas that you can easily replicate. Our goal was to create a highly functional and organized space without breaking the bank, leveraging DIY solutions and readily available organizing tools. Let’s transform that cluttered corner into an inspiring hub for all your painting endeavors!
Crafting Your Organized Paint Storage Closet
The journey to an organized utility closet for paint supplies starts with the right materials. We focused on utilizing existing resources and making smart, affordable purchases to maximize our budget and impact. Here’s a detailed look at the supplies that made our dream “Paint Central” a reality, along with considerations for why each item is essential for creating an efficient paint storage system:
Essential Supplies Used for This DIY Project
(Note: Affiliate links are provided below for your convenience, which may earn us a small commission at no extra cost to you.)
- Leftover White Paint: Not just for touch-ups! We used any existing white paint we had on hand to refresh the interior of the closet. A fresh, light coat of paint instantly brightens the space, making it feel cleaner and more inviting, and helps highlight organized items. This simple step sets a clean foundation for your new system.
- Wood Scraps: Repurposing wood scraps, especially 1x2s and plywood, was key to building custom DIY closet shelves. This approach is incredibly cost-effective and allows for tailor-made storage solutions that perfectly fit the unique dimensions of your closet, maximizing every inch of available space, particularly in narrow niches beside the door. It’s an eco-friendly and budget-conscious way to add structure.
- Pegboard Organizer Kit: A comprehensive pegboard kit is invaluable. It provides a versatile foundation for vertical storage, allowing you to hang a multitude of tools and supplies. Look for kits that include various hooks, bins, and holders to accommodate different items like brushes, rollers, and smaller tools, providing flexibility for your specific needs.
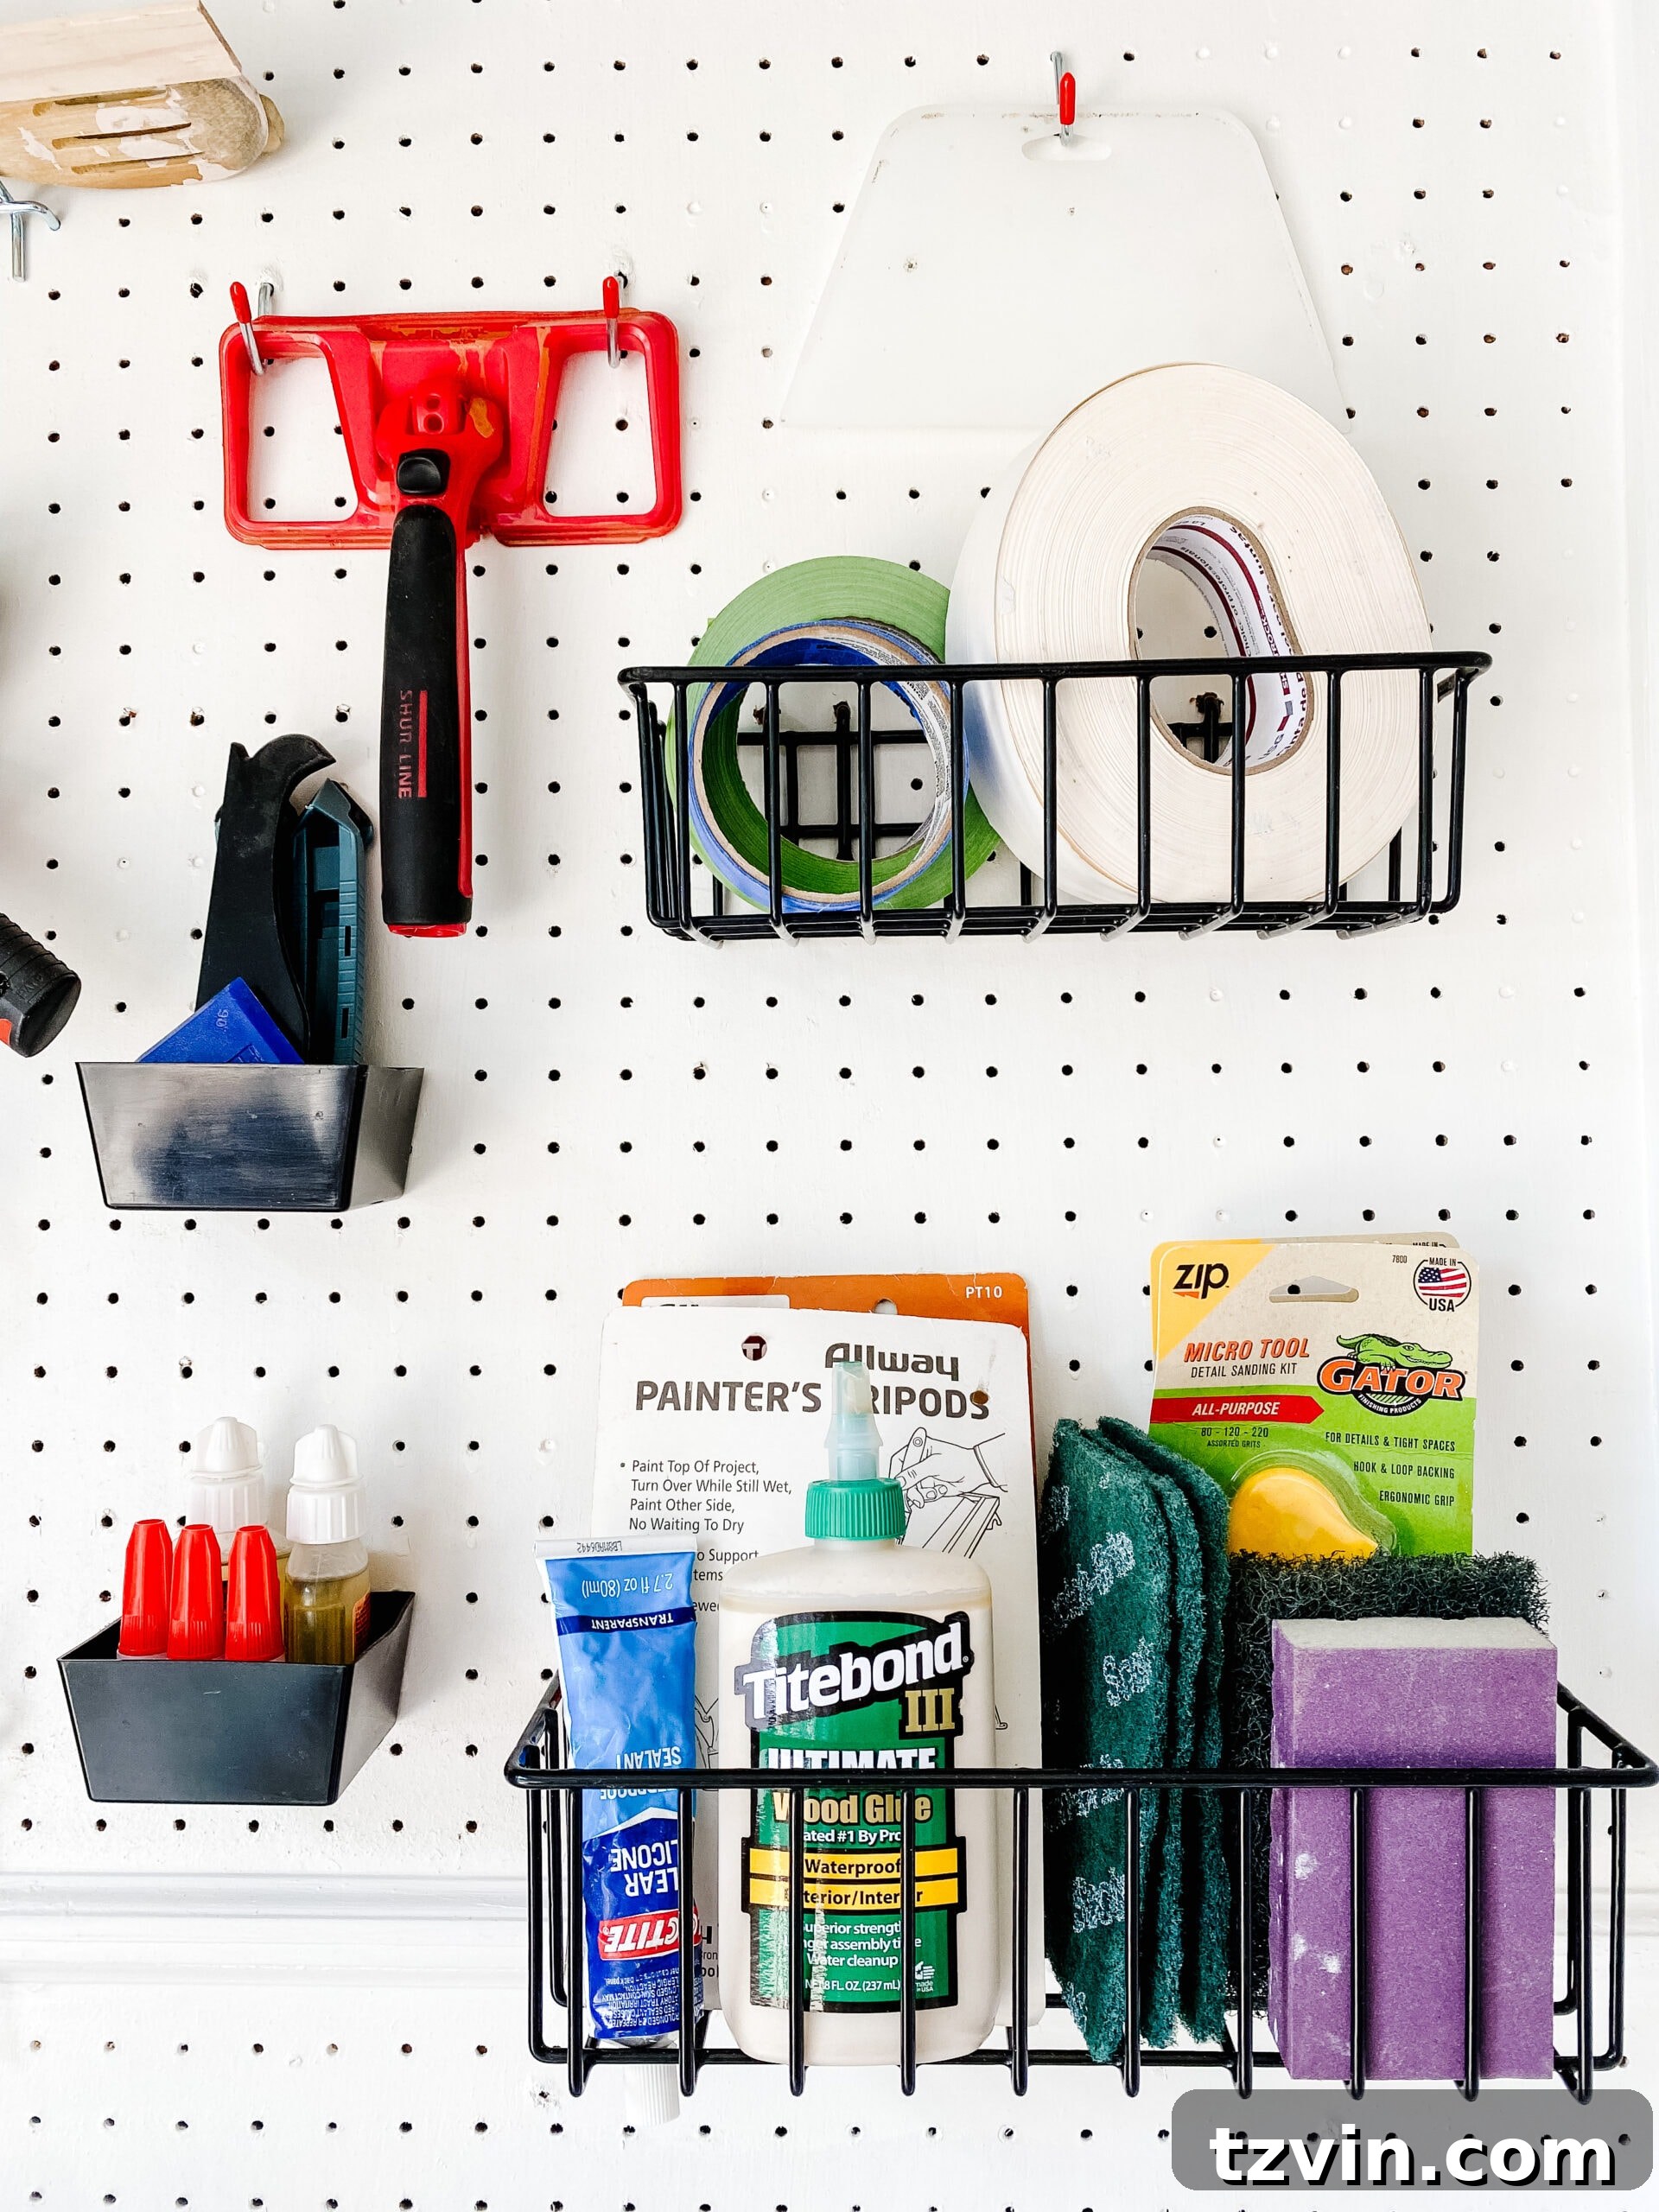
- Pegboard Baskets: These baskets are a game-changer for containing smaller items that can’t be hung directly, such as sandpaper, tape rolls, or caulking tools. They keep these essentials visible and easily accessible, preventing clutter on shelves and ensuring everything has a designated spot. They are perfect for grouping similar small items.
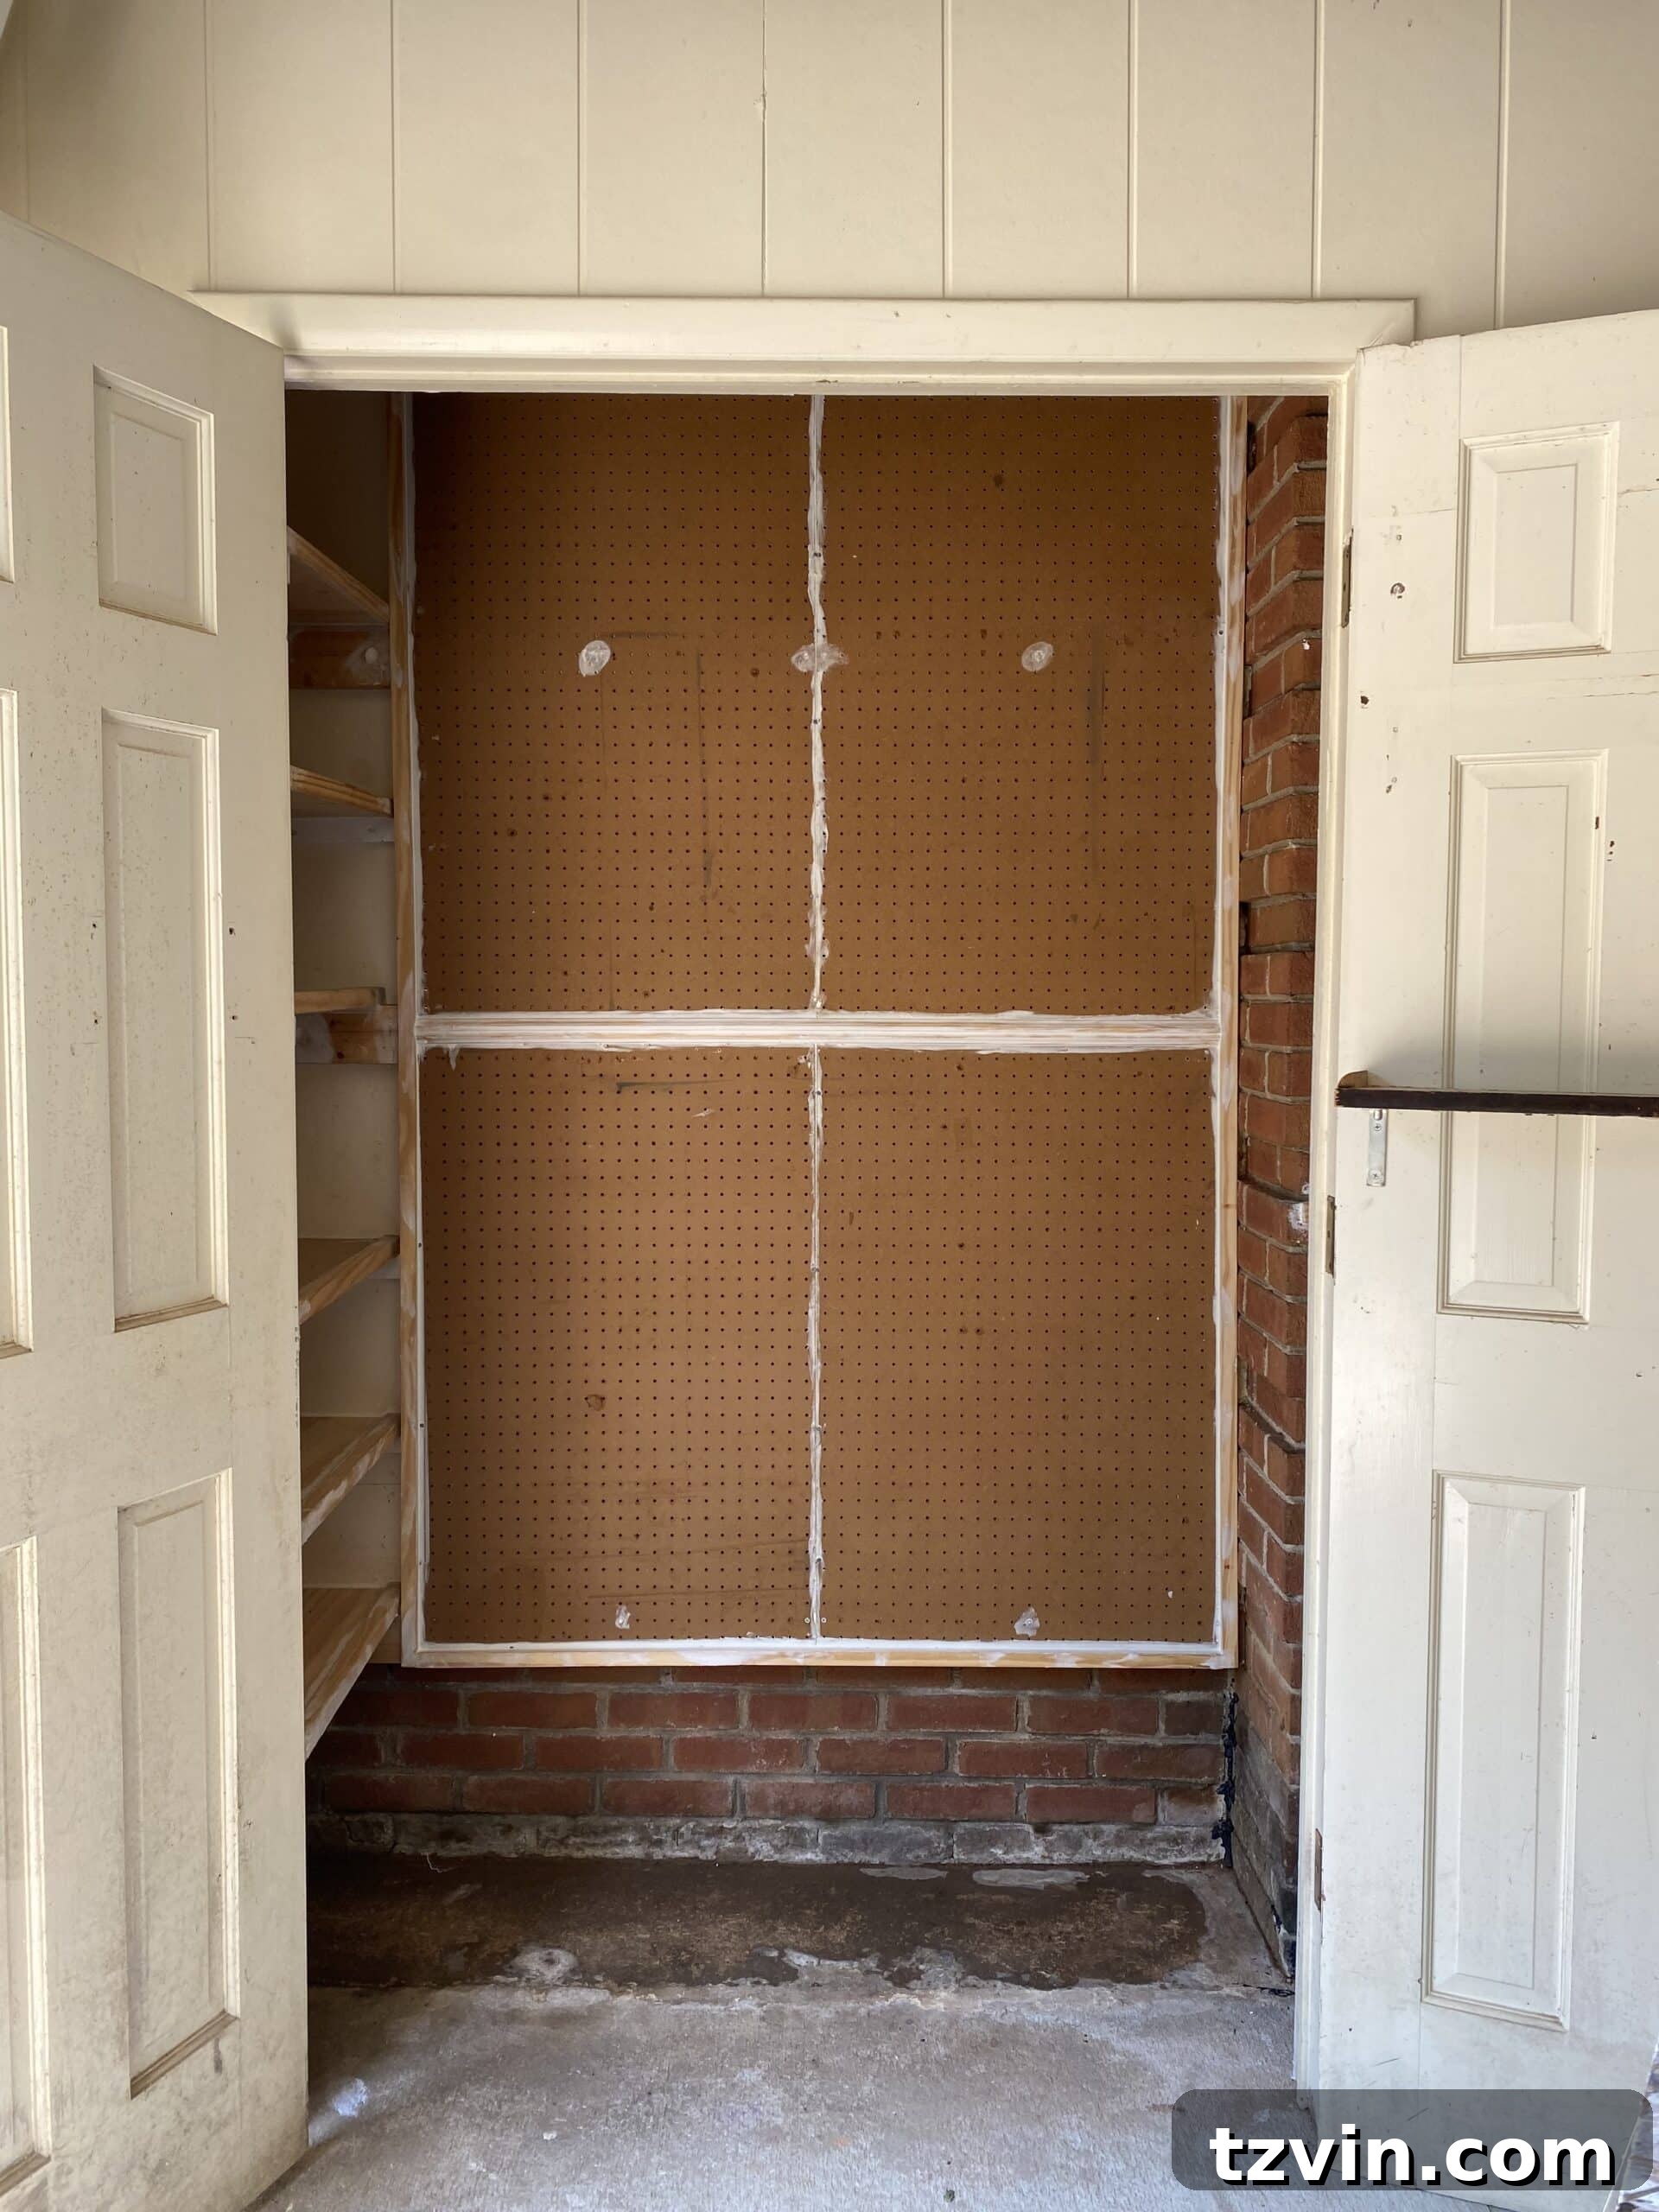
A Quick Note on Pegboard: Our closet already featured pegboard installed by the previous owners. We simply reinforced it with construction adhesive for added stability and gave it a fresh coat of paint to match the revitalized closet interior. If your closet doesn’t have pegboard, don’t worry! You can easily purchase pegboard sheets here and install them yourself. It’s a straightforward DIY project that yields immense organizational benefits and is a fundamental component of an efficient paint storage system.
Streamlining Your Workflow: Organize Paint Supplies By Category
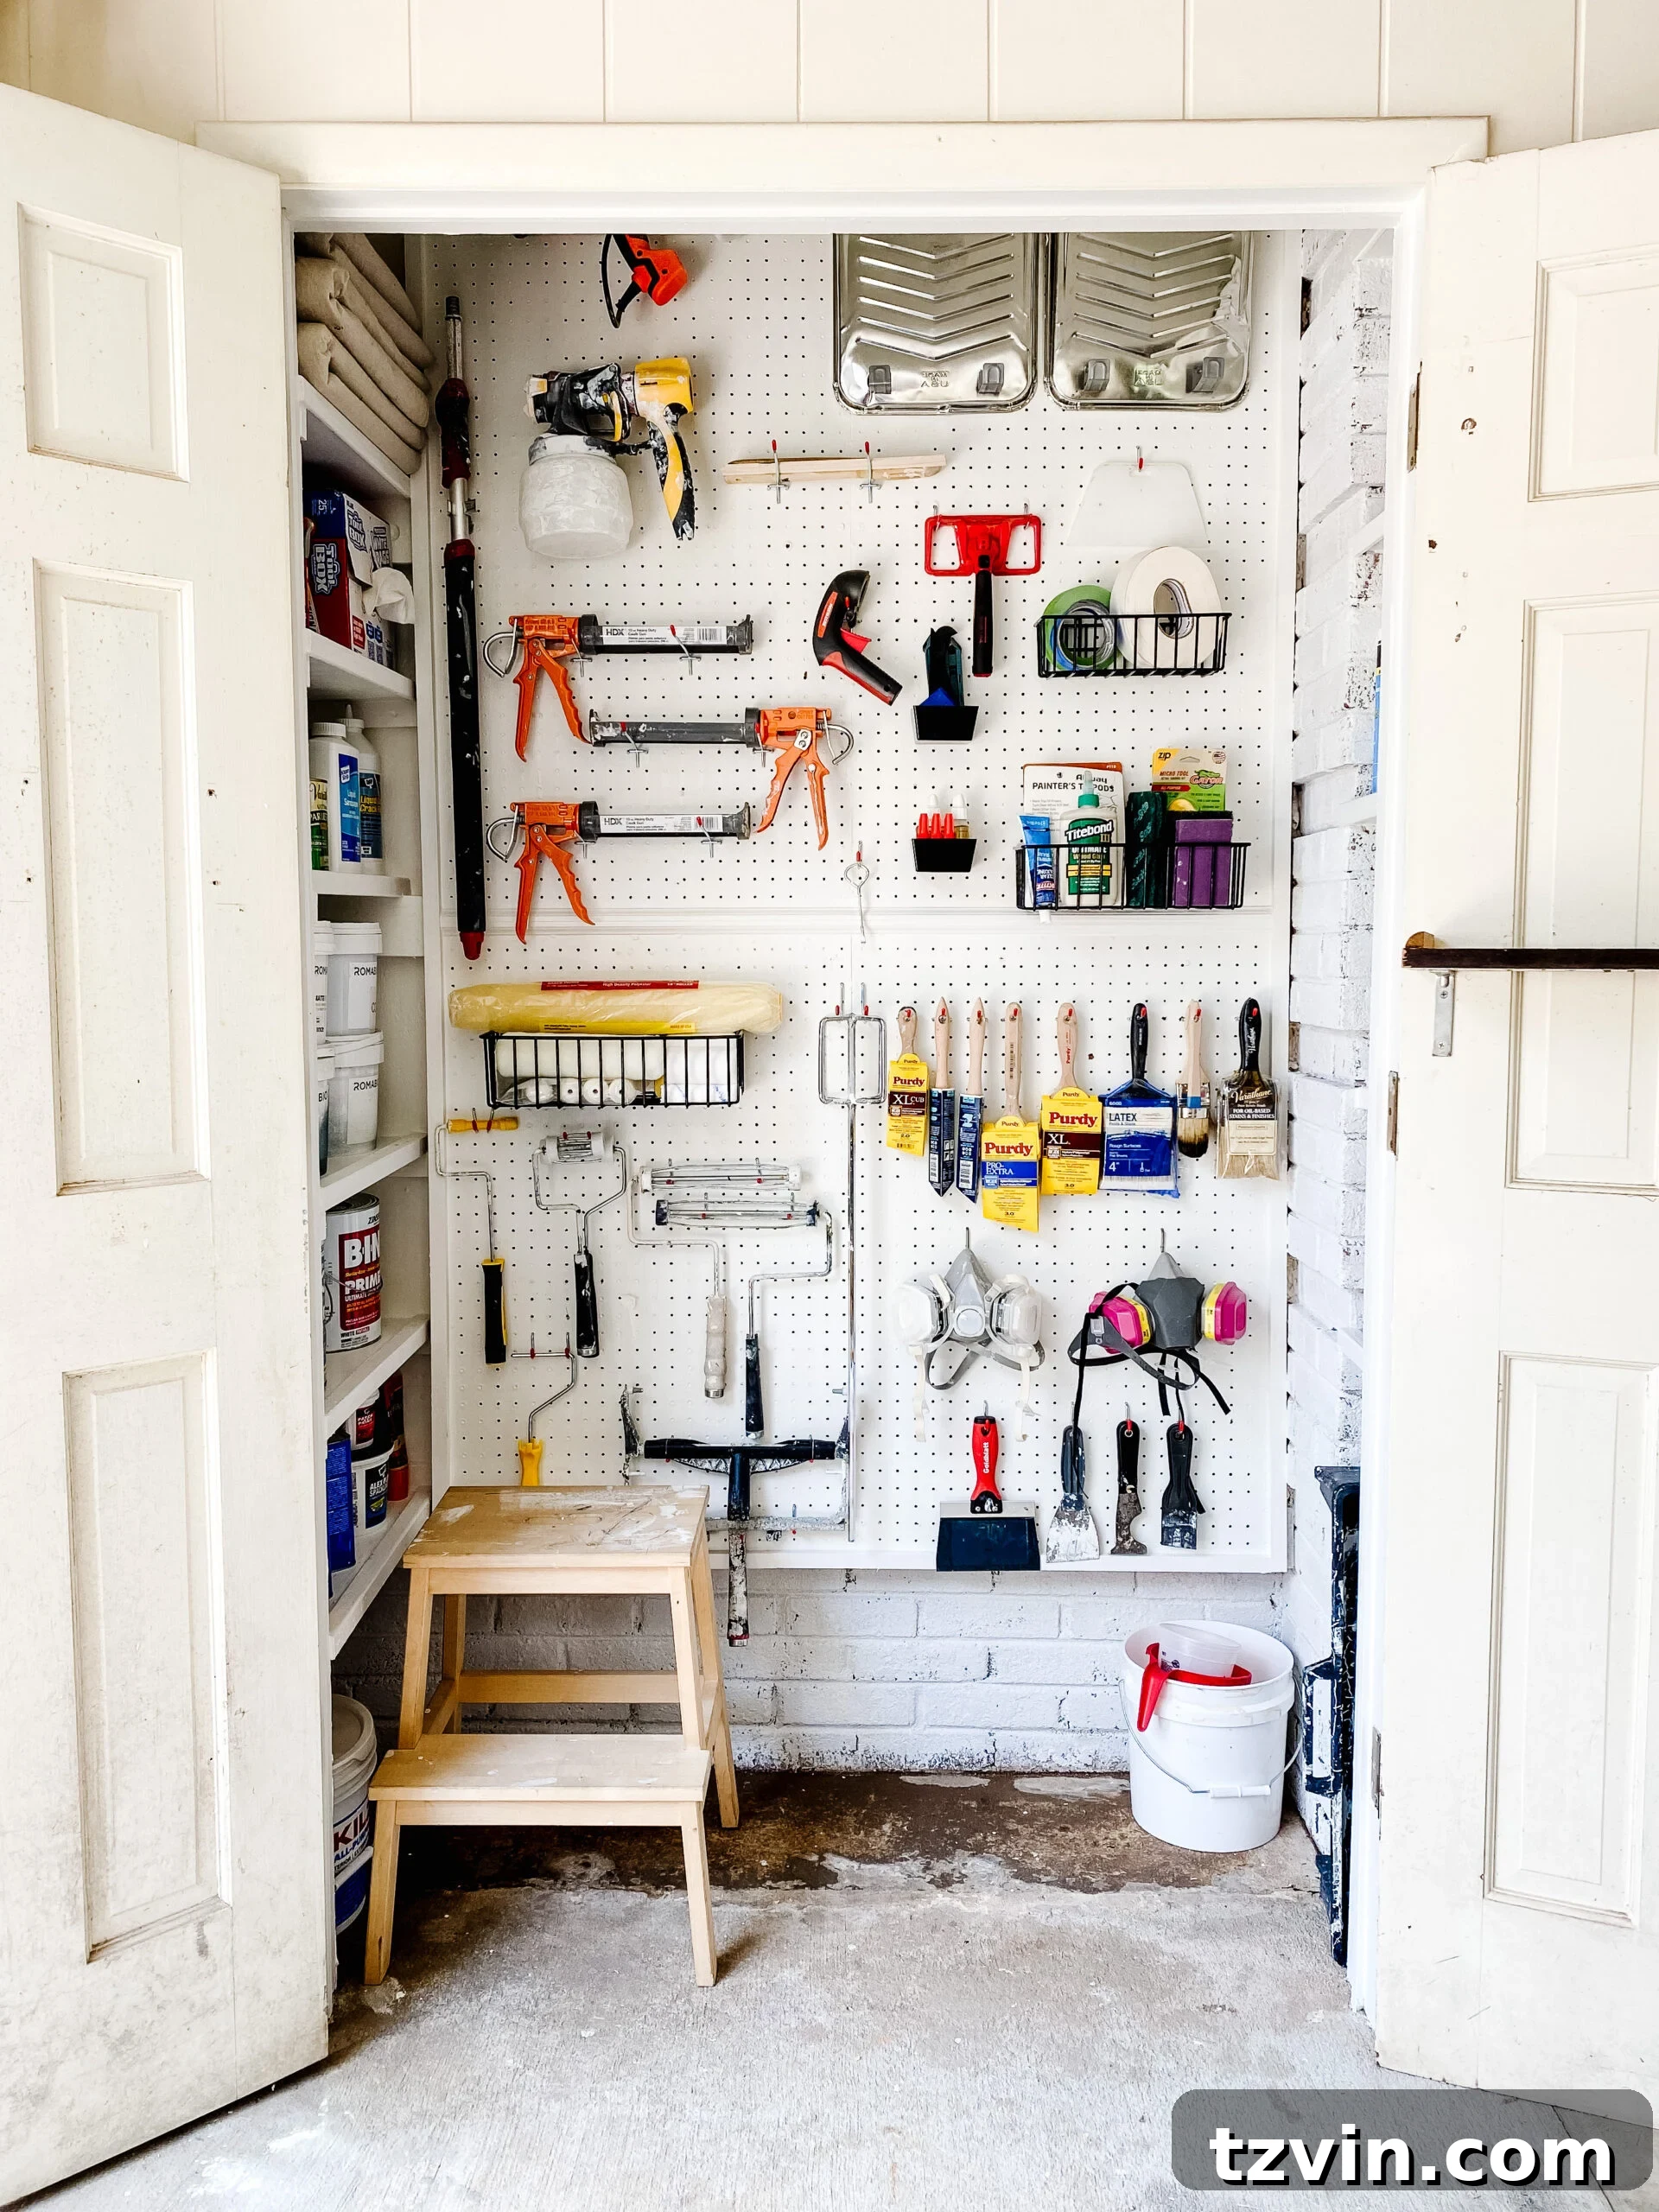
The cornerstone of an efficient paint storage system is thoughtful categorization. Instead of a jumbled mess, we conceptualized and implemented “stations” within the closet, dedicating specific areas to different stages of the painting process. This approach ensures that when you’re ready to start a project, all the necessary tools and materials for each step are logically grouped together, minimizing search time and maximizing productivity. Here’s how we structured our system for optimal paint supply organization:
- Prep Station: This area holds everything needed to prepare surfaces before painting. Think drop cloths, cleaning rags, spackle, liquid sandpaper, primer, and any necessary patching compounds. Having these items together streamlines the initial phase of any project, making surface preparation a breeze.
- Paint Station: This is where the main event happens. Here you’ll find various paint colors, typically in pry-top cans, organized for easy access. We aim to keep our most frequently used neutrals (whites, grays, blacks in various sheens) here, ensuring they are always within reach for immediate use or touch-ups.
- Finishing Station: Once the paint is on, it’s time for finishing touches and protection. This station houses items like polyurethane, sealants, and any specialized finishing tools. This ensures that the final steps of your project are just as organized as the initial ones.
- Hand Tools Station: Essential hand tools used in painting, such as putty knives, caulk guns, small brushes, painter’s tape, and stir sticks, are hung on the pegboard or neatly stored in baskets in this dedicated section. This keeps sharp or frequently used tools safely and visibly stored.
Our DIY shelves, strategically placed throughout the closet, provide stable homes for bulkier items and various cans. These shelves efficiently hold:
- Dropcloths and protective coverings, neatly folded
- Rags and cleaning cloths, ready for spills or cleanup
- Spackle and patching compounds, for surface imperfections
- Liquid sandpaper and surface preparation liquids, to ensure proper adhesion
- Primers of various types, essential for different surfaces
- Wallpaper paste (if applicable), for specific projects
- A selection of pry-top cans containing different paint colors, organized by color family or usage frequency
- Polyurethane and other clear finishes, for durable topcoats
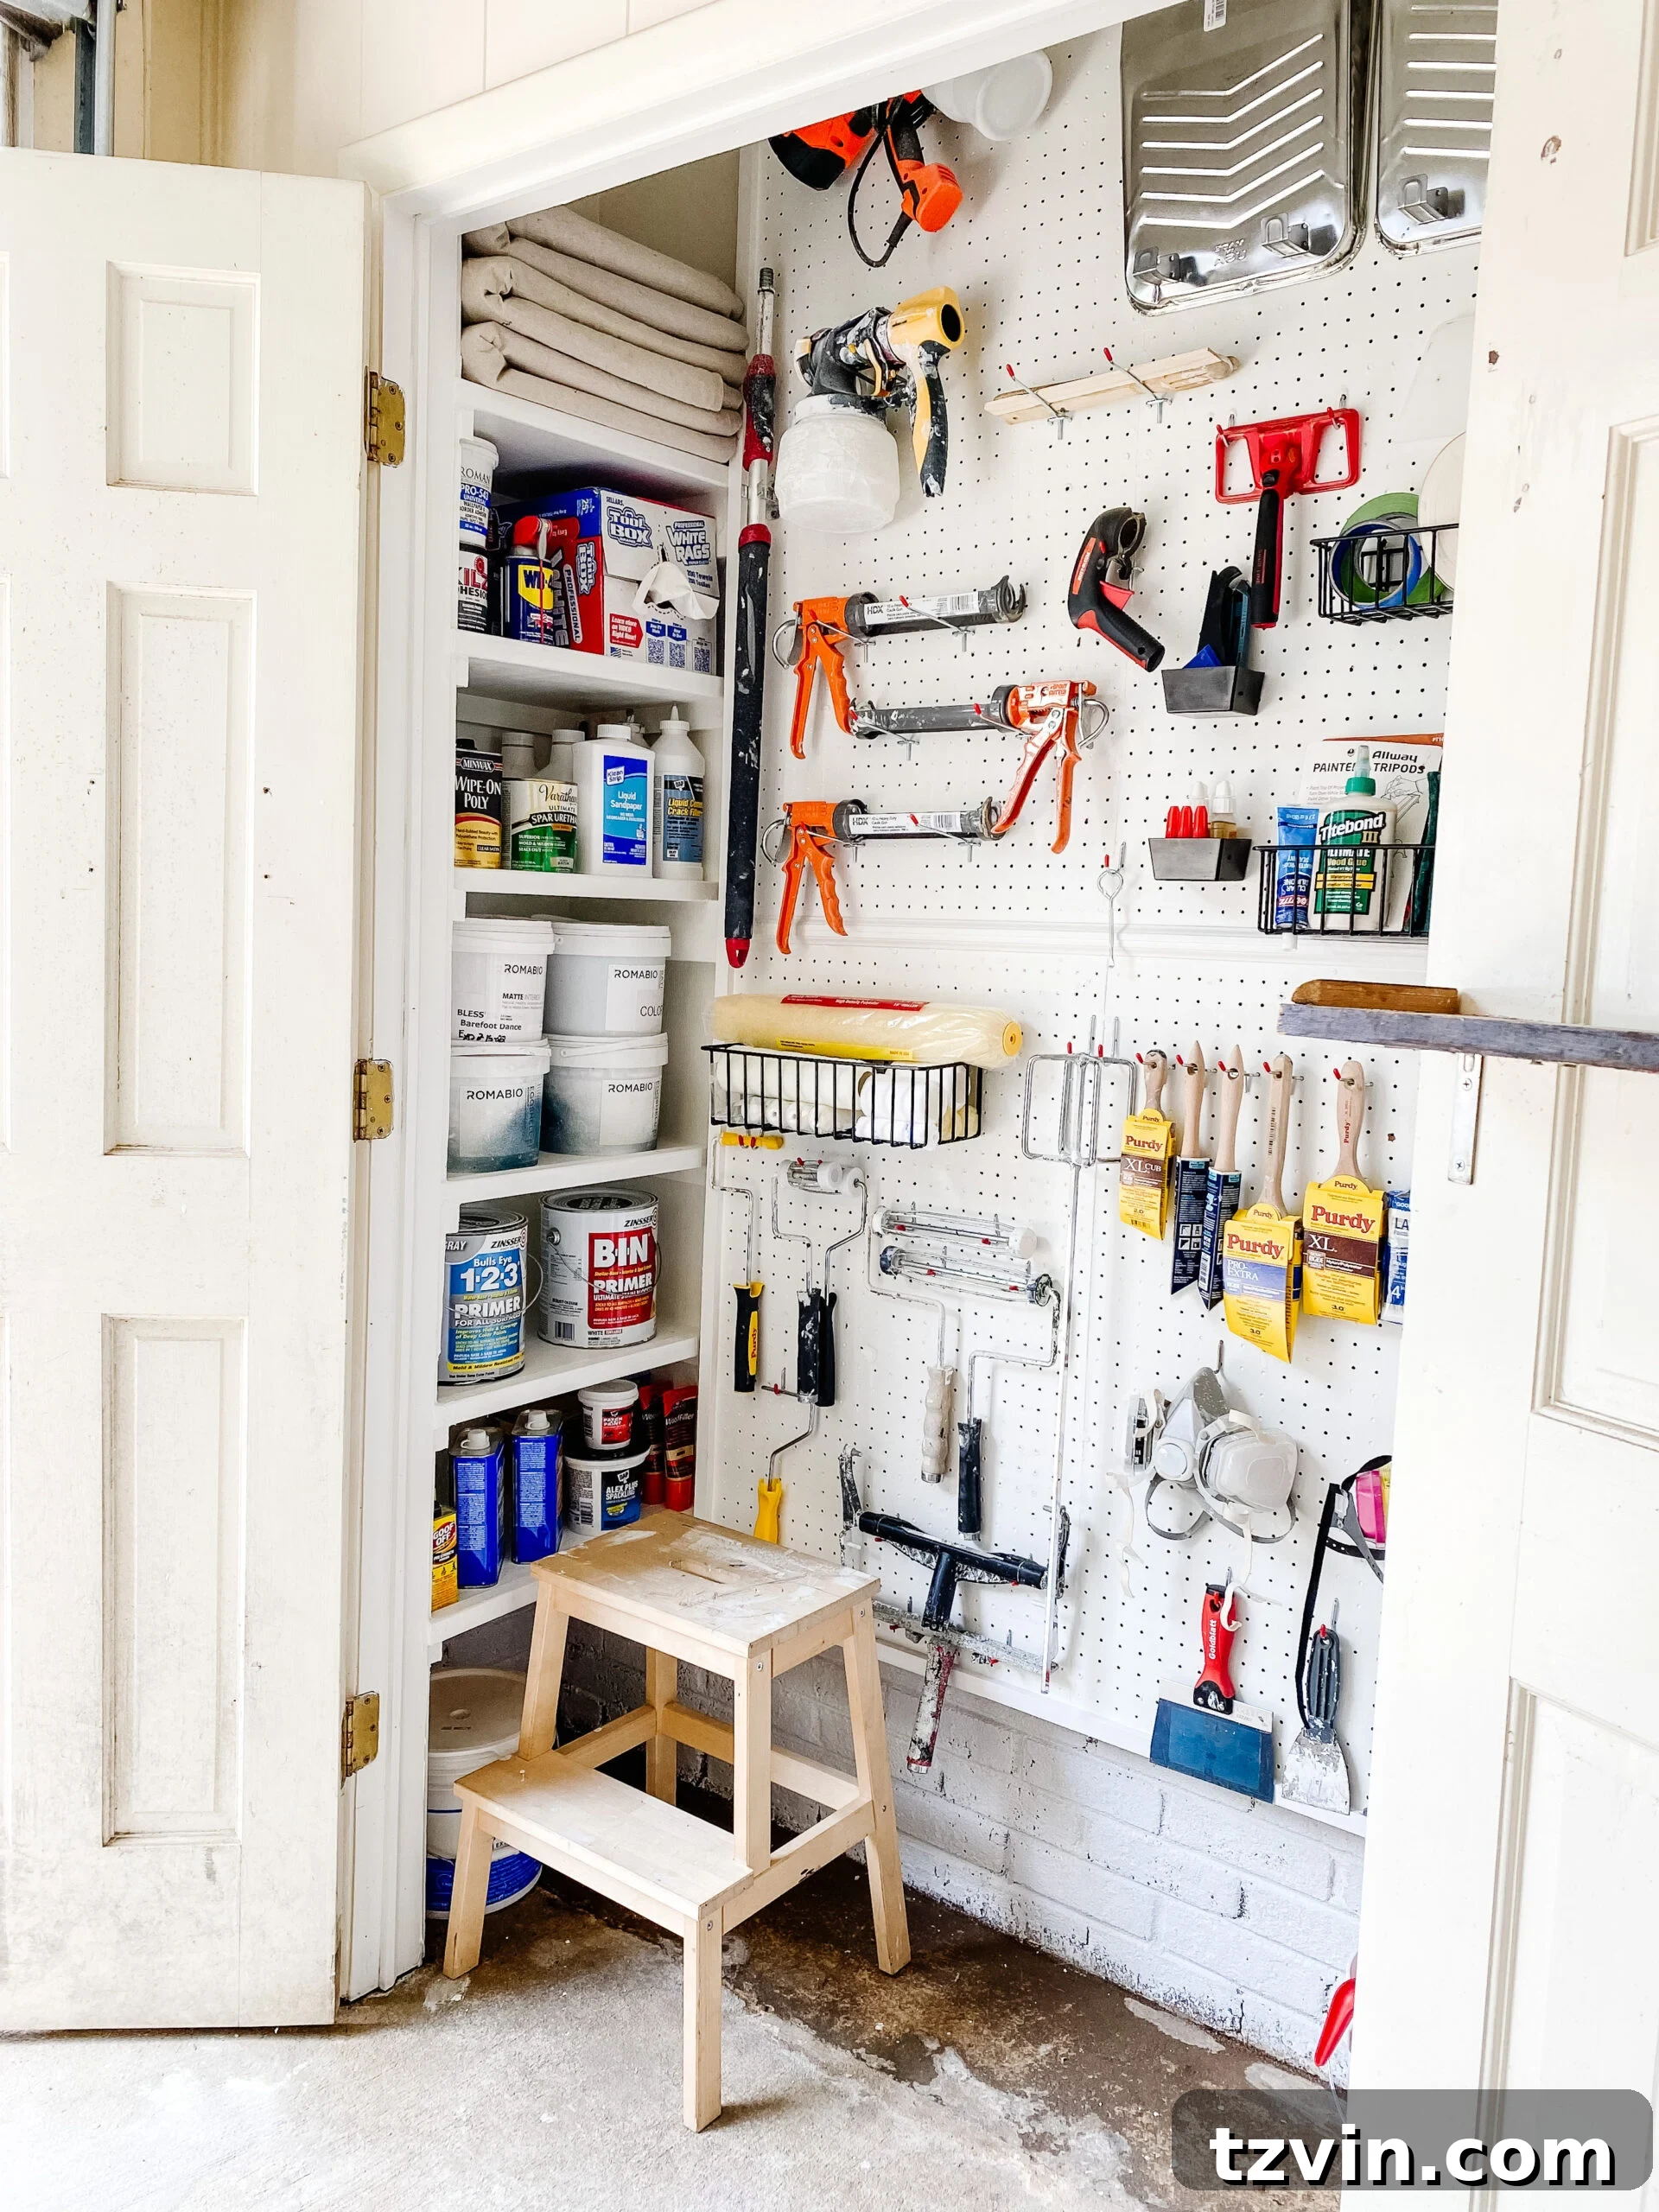
While some people prefer meticulously labeled shelves, we opted against it for this particular system. Our reasoning was simple: we wanted maximum flexibility. As supplies are used up or new projects dictate different needs, the ability to easily shift items around without relabeling is invaluable. This keeps the system adaptable and stress-free, perfect for a dynamic DIY environment. However, for those who thrive on precise labeling, a reliable simple label maker can be a fantastic tool for countless organizing projects around the home, ensuring every item has a clear designation.
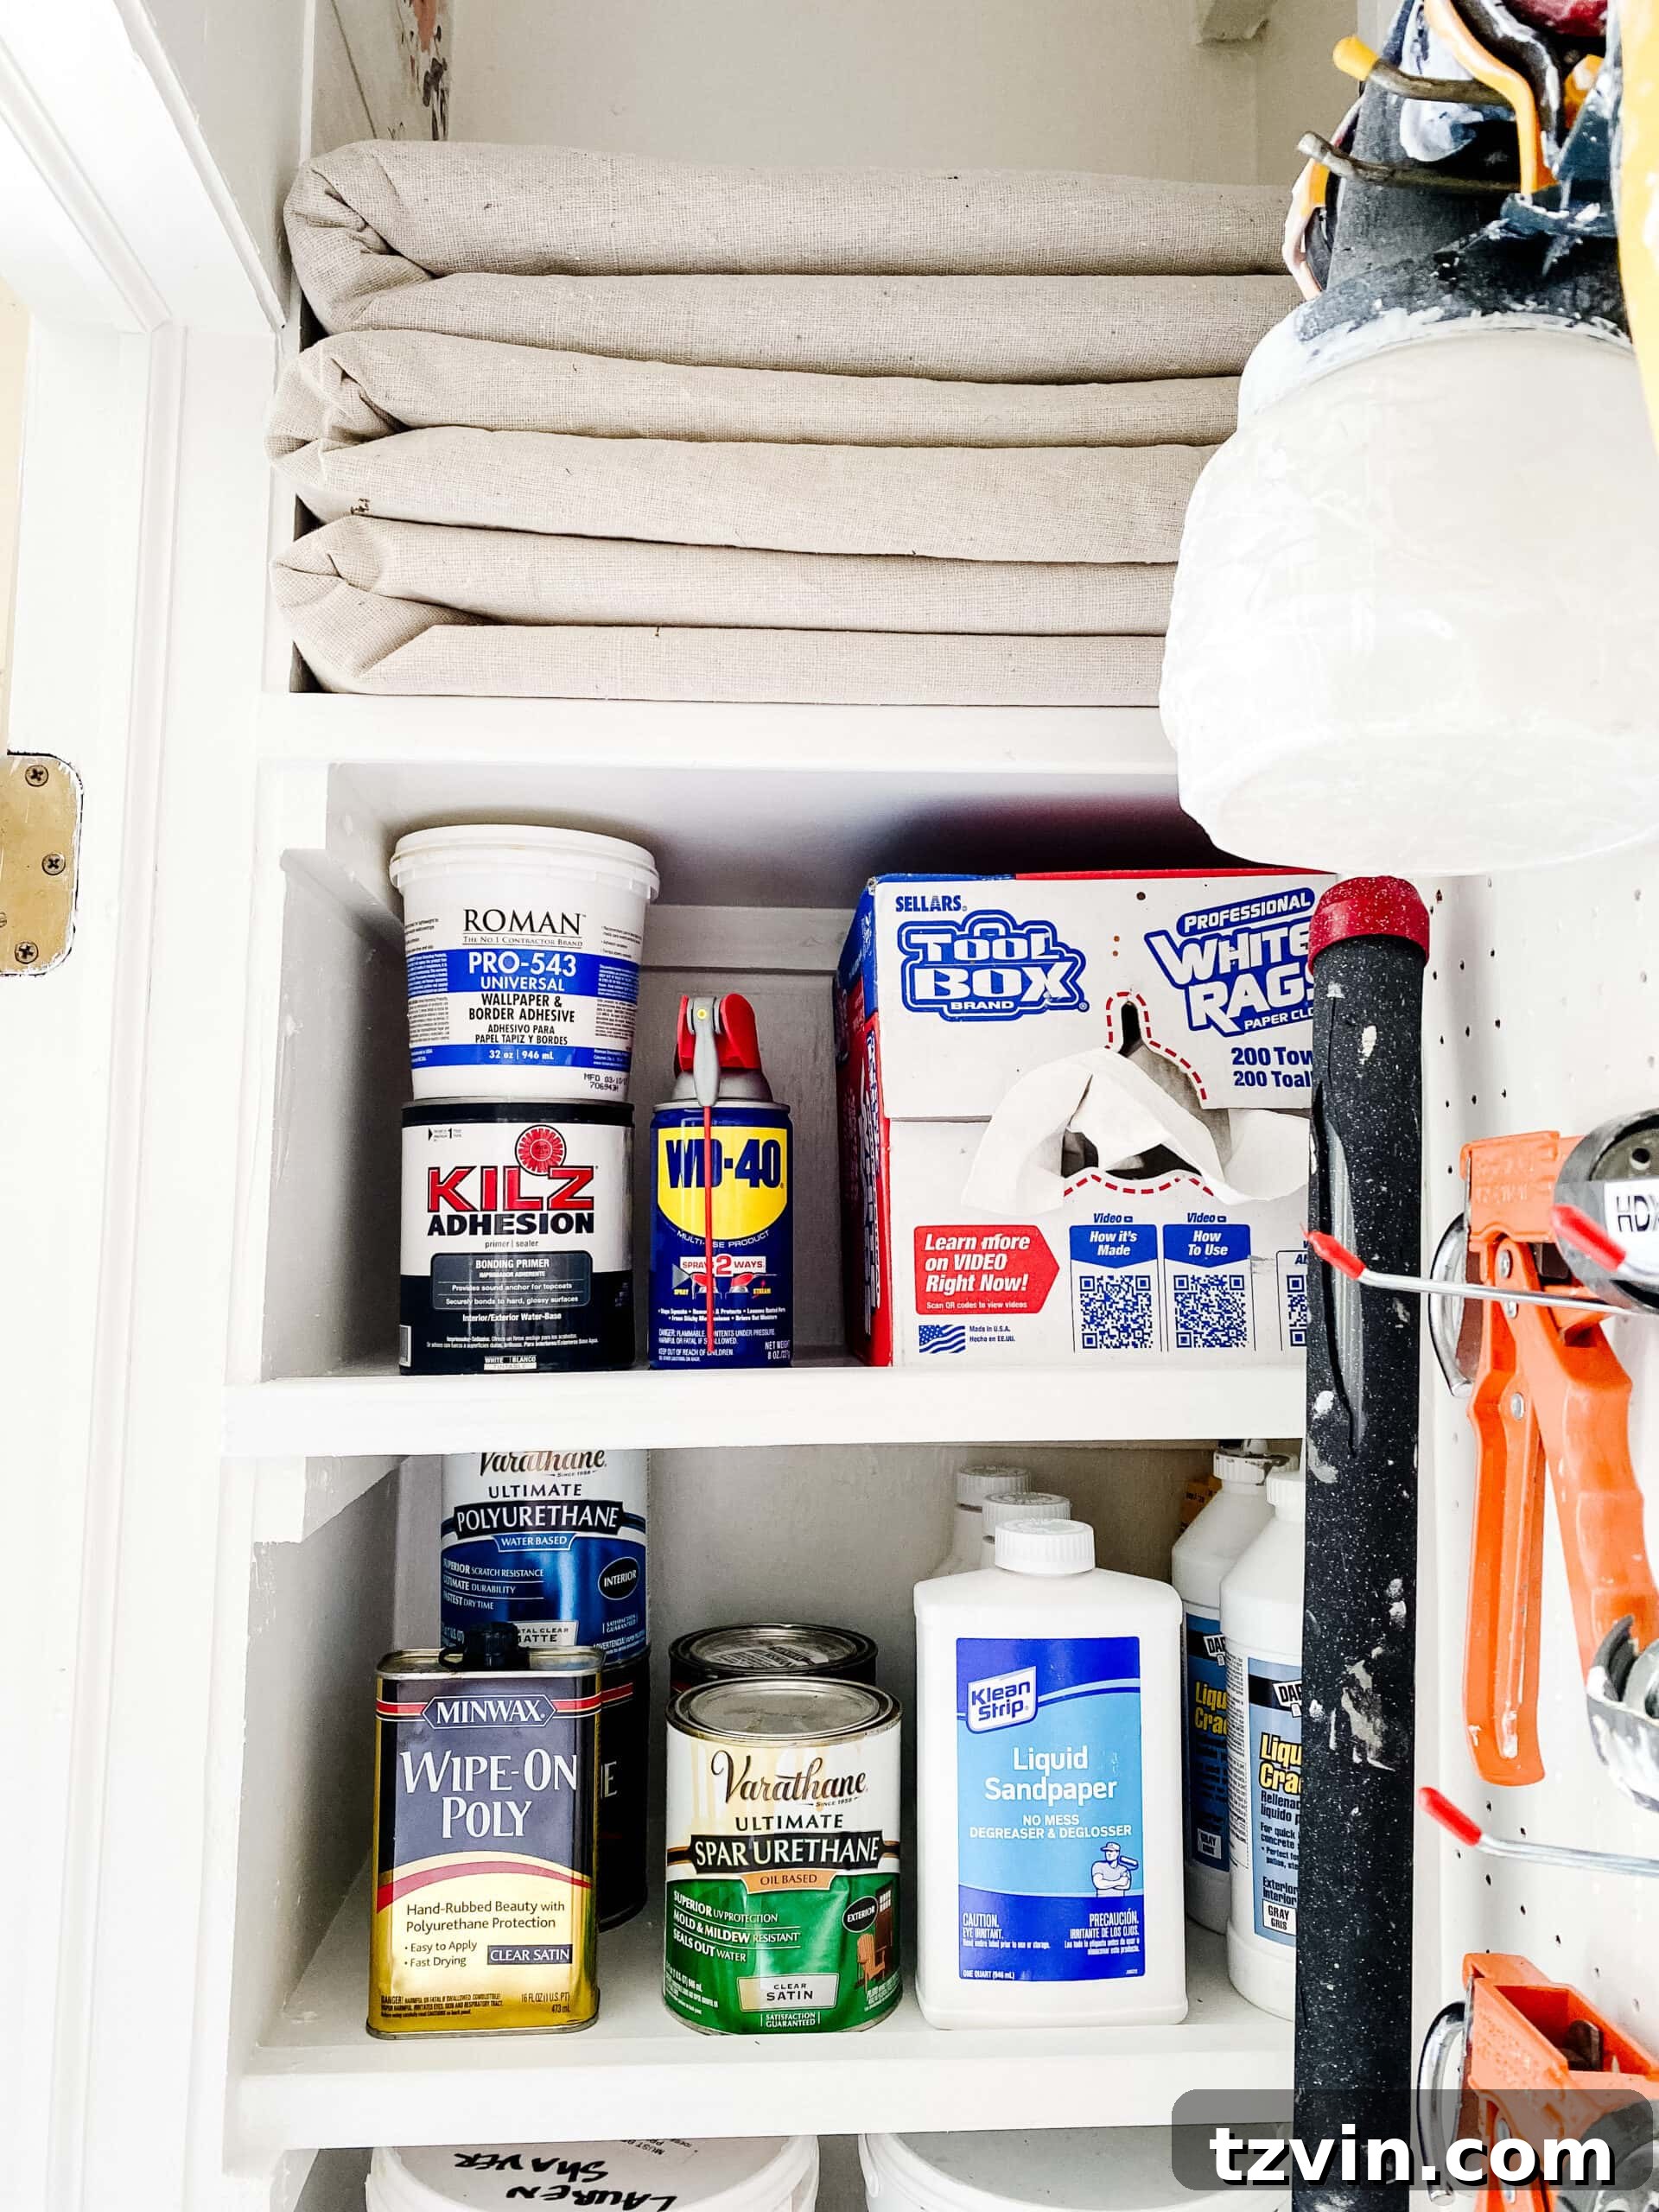
Smart Strategies for Storing Paint: Maximize Space & Minimize Waste
One of the biggest challenges in paint organization is managing partially used cans. Over time, these can accumulate into an overwhelming collection, taking up valuable space and often going bad before they’re ever used again. Implementing smart strategies for storing old paint is crucial for maintaining an efficient and clutter-free system. Here are our top tips for effective paint storage and decluttering:
Only Keep What You Truly Plan to Use: This is perhaps the most important rule. Be realistic about what paint you’ll actually use again. We typically maintain a stock of common neutrals—white, black, and various shades of gray—in satin, eggshell, and semi-gloss finishes, as these are frequently needed for touch-ups or small projects. However, it’s easy to reach a point, as we did, where you have fifty or more partially used cans of various colors. It’s highly unlikely these will all be used within a couple of years before their quality degrades, leading to wasted product and valuable storage space consumed. Instead of letting them gather dust and solidify, consider giving them a new purpose. Unused or nearly full cans of paint can often be donated to local organizations like Habitat for Humanity ReStores, where they can be put to good use for community projects or sold at a discount, benefiting a worthy cause and reducing landfill waste.
Save Just Enough for Paint Touch-Ups: Before you decide to toss or donate those older, less-used paints, think about preserving a small amount for future touch-ups. This simple trick can save you a trip to the paint store later on. Instead of storing large, bulky cans, pour a small quantity of each desired color into smaller, airtight containers. We highly recommend using specialized paint touch-up cups. These cups are specifically designed to keep paint airtight for extended periods and often come with a built-in labeling system, allowing you to easily note the room or area the paint was used in, along with the date. Many also include a mixing ball, eliminating the need for a stir stick when you need a quick, seamless touch-up around your home. This approach significantly reduces the bulk of stored paint while ensuring you always have the right shade for minor repairs, extending the life of your paint colors and maximizing your storage efficiency.
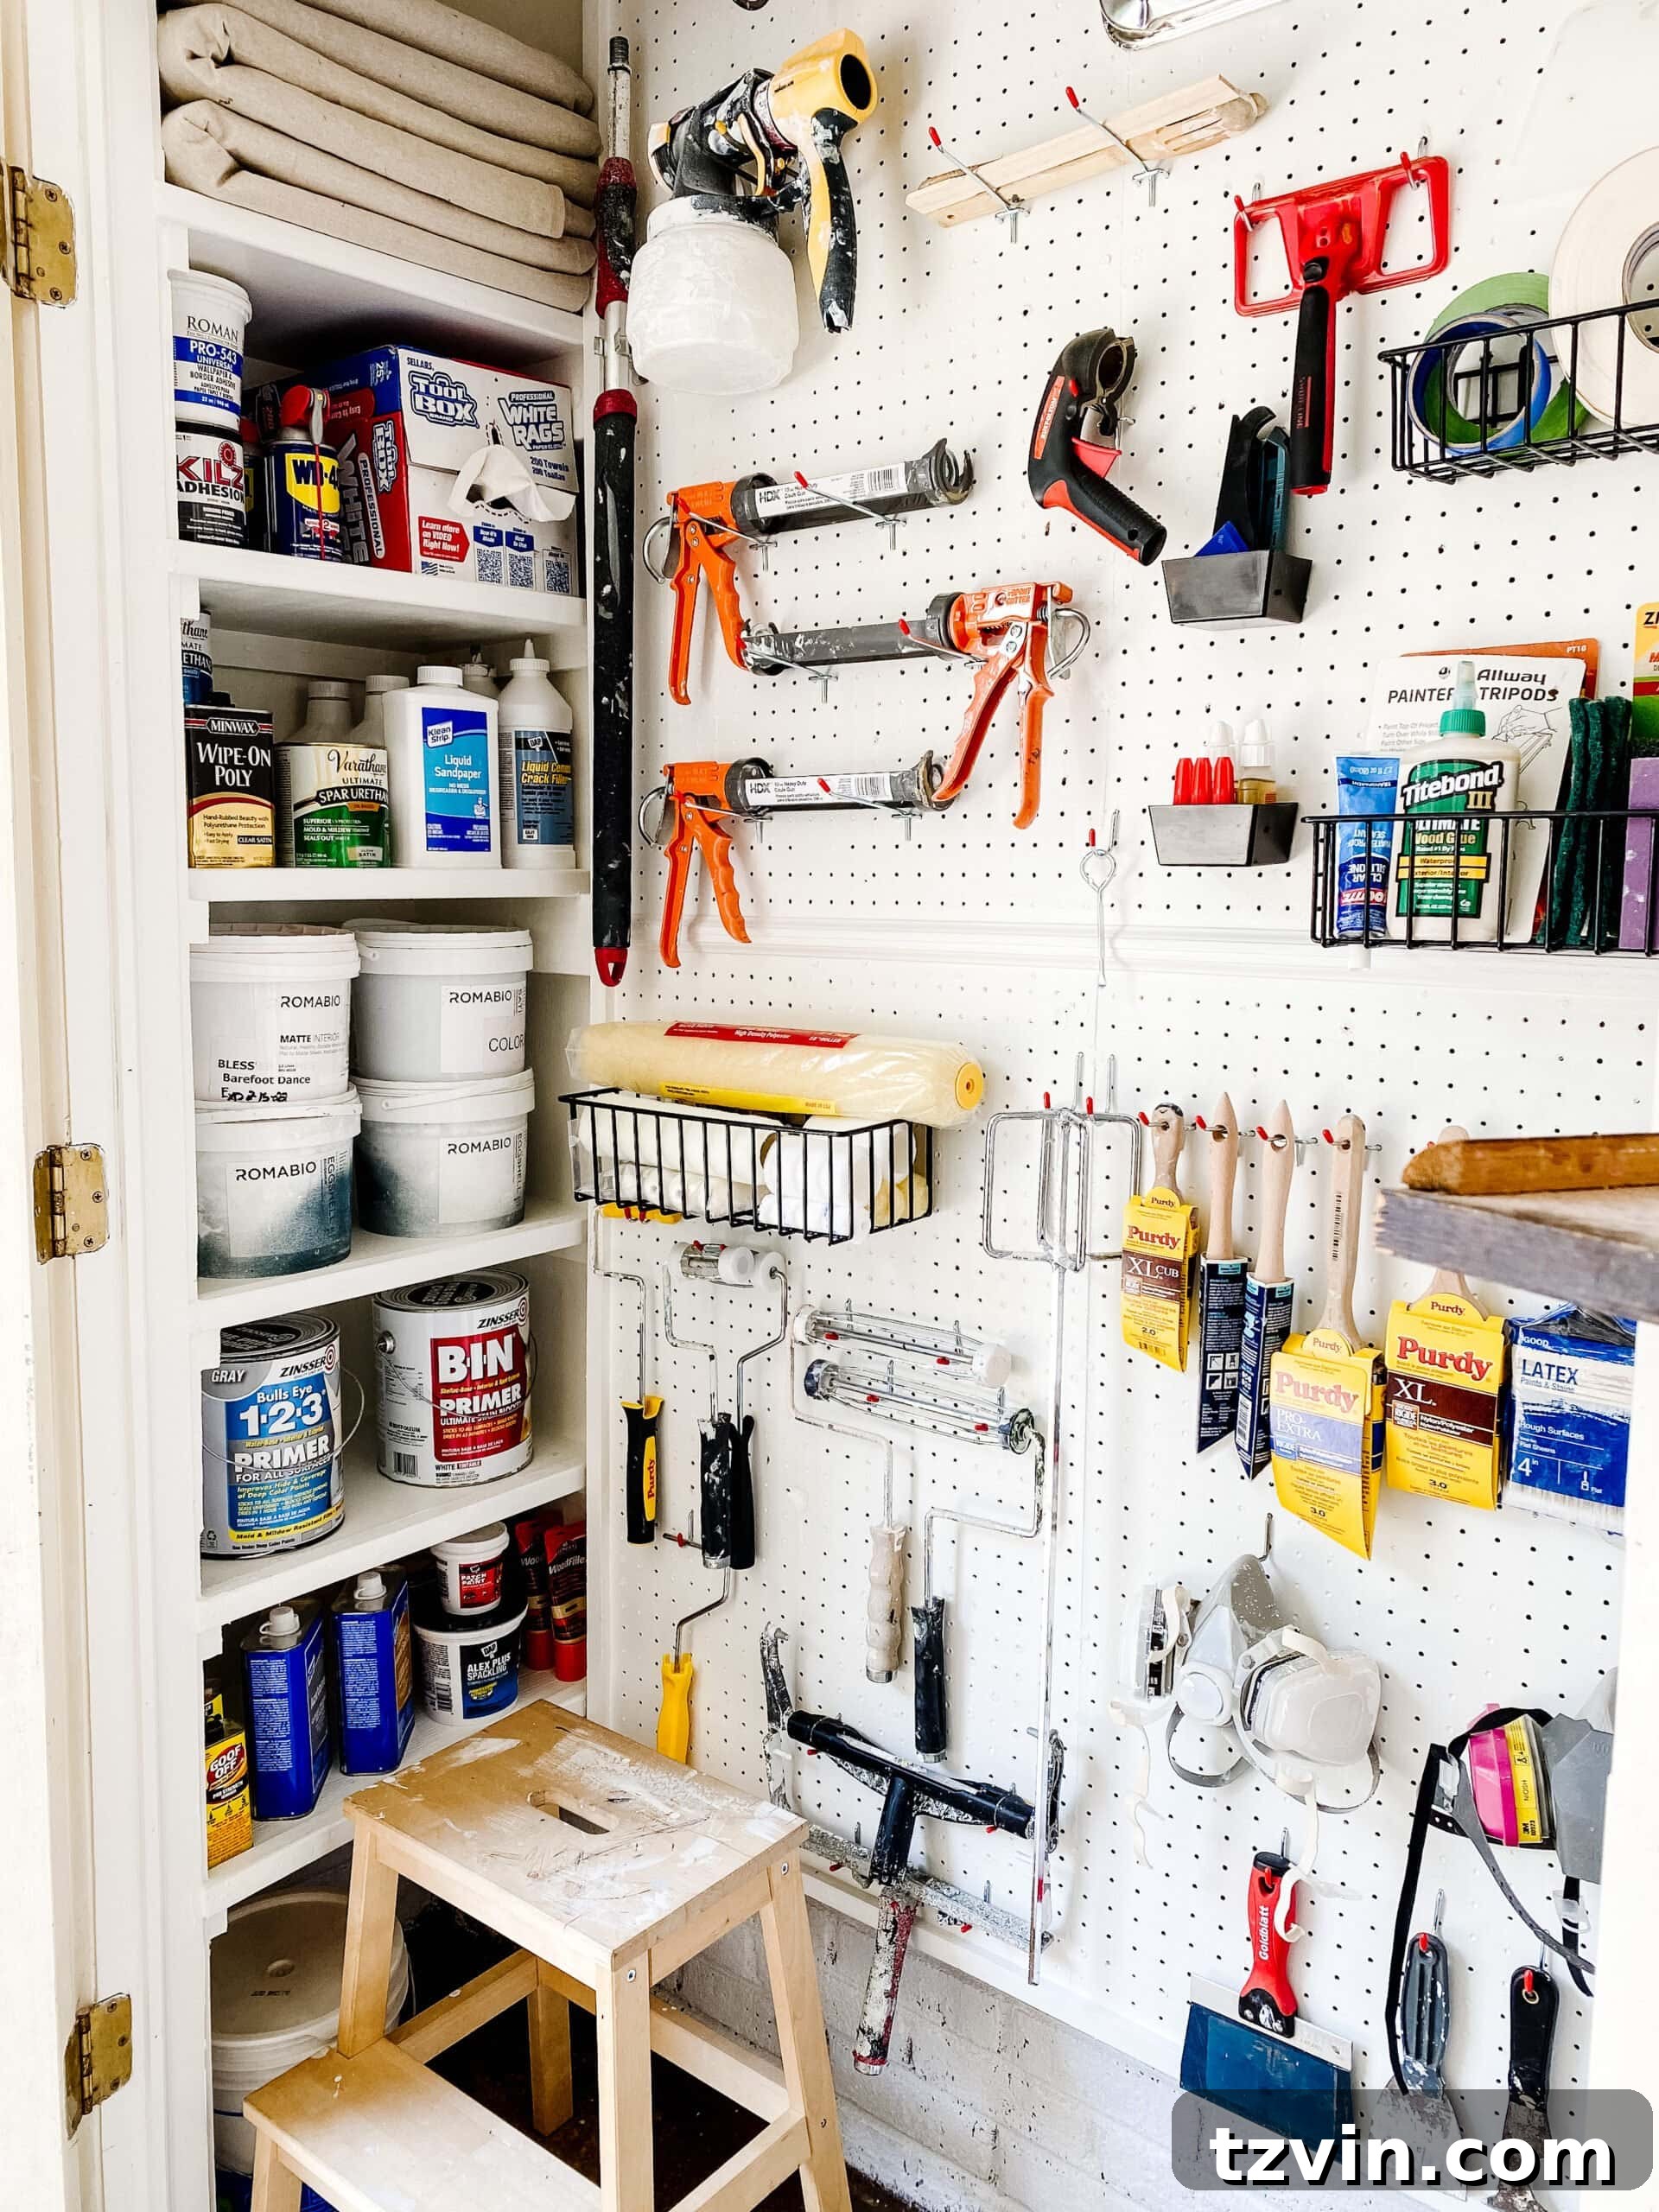
Custom Solutions: Building DIY Paint Storage Shelves
Maximizing every square inch of a utility closet, especially one with awkward nooks and crannies, is paramount for effective organization. Our secret weapon for this was custom-built DIY paint storage shelves. By following our reliable basic DIY closet shelving tutorial, we were able to create bespoke storage solutions using materials we already had on hand – primarily scrap 1x2s and plywood. This approach embodies the spirit of practical DIY, transforming waste into functional assets.
This method allowed us to construct shelves that perfectly fit into the narrow, often unusable spaces beside the door frame. Consider that skinny section on the right in the images, which was previously dead space. With our custom shelves, it was transformed into a highly functional area for smaller, frequently used items. This is a testament to the principle that every inch counts when organizing a compact space! These narrow shelves proved to be the perfect caulk storage idea, providing an accessible home for the numerous tubes of caulk we always seem to have on hand, along with other cylindrical spray products like spray paint and primers. This ingenious use of space adds immense value to the overall storage capacity of the closet.
Each custom-built shelf was dedicated to a specific type of item, further enhancing the systematic organization and making it easy to grab exactly what’s needed:
- Spray paint cans, organized by color or finish
- Spray primer cans, for quick surface preparation
- Caulk tubes, for sealing and finishing tasks
- Construction adhesive tubes, for various bonding needs
- Various spray adhesives, for craft or repair projects
This dedicated placement ensures that when you reach for a specific item, you know exactly where to find it, eliminating frustrating searches and improving workflow. DIY shelving, even simple ones, makes a significant difference in how efficiently a small space can function, turning potential dead space into invaluable storage for your paint supplies.
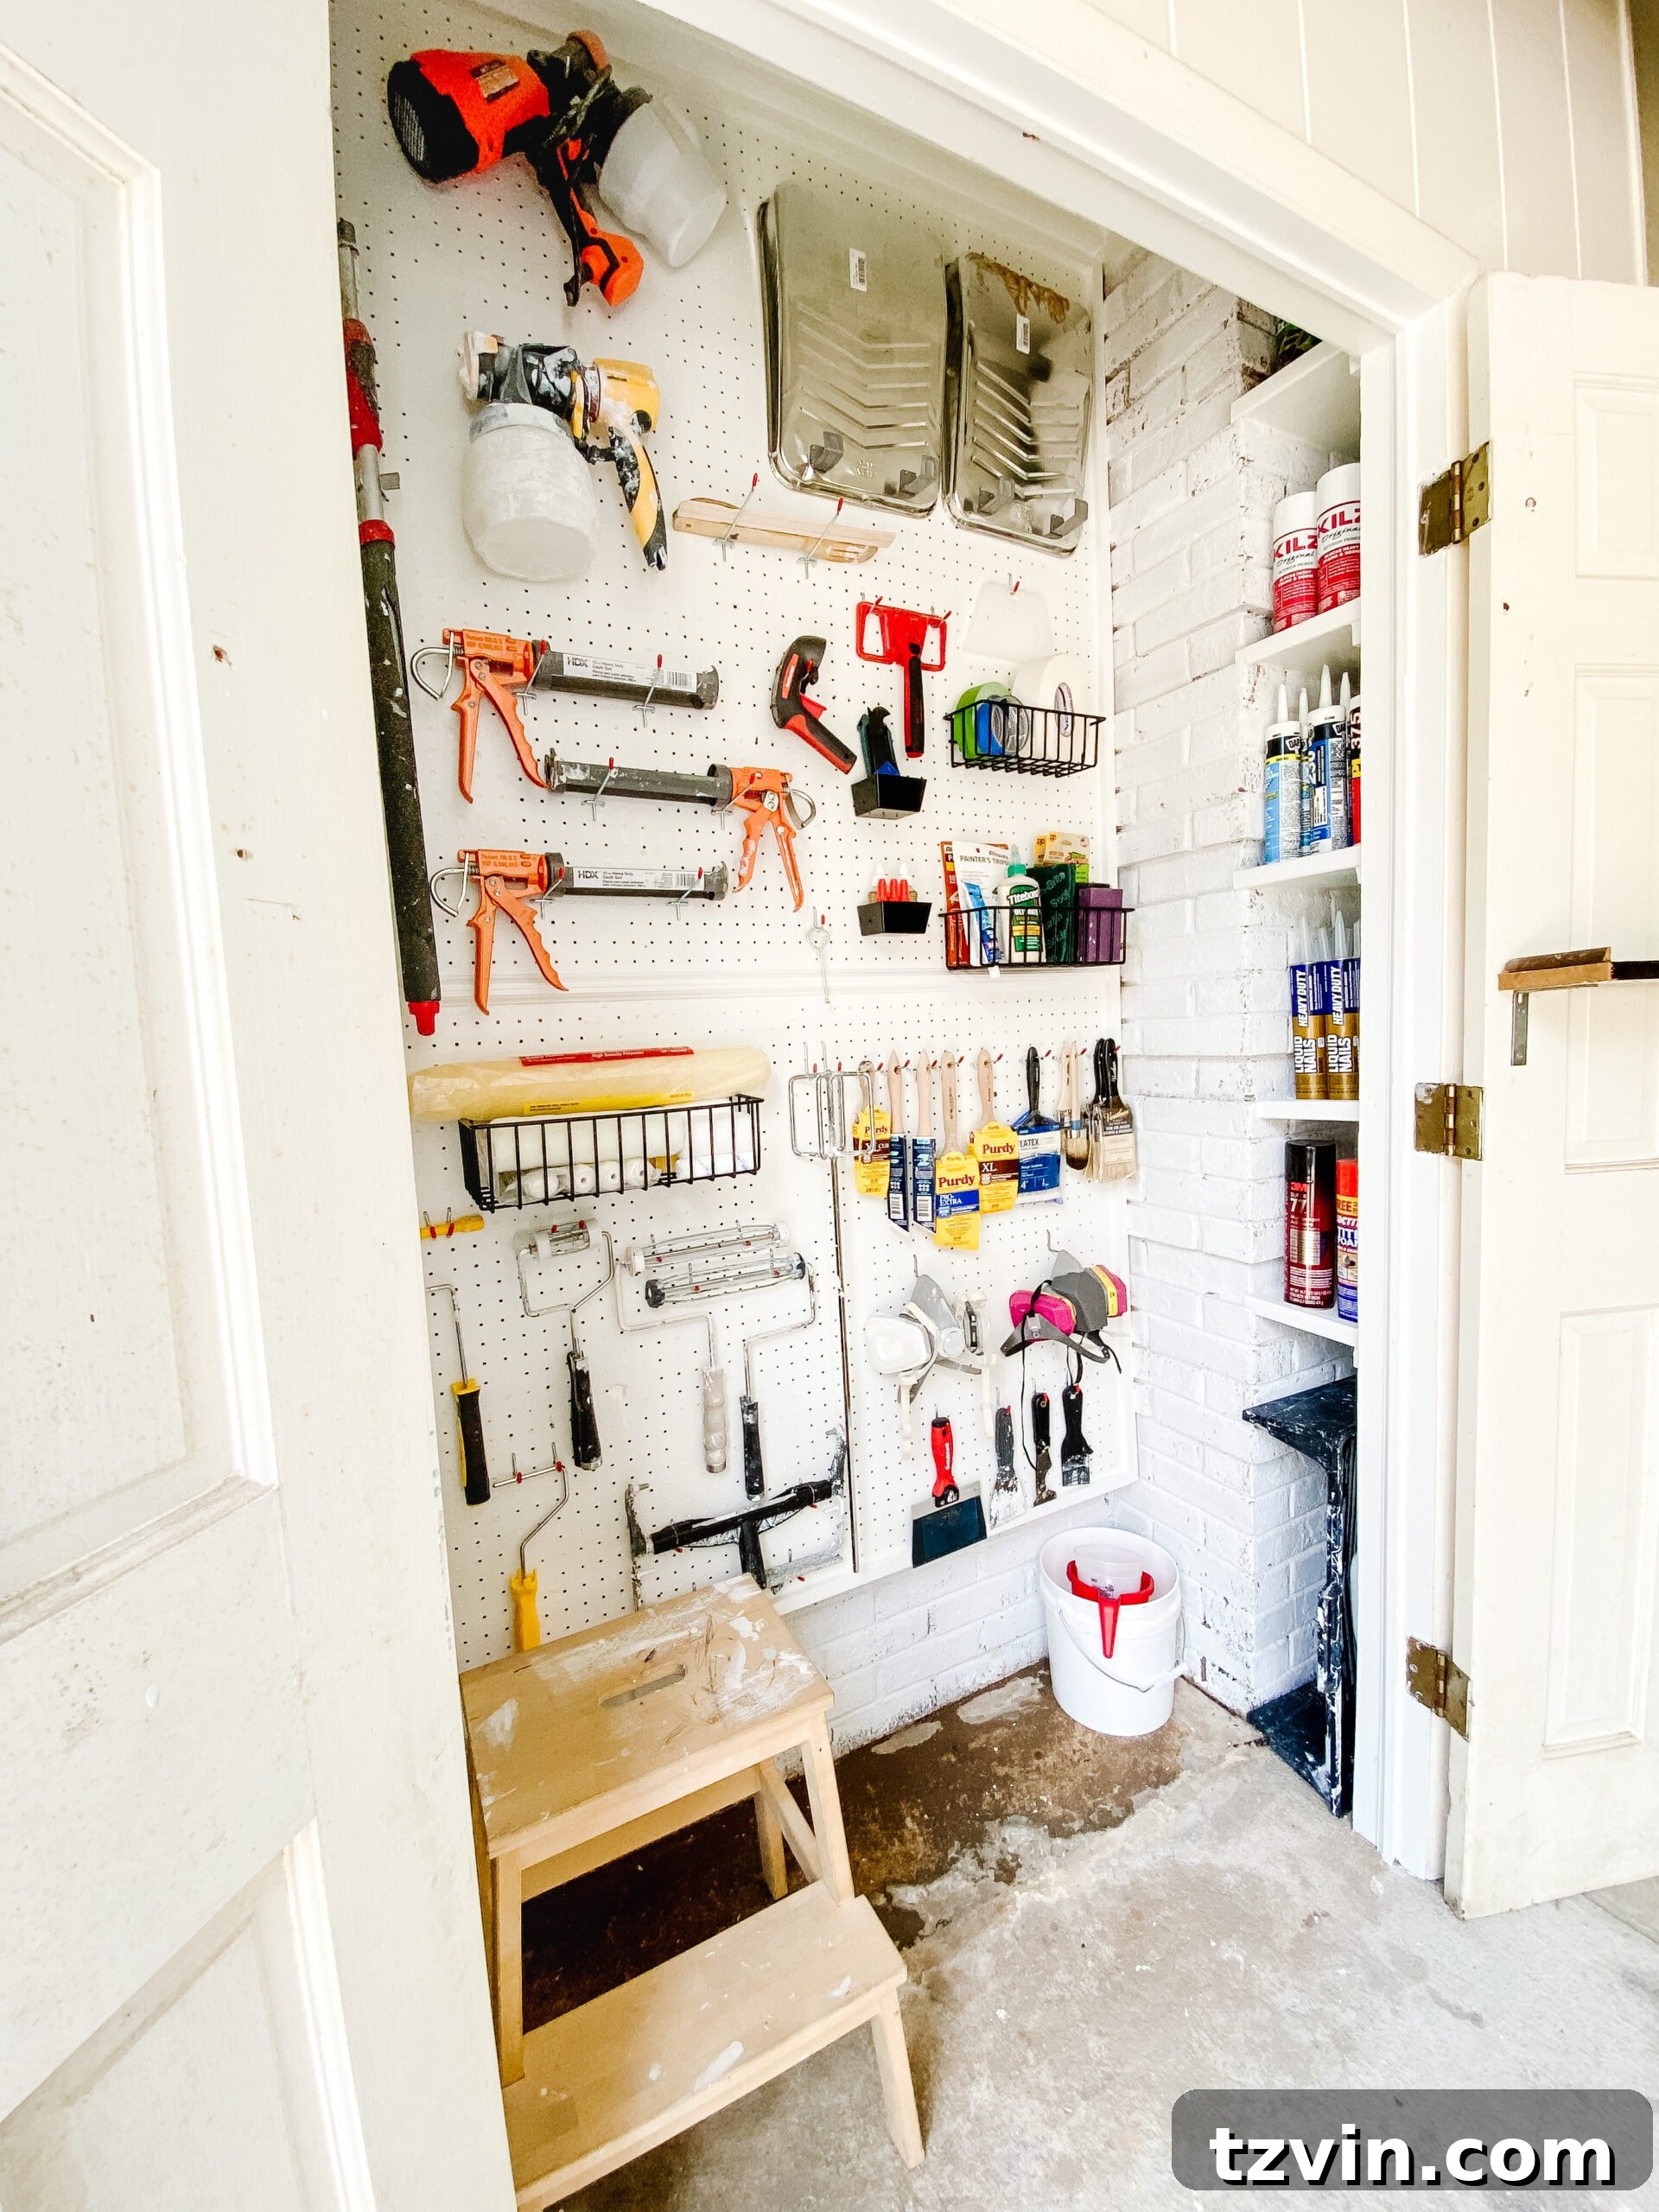
Revolutionizing Tool Storage with Pegboard Systems
While shelves are excellent for bulkier items, the vertical real estate of a pegboard system is truly transformative for organizing a wide array of paint tools and smaller supplies. The combination of a robust pegboard organizer kit and versatile pegboard baskets became our saving grace in making sense of the myriad paint supply essentials. This dynamic duo allowed us to bring order to items that typically end up in drawers or scattered haphazardly, making it a cornerstone of our effective paint supply storage strategy.
Think about the typical painting arsenal: brushes of various sizes and types, rollers and their frames, rolls of painter’s tape, paint trays, a sprayer, caulk guns, putty knives, masking paper, and more. Before the pegboard, these items were often piled together, making it difficult to locate what was needed quickly, leading to frustration and wasted time during projects. Now, with the pegboard system, each item has a visible, dedicated home, vastly improving efficiency and preventing damage to delicate tools.
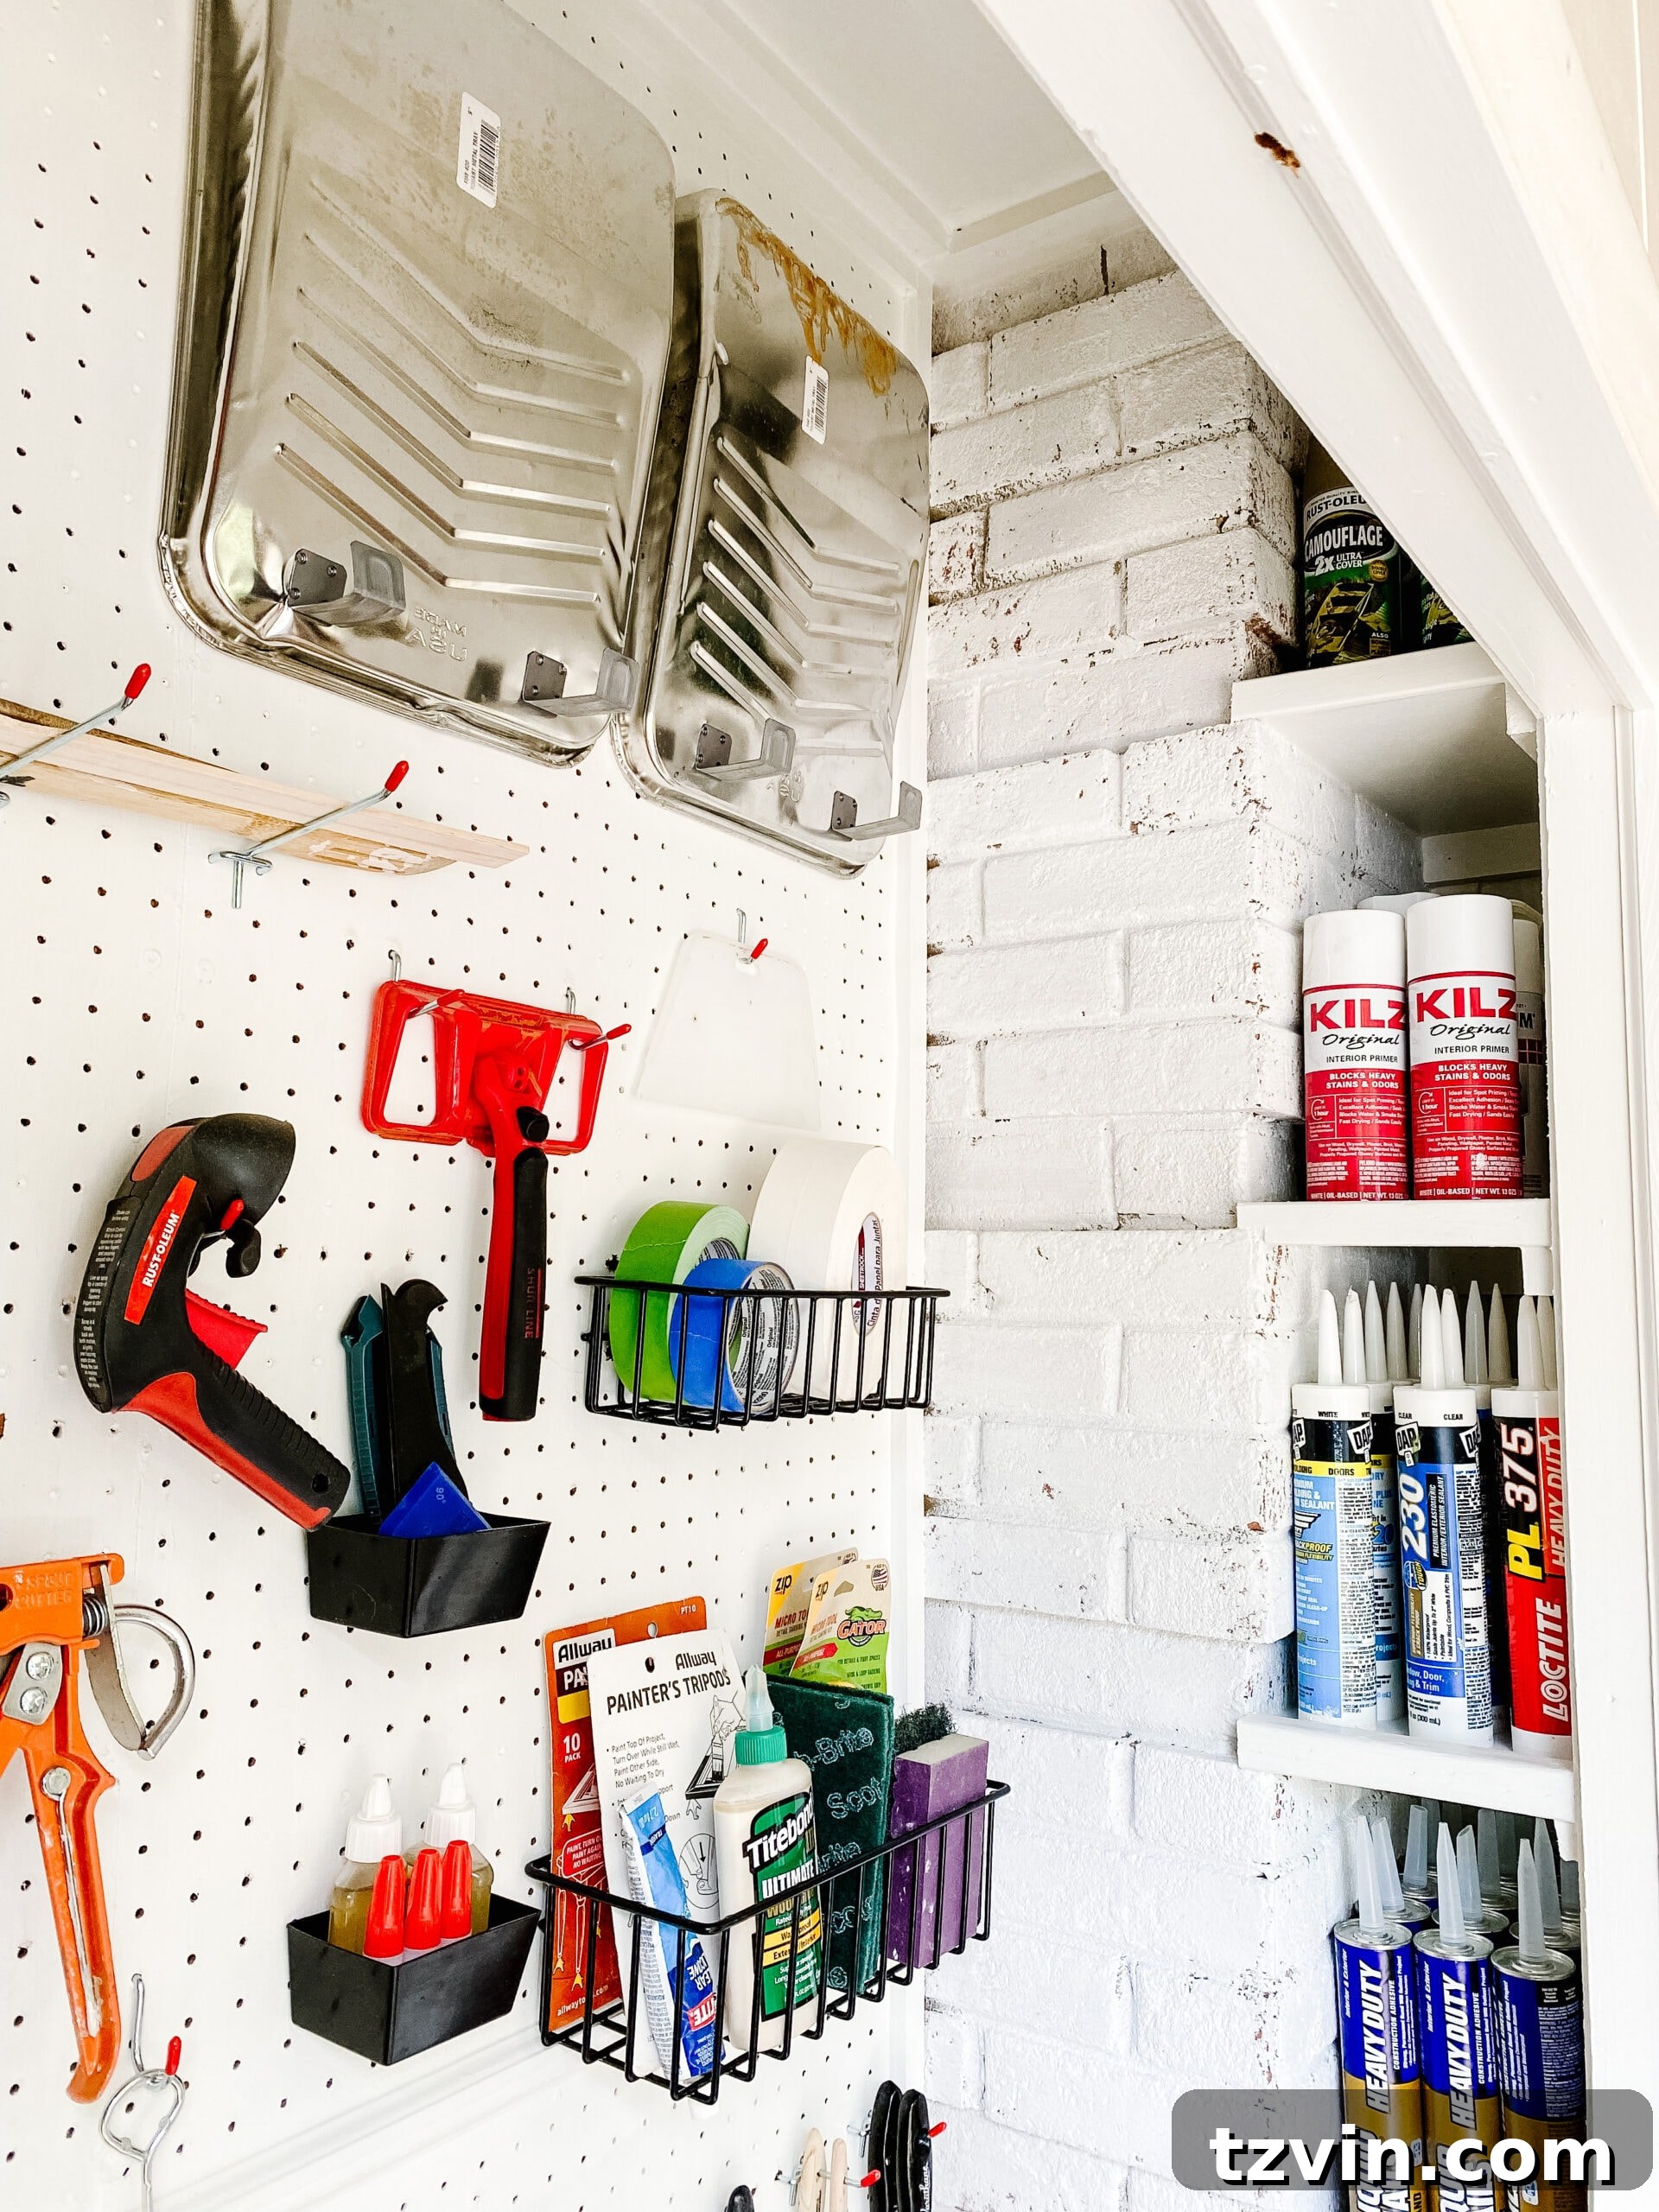
For smaller, loose items like sanding pads, rolls of tape, and specialized caulking tools, the pegboard baskets are indispensable. They prevent these tiny but crucial components from getting lost or creating clutter on shelves, ensuring they are always at hand. The beauty of a comprehensive pegboard kit lies in its variety; ours came with an abundance of hangers and hooks, offering endless possibilities for custom arrangements. This enabled us to hang virtually everything else – from paintbrushes and rollers to caulking guns and scrapers – ensuring optimal visibility and easy access for any painting task.
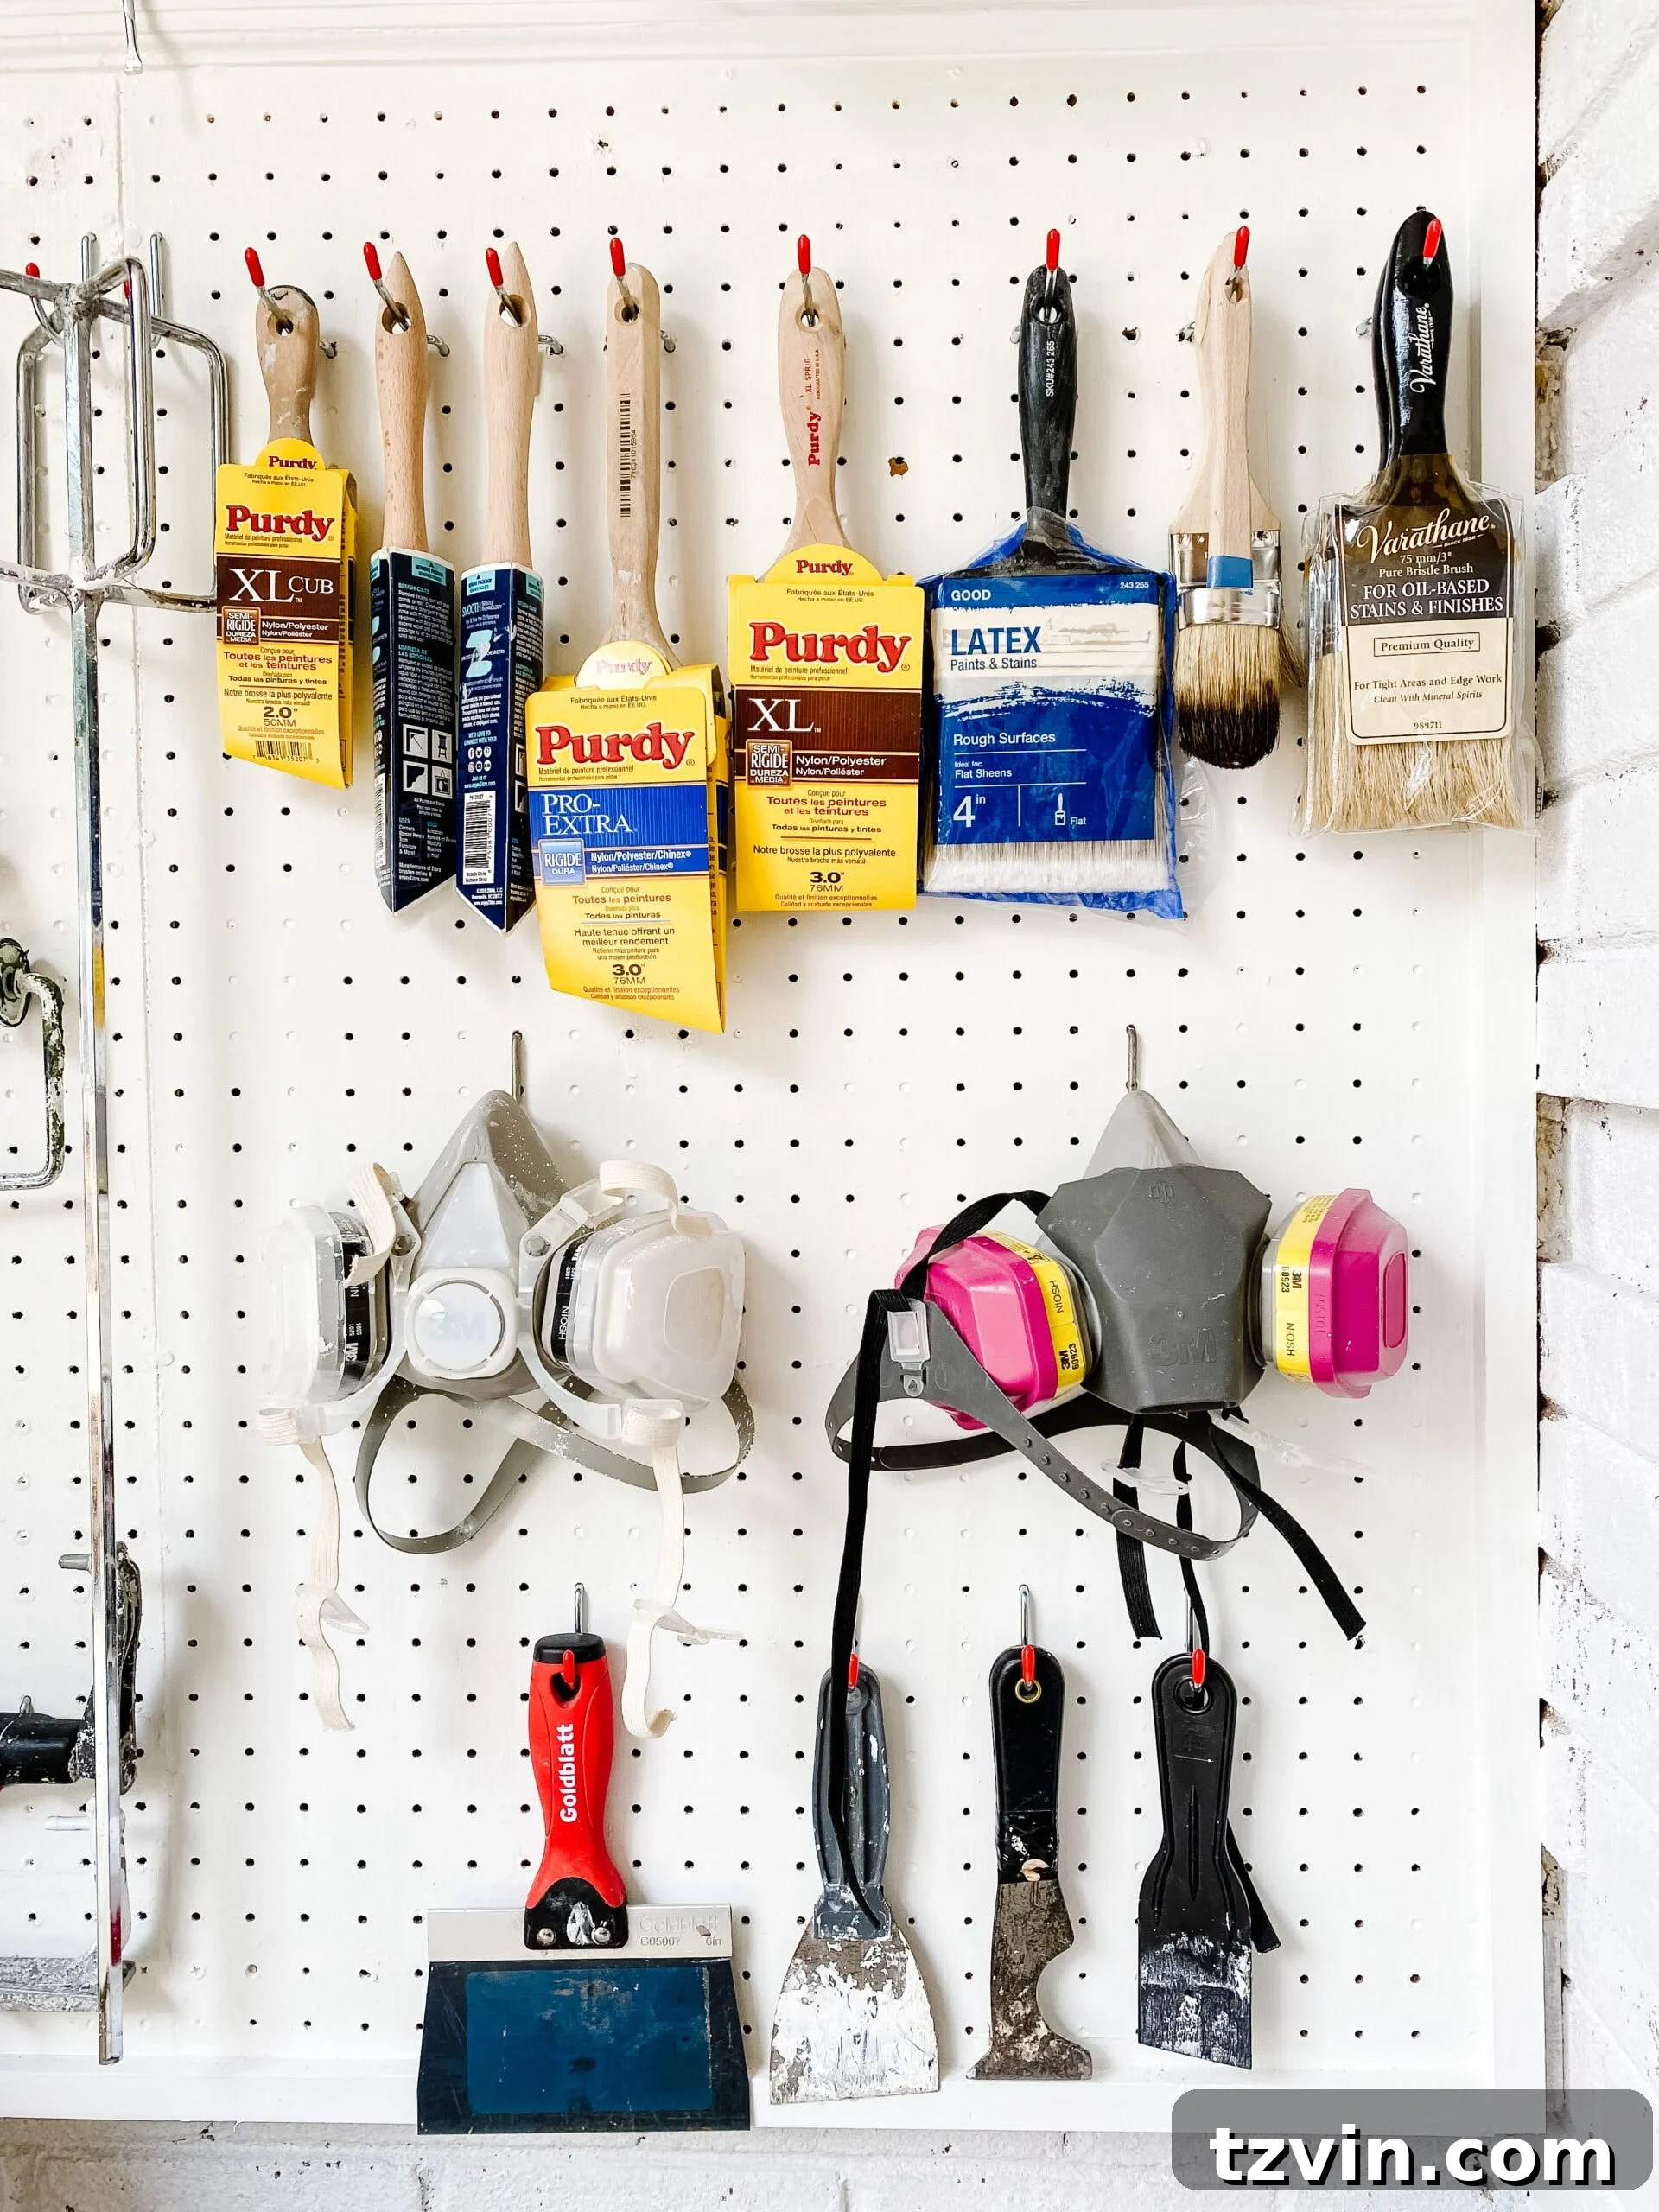
A particularly clever trick for paintbrush storage involves hanging them bristles down. This method is incredibly practical; after washing brushes thoroughly, they can be hung damp, allowing any residual water to drip directly onto the floor rather than accumulating within the brush handle. This not only promotes faster and more complete drying but also helps preserve the integrity and longevity of your brushes, preventing damage to the ferrules (the metal band) and ensuring they maintain their shape and effectiveness for countless future projects. It’s a small detail that makes a big difference in maintaining your valuable tools.
For the few bulkier items that don’t fit on shelves or pegboard, such as large paint buckets, cans of paint that are currently in use, or a small step stool, the floor of the paint storage closet serves as a natural, easily accessible resting spot. Keeping these items on the floor ensures they are out of the way but still within immediate reach when a project calls for them, maintaining the overall tidiness of the space without over-stuffing shelves or hooks.
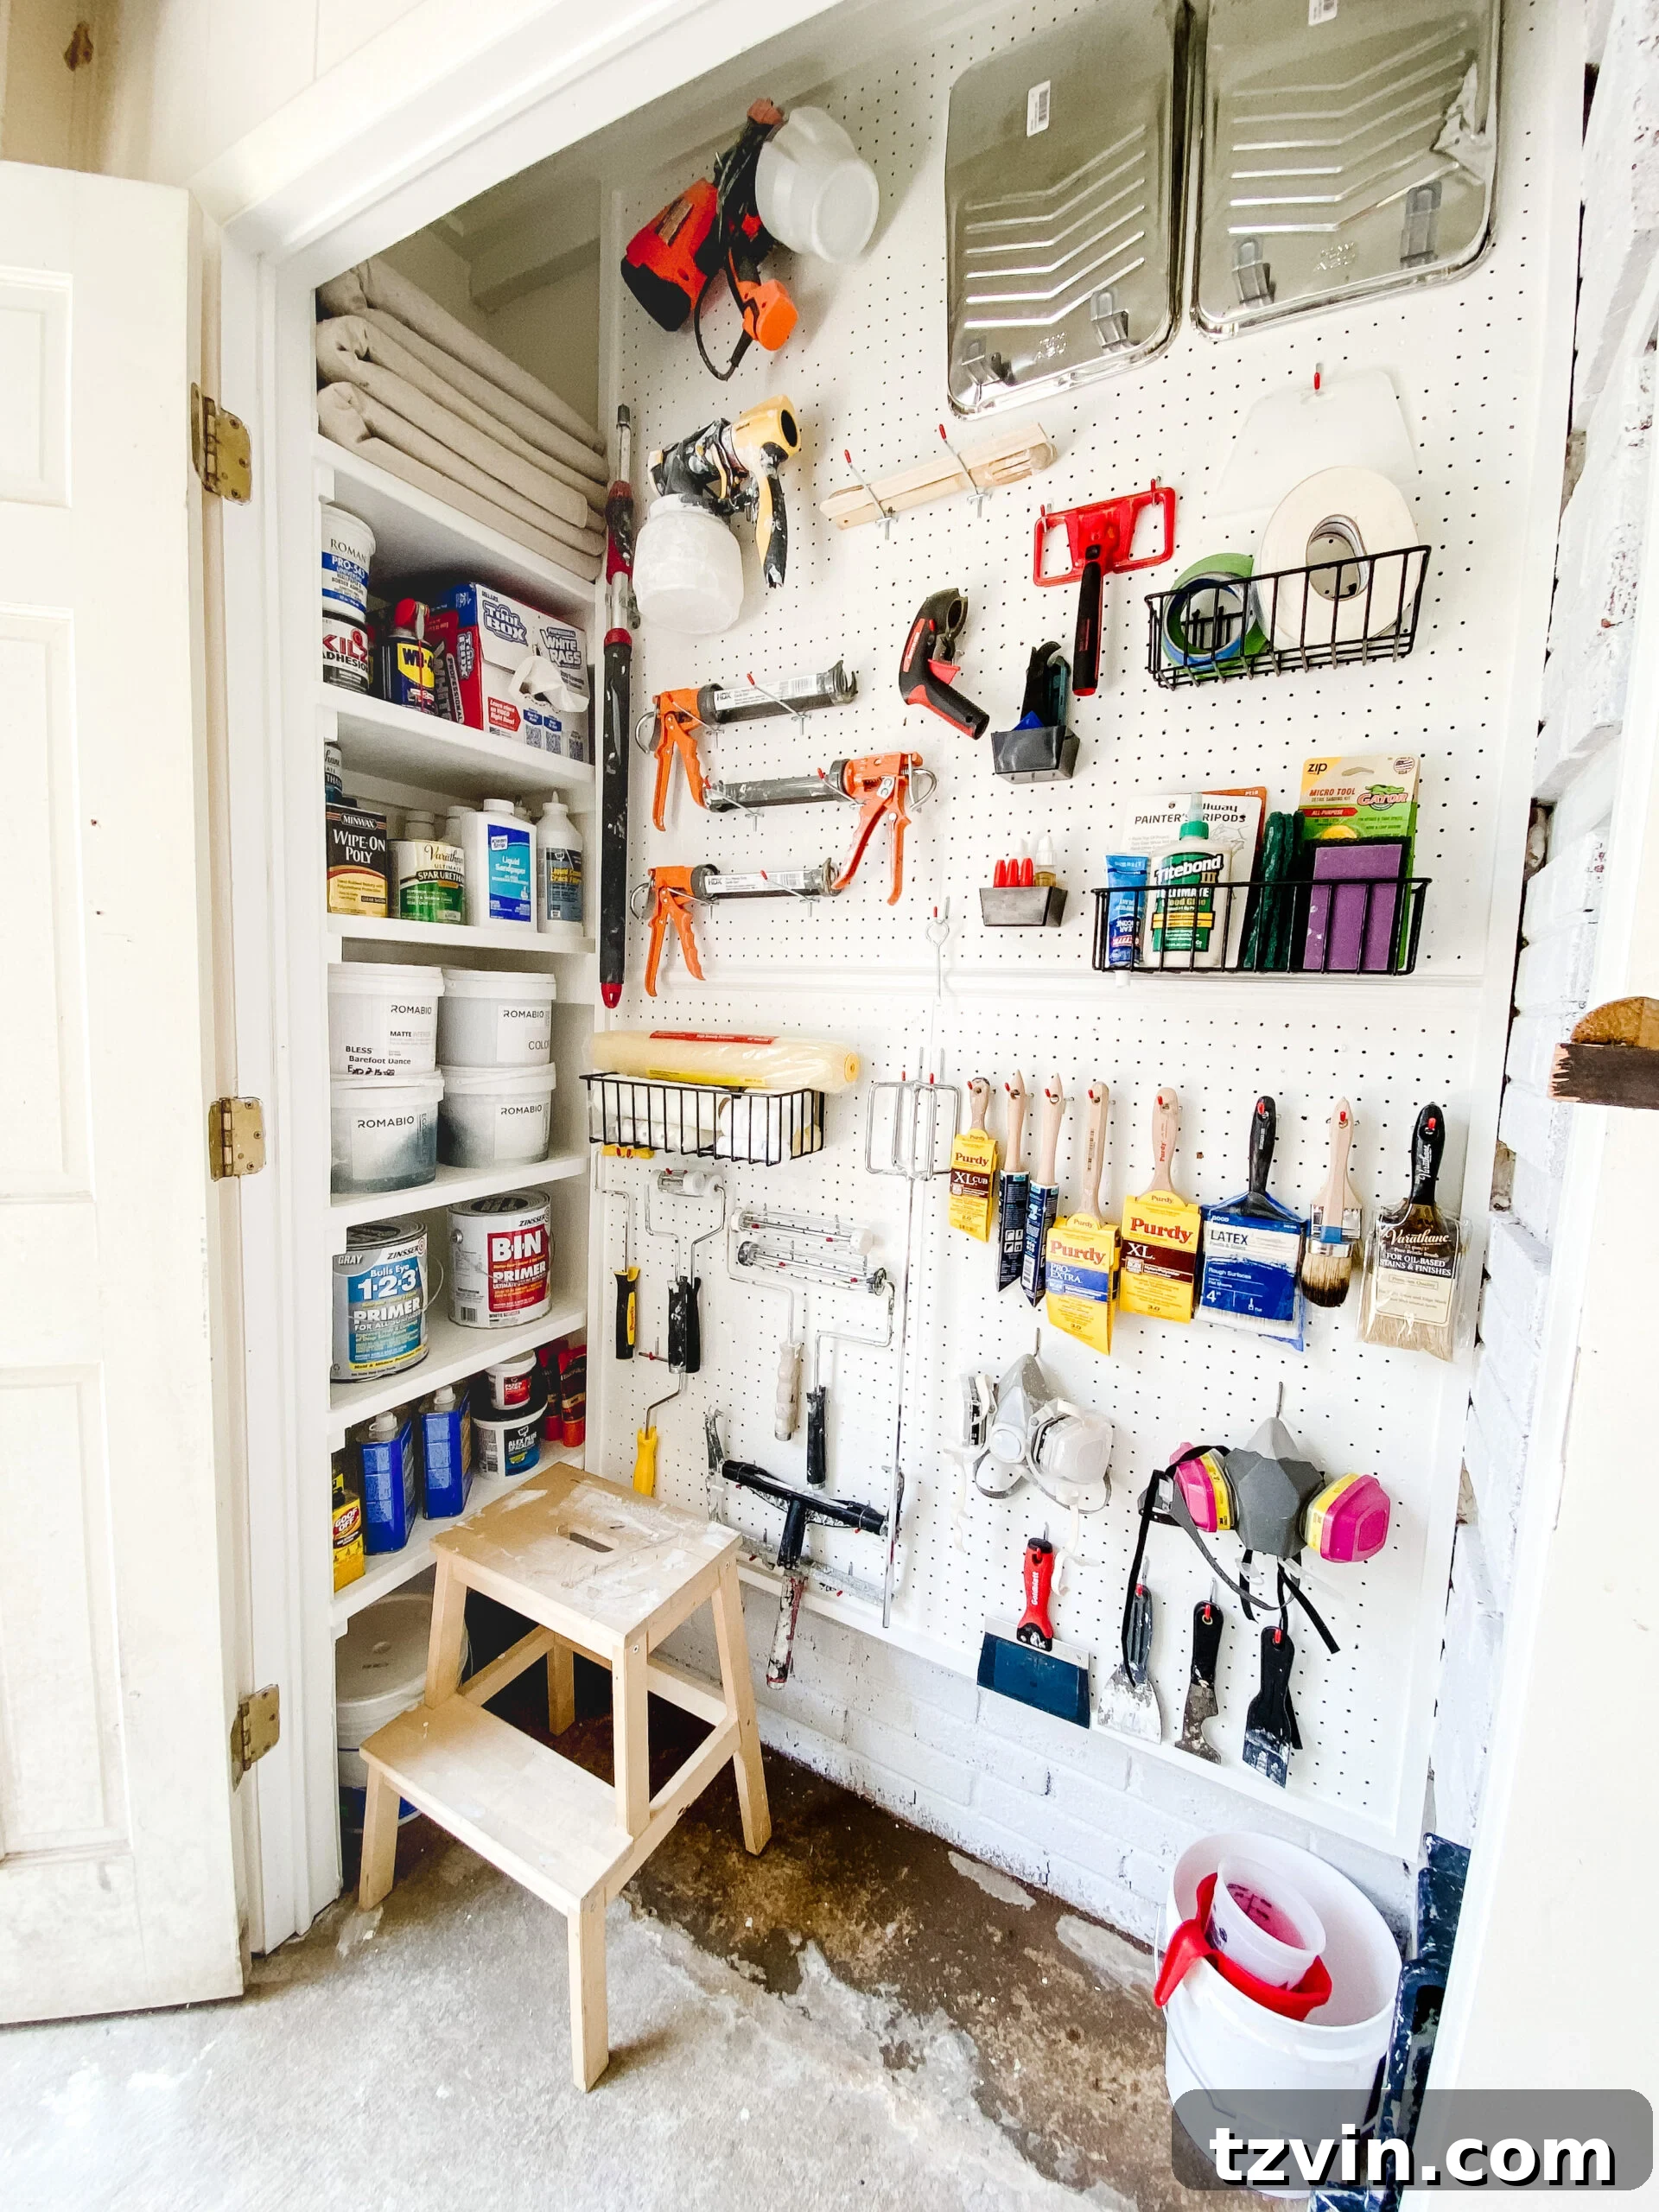
And there you have it – our fully organized paint storage system! It’s a testament to the fact that effective organization doesn’t require elaborate or overly fancy solutions. By focusing on practical DIY shelving, the versatility of pegboard, and smart categorization, we’ve transformed a cluttered mess into a highly functional “Paint Central.” While we opted against labeling every single hook and shelf for maximum flexibility, the underlying system provides immense peace of mind. It feels incredibly satisfying to finally know exactly where everything is, eliminating the dread of starting a painting project, even if the rest of the garage still poses its own unique organizational challenges.
This organized paint storage closet, coupled with our previous success in tackling the garden shed supply closet, represents significant progress. We’re slowly but surely conquering the chaos, one closet at a time, proving that consistent effort leads to remarkable transformations!
UPDATE: Expand your garage organization knowledge with all our comprehensive garage organization tips and transformations.
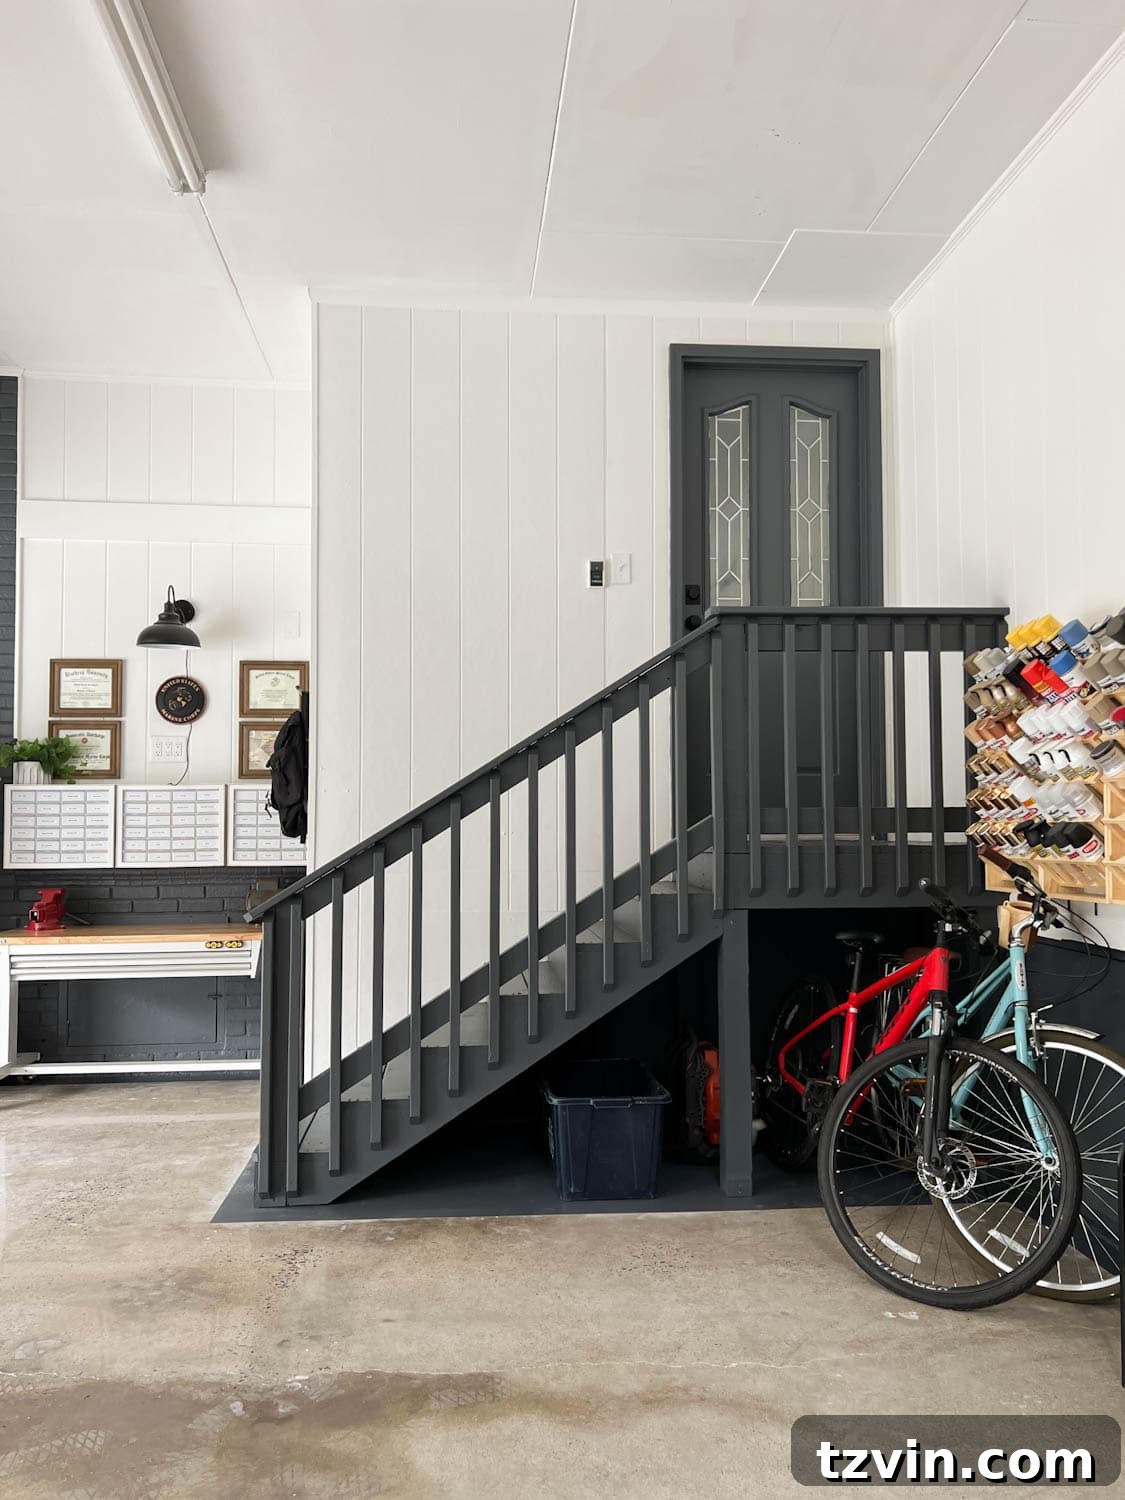
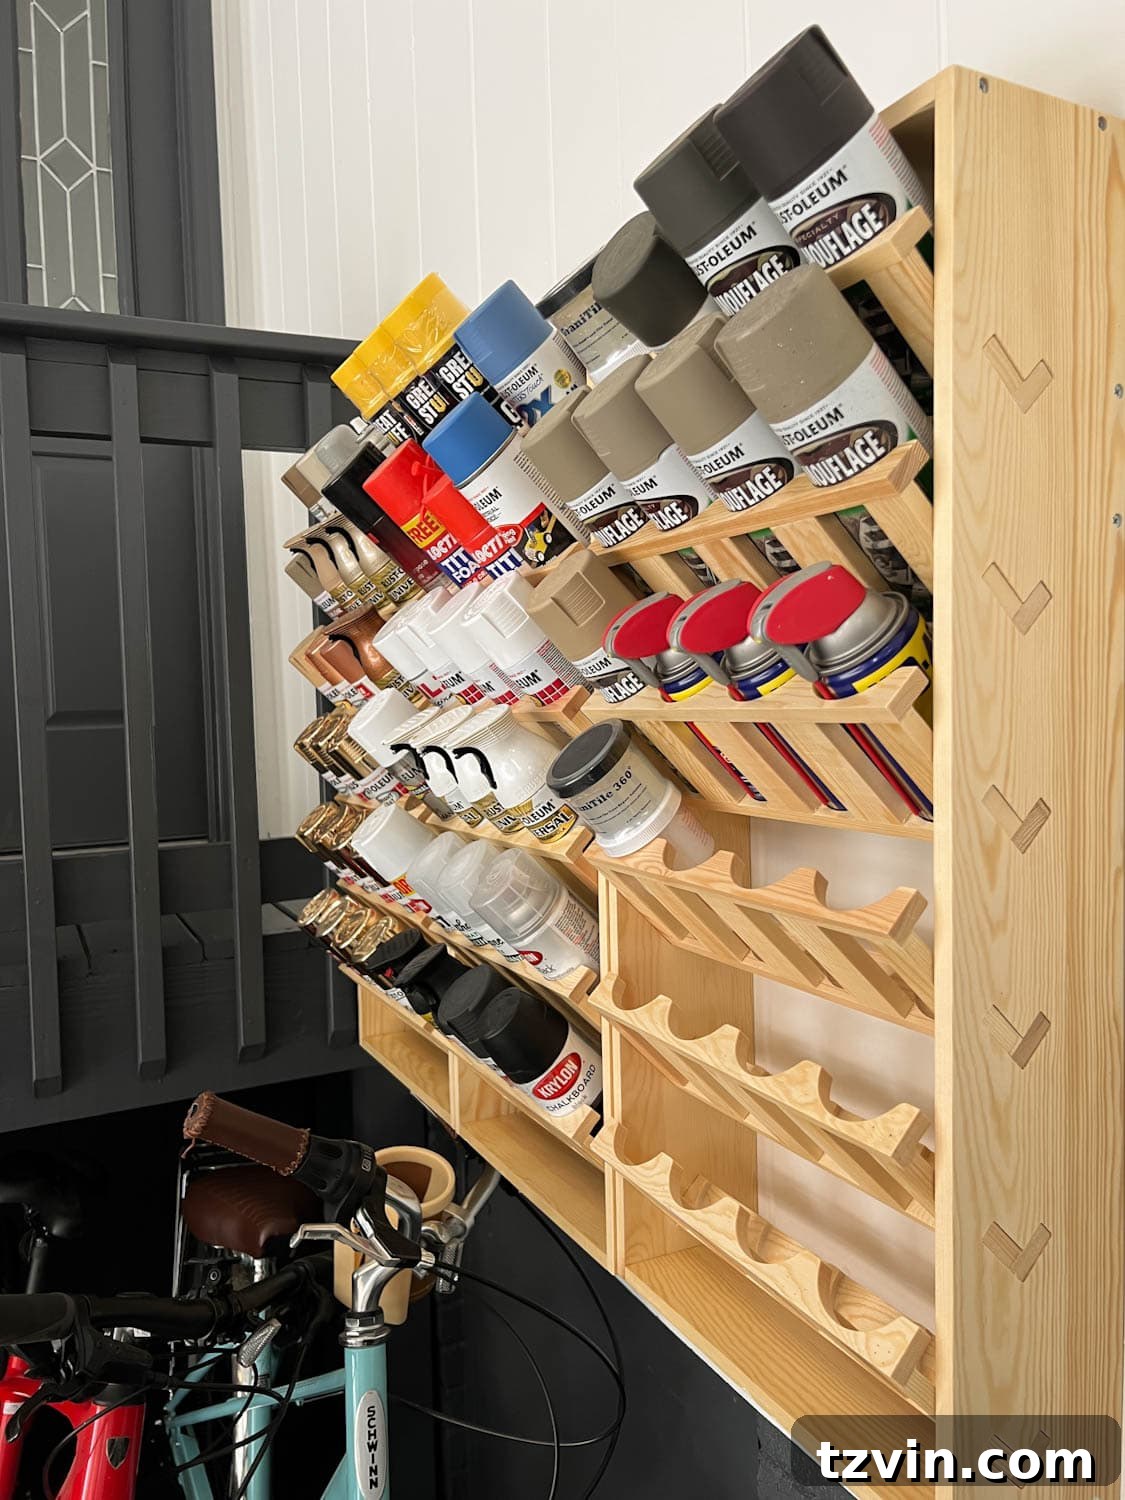
In a recent development, we had to relocate our water heater into this very closet, which inevitably consumed some valuable storage real estate. However, ingenuity prevailed! To adapt to the reduced space and maintain our commitment to efficient organization, we integrated a clever spray paint rack. This rack proved to be a perfect solution not only for organizing spray paint cans but also for neatly storing tubes of caulking, adhesive, and even craft paint tubes. It keeps these items upright, visible, and easily accessible, ensuring that even with a water heater in the mix, our “Paint Central” remains highly functional during projects. This adaptability highlights the “progress over perfection” mindset in action.
Our ongoing philosophy, and one we encourage you to adopt, is “progress over perfection.” Every step towards a more organized home, no matter how small, makes a difference. This paint closet makeover is a prime example of how starting with one area can create a ripple effect of positive change throughout your entire home and workspace. Embrace the journey of organization, and celebrate each achievement along the way! A tidy space is a peaceful mind, and with these tips, you’re well on your way to achieving both.
Discover More Inspiring Home Organizing Ideas
If you’re energized by this transformation and eager to tackle more organizational projects around your home, explore some of our other popular guides designed to help you create tidy and functional spaces. Dive into these resources to continue your journey towards a beautifully organized home:
- Kids’ Bathroom Organization Tour: Practical Solutions for Family Spaces
- The Best Home Organizing Items for a Tidy Space: Must-Have Tools & Products
- Our Full Kitchen Organization Makeover: Transform Your Culinary Hub
- 9 Tips for Organizing a Functional Coat Closet: Maximize Entryway Storage
- Linen Closet Organization Makeover: Achieve Serene and Tidy Storage
- 10 Organization Projects You Can Do in a Day: Quick Wins for a Tidier Home