
Styling Vintage Printers Trays: A Guide to Creative Displays
Hey there, Bless’er House readers! I’m Michelle from Dandelion Patina, and I’m absolutely thrilled to be here today, sharing my passion for transforming timeless and trendy homes. Lauren was kind enough to invite me, and I’m so excited to dive into one of my favorite topics: styling vintage printers trays! I hope you enjoy these tips!
If you’re anything like me, you’ve probably admired these charming pieces at flea markets, antique stores, and online. They have so much character and potential! But, let’s be honest, sometimes figuring out how to style them can be a bit of a head-scratcher. That’s where I come in! Today, I’ll walk you through how I styled a vintage printers tray in my kitchen, bringing together a mix of textures and personal touches to create a captivating wall vignette.
Why I Love Vintage Printers Trays
For me, vintage printers trays are more than just decorative items; they’re pieces of history. They offer a unique way to display collections, incorporating architectural salvage into your home decor. The little square compartments offer so many display possibilities!
They are the perfect architectural salvage pieces to incorporate into displays in my home. I love the potential to display your collections. And, I’m not afraid to admit it… I’m a collector at heart. Each compartment provides a tiny stage for a curated selection of treasures, adding depth and visual interest to any space.
Who’s with me on this love of vintage treasures?
My Printers Tray Styling Project
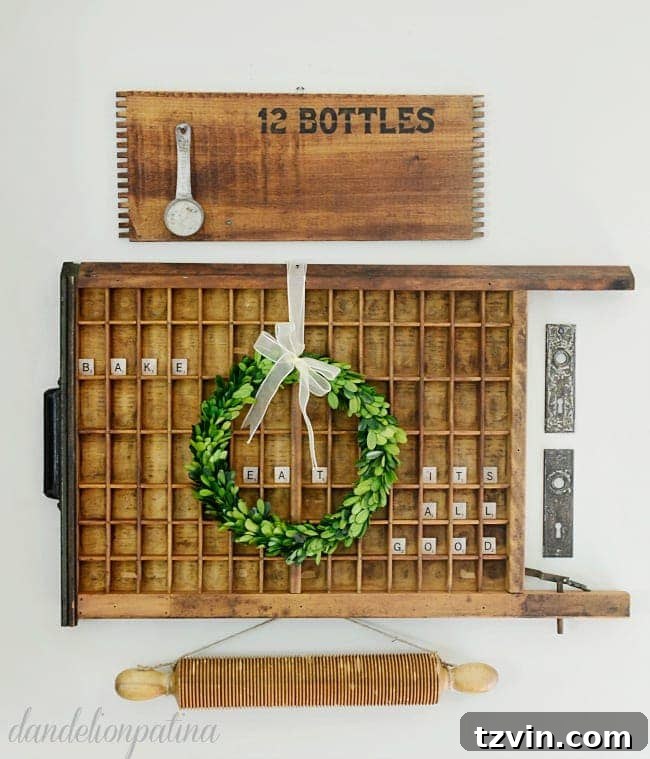
I found the perfect vintage printers tray a while back, and I knew immediately that it would be a fantastic addition to my kitchen. The first step was to hang it. I simply added some sturdy hanging hooks to the back and mounted it horizontally on the wall.
Step 1: The Foundation – Finding the Perfect Printers Tray
The first step is, of course, finding the perfect tray! Look for one with interesting details, a good patina, and, most importantly, a size that fits your desired space. Don’t be afraid to embrace imperfections – they add to the charm!
Step 2: Adding a Focal Point
The next thing was adding a focal point. For my project, I sourced a piece from an old crate with dovetail joints. I loved the typography and the craftsman details on each end.
Consider what you’d like to use. Maybe an old sign, a small painting, or a grouping of interesting objects can work.
Step 3: Creating Balance and Symmetry
I love symmetry and the balance it gives. My goal was to create balance and add texture. I found an old rolling pin and used it to bring in some curves into the arrangement. Simple jute tied to each end gave me the perfect hanging mechanism.
Step 4: Incorporating Greenery
Greenery always brings a project to life and adds a layer of depth. For my kitchen vignette, I opted for a boxwood wreath. Boxwood wreaths are super easy to care for – just a spritz of water every few days, and they’ll stay fresh for a long time.
Step 5: Adding Metallic Accents
To bring some metallic accents, I added a few metal door plates with keyhole details. They added a layer of interest to the piece.
Step 6: Personalizing with Treasures
Now comes the fun part: adding personal touches! Since I’m a coffee lover, I incorporated a metal stamped coffee scoop. The stamping added so much character. Think about what reflects your interests and passions. Do you collect stamps, small vintage toys, or antique keys? This is your chance to shine!
Step 7: Fun Finishing Touches
To add a touch of whimsy, I used scrabble tiles to spell out words. You can use quotes, seasonal phrases, or anything that makes you smile.
Tips for Styling Your Own Printers Tray
- Consider the space: Where will your printer’s tray live? The location will help determine the theme and the size of your elements.
- Gather your treasures: Start collecting items that you love. Flea markets, antique stores, and even your own home are great places to start.
- Play with arrangements: Lay out your items and experiment with different arrangements before committing.
- Mix textures: Combine different materials like wood, metal, glass, and textiles to create visual interest.
- Add height: Use taller items to draw the eye and create a more dynamic display.
- Don’t be afraid to edit: Sometimes, less is more. Remove items until the display feels balanced and cohesive.
And there you have it! A simple guide to styling vintage printers trays. I hope this inspires you to dust off your own trays and start creating!
I encourage you to embrace your creativity and enjoy the process of transforming these vintage treasures into stunning displays. Have fun!
If you’re looking for more inspiration, be sure to check out my article on how to style shelves like a professional. You can also see a printer’s tray used in a bedroom here. And, how about a printer’s tray layered with frames on a guest room dresser!
Connect with Dandelion Patina
I love connecting with my readers! Follow me on these platforms for more DIY projects, home decor inspiration, and behind-the-scenes glimpses into my creative process:
XOXO,